Chapter 55. Depth Cues
Learning Objectives

Describe the major depth cues that are at work in visual perception.
Review
Review
Select the NEXT button to continue with the Review.

1. The brain uses depth cues to translate a flat image on the retina into a three-dimensional representation of the outside world.
Review
Review
Select the NEXT button to continue with the Review.

2. Some of these perceptual markers for distance and depth are binocular cues (dependent upon the use of both eyes), while others are monocular cues (available to either eye alone). Depth perception is much more accurate when both eyes are used.
Review
Review
Select the NEXT button to continue with the Review.

3. Many of the monocular cues to depth are illustrated in sidewalk chalk art, such as this clever image, which creates a false sense of depth even though it is drawn on a flat surface. The drawing uses interposition (near objects block distant objects, as in the stone pillars blocking the canyon below), linear perspective (straight lines converge in the distance, as in the edges of the wooden framework), texture gradient (texture of near objects is coarse while distant objects have smooth texture, as seen in the rock walls of the canyon), relative clarity (clear objects are near while distant objects are more blurred), relative height (objects higher in the visual field are more distant, as in the far end of the canyon), as well as light and shadow to create a sense of depth.
Review
Review
Select the NEXT button to continue with the Review.
4. Binocular cues add extra information that the brain uses to process depth. The convergence cue is based on the degree to which the eyeballs must turn toward the nose (converge) in order to focus on an object. Retinal disparity takes advantage of the fact that each eye sees the same scene, but from a slightly different point of view. If you hold up your thumb in front of a distant object, shifting your focus from the distant object to your thumb demonstrates convergence. Closing one eye at a time demonstrates retinal disparity.
Review
Review
Select the NEXT button to continue with the Review.
5. A special depth cue called relative motion requires that our head (or whole body) be moving while we view a scene. Objects that appear to move rapidly in the opposite direction of our motion must be closer than other objects moving more slowly.
Practice 1: Relative Size
Practice 1: Relative Size
Play the video to view a demonstration of relative size as a depth cue.
- Chapters
- descriptions off, selected
- captions settings, opens captions settings dialog
- captions off, selected
- English Captions
This is a modal window.
Beginning of dialog window. Escape will cancel and close the window.
End of dialog window.
This is a modal window. This modal can be closed by pressing the Escape key or activating the close button.
This is a modal window.
NOTE: this video has no audio.
The amount of space that an object takes up on the retina is proportional to the distance between the object and the eye; as an object moves away from the eye, the retinal image of that object gradually gets smaller.
The brain uses this principle of relative size to judge depth in two ways: If we know the actual size of an object (such as a human body), we judge it to be far away if it appears tiny, and near to us if it approximates its normal size. If two similar objects appear different in size, we judge the larger object to be nearer.
In this video clip, notice that when the children are at a distance, they appear smaller than their actual size. The retinal images of all the children grow in size as they approach the camera, but the brain judges the “larger” children as nearer than the “smaller” children.
Practice 2: Interposition
Practice 2: Interposition
Play the video to view a demonstration of interposition as a depth cue.
- Chapters
- descriptions off, selected
- captions settings, opens captions settings dialog
- captions off, selected
- English Captions
This is a modal window.
Beginning of dialog window. Escape will cancel and close the window.
End of dialog window.
This is a modal window. This modal can be closed by pressing the Escape key or activating the close button.
This is a modal window.
NOTE: this video has no audio.
Interposition: When one object partially blocks or overlaps another object, we perceive the overlapping object to be closer to us than the one that is partially obscured.
Interposition is demonstrated in this video clip of skiers. As the skiers alternately overlap each other, we perceive the skier who is partially blocked as more distant than the other.
This cue helps us judge the relative distance of two objects (which one is nearer to us), but it isn’t much use in judging the absolute distance of the objects from our own location.
Practice 3: Light and Shadow
Practice 3: Light and Shadow
Select each of the buttons and drag the slider to show how light and shadow influence depth perception.
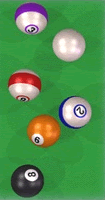
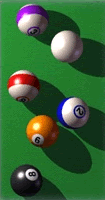
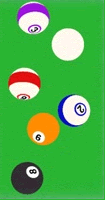
Light and shadow (also called relative brightness): Adding shading or shadows to objects is one of the most effective ways to introduce depth into a drawing.
In the pool ball example, notice how the introduction of brightness differences on the balls, and shadows on the table, creates a strong sense of depth.
In the word example, note how the introduction of shadow creates the impression that the letters are lifted up off the page.
Practice 4: Texture Gradient
Practice 4: Texture Gradient
Play the animation to view a demonstration of texture gradient as a depth cue.
Texture gradient appears whenever there is a large repeating pattern in our visual environment—such as a field of wheat or a wooden floor in a gymnasium. The brain uses the texture of that pattern as a marker for distance (large, clearly detailed patterns appear closer; small, fuzzy patterns appear more distant).
As you can see in this animation, the part of the pattern where the texture is coarse (that is, where the individual details are large and clearly visible) must be near to us, while the portions of the pattern where the texture is fine (the individual details are small and possibly blurred) are perceived as more distant.
- Chapters
- descriptions off, selected
- captions settings, opens captions settings dialog
- captions off, selected
- English Captions
This is a modal window.
Beginning of dialog window. Escape will cancel and close the window.
End of dialog window.
This is a modal window. This modal can be closed by pressing the Escape key or activating the close button.
This is a modal window.
Note: This video has no audio. The animation shows a series of overlapping circles that start small and fuzzy, thus appearing to be far away in the distance. As they get larger and more clear, they appear to be getting closer.
Practice 5: Relative Height and Relative Clarity
Practice 5: Relative Height and Relative Clarity
Select each of the buttons to view two demonstrations of relative height and relative clarity as depth cues.
Here is a photo of the Great Wall of China. The wall and the people are sharp and clear, because they are close to the camera. (Objects farther away would most likely appear fuzzy.)
The wall and people are also low in the field of view. When you select the “Play Great Wall” button, the upper portion of the photo will appear. Notice that the rest of the wall in the upper portion of the photo is farther away, and is shrouded in haze.

Here is a photo of the Li River in China. The trees and bushes on the left are sharp and clear, because they are close to the camera. (Objects farther away would most likely appear fuzzy.)
The trees and bushes are also low in the field of view. When you select the “Play Li River” button, the upper portion of the photo will appear. Notice that the mountains in the upper portion are farther away, and are shrouded in haze.

Practice 6: Linear Perspective
Practice 6: Linear Perspective
Select PLAY to view a demonstration of linear perspective as a depth cue.
Linear perspective is based on the fact that parallel lines, such as those formed by train tracks or the edges of a road, appear to come together at a point in the distance.
We perceive objects as being near to us if they are positioned where the parallel lines are far apart. In contrast, if an object is located where the parallel lines come together, we perceive the object as being farther away from us.
Practice 7: Relative Motion
Practice 7: Relative Motion
Select PLAY to view a demonstration of relative motion as a depth cue.
If you were on a train moving past a field of red, yellow, and green poles, your brain would use the relative motion cue to determine which poles were nearer. This animation simulates what your eyes would see.
Note the difference between the relative motion of the front row of poles as compared to the middle row and the most distant row. The brain perceives the "faster" moving red poles as closer to you, and the "slower" moving green poles as farther away.
Practice 8: Convergence
Practice 8: Convergence
Select PLAY to view a demonstration of convergence as a depth cue.
Convergence is a binocular cue (that is, it requires two eyes). It is based on the degree to which the eyeballs must turn toward the nose (converge) in order to focus on an object. The closer an object is to you, the greater the convergence, as shown in this animation. The brain monitors the position of the eyeballs, and uses this information to calculate the distance of the object.
You can demonstrate convergence by first looking at an object across the room, then holding up your right thumb in front of your nose (about a hand's width away from your face) so that your thumb partially covers the object. If you alternate between focusing on the distant object and focusing on your thumb, you will feel your eyeballs rotate as they converge and diverge (turn away from the nose).
Practice 9: Retinal Disparity
Practice 9: Retinal Disparity
Select each of the buttons to see the difference between the view from the left and right eye.
Retinal disparity is the difference between what the left eye sees and what the right eye sees. Each eye sees the same scene, but from a slightly different point of view. You can demonstrate retinal disparity for yourself by holding a pencil against your nose, as simulated in these illustrations. Then close one eye at a time and pay attention to the distinctly different view that each eye sees of the pencil, your nose, and your hand.
Quiz 1
Quiz 1
Drag each depth cue term to the gray area in front of the appropriate description. When all the terms have been placed, select the CHECK ANSWER button.
Distant objects are usually higher in the visual field.
If two similar objects appear different in size, we judge the larger object to be nearer.
Objects located at a great distance from us appear blurred or indistinct, and often a little blue in color.
The relative brightness of objects and parts of objects provides a sense of depth.
Objects that move past us rapidly must be closer than objects that appear to move more slowly.
Quiz 2
Quiz 2
Match the depth cue terms to their descriptions by dragging each colored circle to the appropriate gray circle. When all the circles have been placed, select the CHECK ANSWER button.
Quiz 3
Quiz 3
Play each animation. Then, select the depth cue that is illustrated in that animation. When depth cues have been chosen for both animations, select the CHECK ANSWER button.
- Chapters
- descriptions off, selected
- captions settings, opens captions settings dialog
- captions off, selected
- English Captions
This is a modal window.
Beginning of dialog window. Escape will cancel and close the window.
End of dialog window.
This is a modal window. This modal can be closed by pressing the Escape key or activating the close button.
This is a modal window.
NOTE: this video has no audio.
- Chapters
- descriptions off, selected
- captions settings, opens captions settings dialog
- captions off, selected
This is a modal window.
Beginning of dialog window. Escape will cancel and close the window.
End of dialog window.
This is a modal window. This modal can be closed by pressing the Escape key or activating the close button.
This is a modal window.
NOTE: this video has no audio.
Quiz 4
Quiz 4
Play each animation. Then, select the depth cue that is illustrated in that animation. When depth cues have been chosen for both animations, select the CHECK ANSWER button.
- Chapters
- descriptions off, selected
- captions settings, opens captions settings dialog
- captions off, selected
- English Captions
This is a modal window.
Beginning of dialog window. Escape will cancel and close the window.
End of dialog window.
This is a modal window. This modal can be closed by pressing the Escape key or activating the close button.
This is a modal window.
NOTE: this video has no audio.
- Chapters
- descriptions off, selected
- captions settings, opens captions settings dialog
- captions off, selected
- English Captions
This is a modal window.
Beginning of dialog window. Escape will cancel and close the window.
End of dialog window.
This is a modal window. This modal can be closed by pressing the Escape key or activating the close button.
This is a modal window.
NOTE: this video has no audio.
Conclusion