Chapter 2. Working with Projects
2.1 Logging In to Digfir
Digfir is a online, web-based application. All use of the Digfir application takes place within your web browser. To begin, visit:
http://digfir.websterfw.com
Enter your email address, which serves as your username, and enter your password. Click the Login button to continue.
NOTE: You may only log into a single Digfir session at once. Do not log in using additional tabs in your browser or a different browser.
2.2 Creating and Opening Projects
After you log in, you will see a list of all projects to which you have access. Click on the name of a project to begin editing it. NOTE: Currently, to create a brand new project, you need to first open an existing project and then use the New Project... command in the My Projects menu in the command bar. (Future Enhancement: Or, you may click "New Project..." to create a empty project.)
When you create a new project, the first thing shown in the Editor will be an initial chapter heading, section heading, and paragraph.
If you open an existing project, the first chapter in the project will be loaded into the Editor.
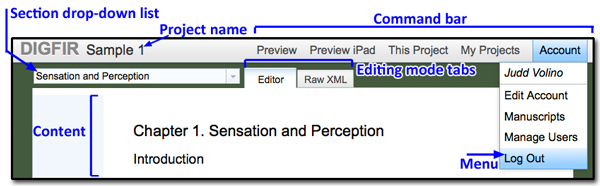
2.3 The Digfir User Interface
The primary components of the Digfir user interface are labeled in the picture below.
2.4 Selecting a Chapter or Section to Edit
In the upper left of the Digfir window, select the arrow button on the right side of the section drop-down list to display the list of chapters and sections in this project. Section headings are denoted by being indented under the chapter headings with a leading “—”. If you select a chapter heading, the entire chapter will be opened in the Editor. However, for improved performance in your browser you may wish to instead select a specific section from the drop-down list when you will be editing only that section’s content.
2.5 Editing Content
To use the WYSIWIG Digfir editing environment, select the “Editor” tab at the top of the window.
To add a new block, right click (Windows) or CTRL-click (Mac) on an existing item, such as a paragraph, and select “Add After” or “Add Before” and then select the type of block you would like to insert. The following lists all block types that you can currently add using this contextual menu (note that additional block types may be added in the future):
| Block Type | Description |
|---|---|
| Box | Used to create a collection of other types of blocks. By setting the “block_type” attribute, the box will enable particular functions or behaviors for the blocks within it, such as a sequence of questions that are revealed as each is completed. |
| Chapter | A major unit of content consisting of one more Sections. Typically numbered in sequence. |
| Comment | This is used for adding editorial comments to Digfir manuscripts that will not be displayed in the published version. |
| Figure | Insert a static image, multimedia object, or an embedded web page. See section X.X for details. |
| List | A set of bulleted lines of text. |
| Metadata | Can be added anywhere; context sensitive. See section X.X for details. |
| Paragraph | The primary text in a manuscript. It can have basic formatting such as bold and italics. Symbols, equations and cross-reference text can be inserted. |
| Question | Serves as a “container” for a group of queries that require student response. Questions are automatically numbered (if designated as such) and have a box for you to optionally enter the question’s title. A paragraph block, query block, and metadata block are automatically added to the question; see section X.X for what to do with these. |
| Query | A query allows for various types of student responses, including multiple choice, fill-in blanks, drop-down lists, and free-response (essay) text answers. You must have one or more query within a question block, and you can also add “page queries” anywhere in a page of text. See section X.X for more details, including the special syntax used in defining queries. |
| Raw HTML | Allows you to enter content using HTML syntax, to accomplish something that you couldn’t otherwise do with existing block types. These blocks should be used sparingly, and should generally be entered by a programmer. |
| Section | A group of other blocks such as paragraphs and figures that pertain to a common topic in the manuscript. Typically numbered in sequence based on the chapter number in which it is contained. |
| Table | Allows for the definition of a table’s columns and rows, along with table headings, title, and caption. |
There are also some additional types of blocks that are added in other ways:
- Keywords: Any words enclosed in double open/close square brackets in any paragraph (for example, “[ [median ] ]”) are added to the keywords database.
- References: Cross-references are created automatically for text in the format “Figure X.X”, “Section X.X” and “Chapter X”.
To edit an existing block, double click on it. The appropriate editing tool or window will open to allow you to modify the content or its attributes.
2.6 Adding Chapters and Sections
In order to add a new Chapter, right-click (Windows) or Control-click (Mac) on an existing Chapter heading in the manuscript, and select “Add After” or “Add Before” and then select “Chapter” from the submenu that appears.
Similarly, to add a new Section, right-click (Windows) or Control-click (Mac) on an existing Section heading in the manuscript, and select “Add After” or “Add Before” and then select “Section” from the submenu that appears.
When you add a new chapter or section, it will initially appear in the Editor at the top (if “Add Before” used) or bottom (if “Add After” used) of the block to which you added it. After you enter and save the text for the title, the Editor will refresh its contents and you will no longer see the new chapter or section. To edit the newly created block, select it from the section drop-down list.
2.7 Adding Figures
When you add a Figure block, a pop-up window will allow you to specify the media type, size, style, captions, and other attributes of that figure, as shown in the image below:
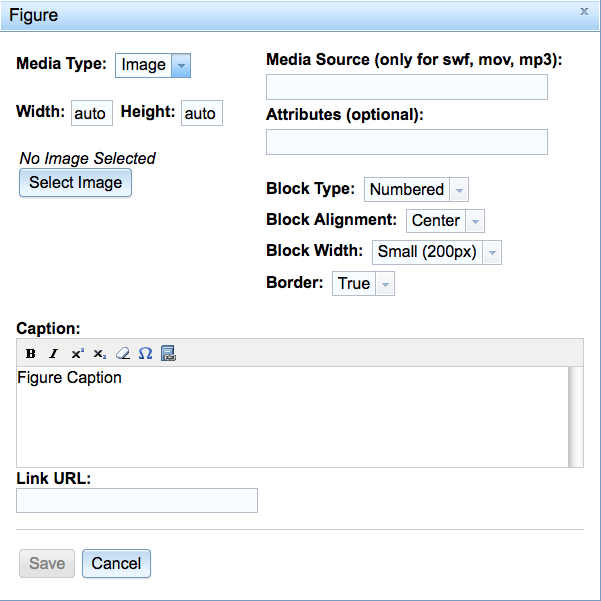
Media Type: You may select from the following types:
- Image: for standard static images
- Flash (SWF): for interactive/multimedia objects
- Audio (MP3): for playing back sounds or audio recordings
- IFrame: Inserts an XHTML “IFRAME” tag to allow for embedding other web pages or snippets within the main page. This is the most commonly used method for adding multimedia of all kinds to eBooks.
Media Source: Enter the full URL that points to the source of the SWF/MP3-format file or an HTML page that will be embedded in the Iframe if using a non-Image media type.
Width/Height: If you want an image to appear at a different size than the source file’s width/height, enter values in number of pixels instead of “auto”. If you are placing an IFRAME or SWF, enter the number of pixels to allow for the IFRAME’s contents.
Attributes: Additional XHTML attributes if needed for special formatting. Typically a programmer will enter these or tell give authors/editors special instructions on what to enter.
Block Type: Select “Numbered” to automatically add a “Figure X.X” label before the figure’s caption text. The numbering will be sequential, based on the chapter number, such as “6.3” for the third numbered figure in chapter six. Select “Unnumbered” to only display the caption text.
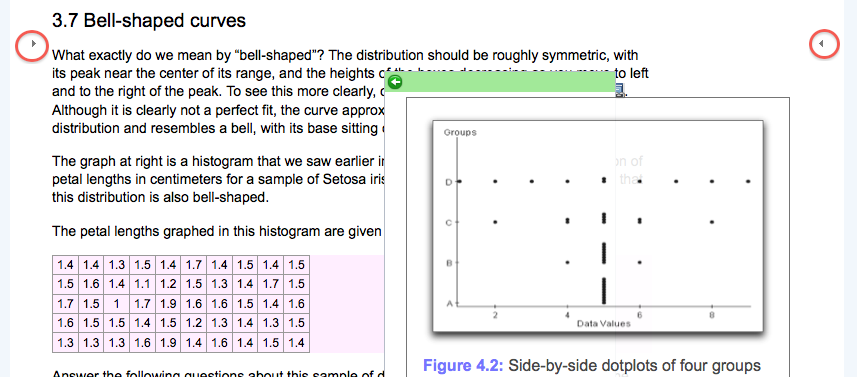
Block Alignment: Select where you wish the block to appear on the page relative to the other block to which it is “anchored.” After you have clicked “Save” in the Figure window, if the figure is not exactly where you want it you can use the “Drag and Drop” context menu command on the image to move the figure so that the small gray arrows (shown circled in red in the image below) appear above the paragraph or other block that will serve as the figure’s anchor. When you are satisfied with the figure’s position, select the “Stop Dragging” button the right side of the Digfir window and wait for Editor window to be refreshed. NOTE: If you move a figure to a location above or below other figures, the figures and all references to them will automatically be renumbered their new order.
Block Width: Determines how much space the figure is given on the page. If the image is smaller than the Block Width, the box will remain at this size, with the image centered within it.
Border: Select “True” if you wish to have a border added to the figure.
Caption: Enter the text that will appear with the figure as a caption. You may use the some text formatting such as bold and italics, symbols, and include reference text.
Link URL: If a URL is entered in this box, the figure box is hyperlinked to the URL and becomes clickable. Once clicked, the URL is opened in a pop-up window. Typically this is used if you want to allow for clicking on a static image to launch a high resolution version. The referenced image is not uploaded via the “Select an Asset” window. Instead it must be uploaded to a publicly accessible area on the Digfir server or you may specify a URL that points to the image on an external server.
Select Image: Select this button to specify the source file used for static images or for an image that will serve as a placeholder for the multimedia item or IFRAME. This is mandatory. The pop-up window below will appear:
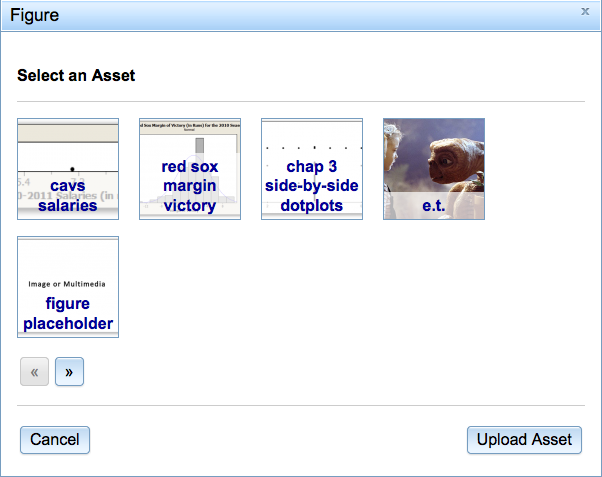
Use the “<<” and “>>” buttons to navigate through the pages of images. Click on an image’s thumbnail to select that image. Typically, a project will have a “figure placeholder” image available in the asset library that you can select for use with IFRAMEs. If the image you need isn’t yet available, you can click “Upload Asset” to select an image from your computer to upload, using the pop-up window shown below:
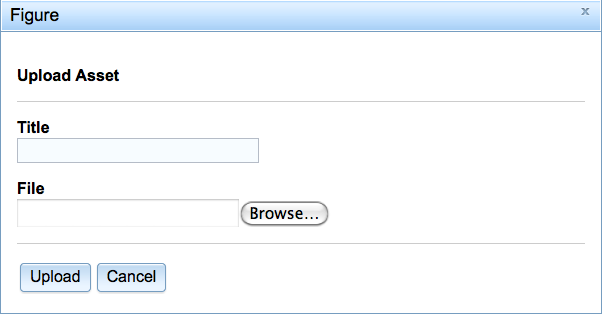
You will be prompted to give the image a title, which will be displayed over the thumbnail in the asset browser. Use the “Browse…” button to select the image file from your computer’s hard drive and click “Upload” to upload it to the Digfir server. It will now appear in the asset browser. Click on it to select it and you will be returned the main Figure editing window.
2.8 Creating Questions and Queries
Questions and queries serve as the primary means of gathering student responses. A question block serves as a “container” for a group of queries that require student response. Questions are automatically numbered (if desired; they can also be unnumbered) and have a box for you to enter the question’s title (title is also optional). A paragraph block, query block, and metadata block are automatically added to any newly-created question. A query allows for various types of student responses, including multiple choice, fill-in blanks, drop-down lists, and free-response (essay) text answers. You must have one or more query within every question block.
To create a basic question with queries:
- Right-click on the block before or after which you wish the question to appear. Select “Add After” or “Add Before” from the context menu as appropriate and the select “Question” from the submenu.
- Enter the question’s title, if desired. By default the question is will be labeled “Question X.X title” with the numbering following from the current section number and its position within the sequence of questions in that section. If you don't enter a title, no title will be displayed.
- Click the “Save” button to confirm the creation of the question block. You must do this before you can edit the query or queries within the question.
- If you want some explanatory text for the first query, you may double click on the “New Paragraph” block to edit the text. You may also delete this block (right-click the block and choose "delete" from the contextual menu) if you don’t need it or add additional paragraphs.
- Double click on the query block (by default it begins “MC: Question text” and is highlighted in green). In the text entry box, compose your query. Digfir provides several types of queries and options for responses, which you select by using a special syntax. The table below lists the types and options.
- Click the “Save” button to confirm your edit of the query.
- You can add additional queries of any type and additional paragraphs within the current question by using the “Add After” and “Add Before” on blocks within the question.
- A “metadata” block is automatically added to the bottom of new questions as well. See the “Metadata” section below for details on using metadata to control student response processing and feedback.
| Query Type | Syntax | Notes |
|---|---|---|
| Multiple-choice | MC: query text A. choice A text *B. choice B text C. choice C text...X. choice X text | Indicate the correct answer by preceding that choice’s letter with an asterisk (“*”). |
| Fill-in-the-Blank | FB: query text *correct answer_alternate correct answer For example, “*0.123_.123” would accept either “0.123” or “.123” as valid responses. | |
| Drop-down list | DD:choice1,*choice2,…choiceX | Indicate the correct answer by preceding that choice’s letter with an asterisk (“*”). |
| Essay | ES: query text | Accepts free response by student; no limit on the number of characters accepted. The student’s response is included in the instructor report. _feedback: general feedback displayed upon student’s submission. |
Metadata is added to the question as a whole (not individual queries) in order to specify how the system provides feedback to the student, how many attempts at entering the correct response are permitted, and how answers are evaluated. The table below describes the parameters available. N indicates a numeric parameter and XXX indicates a textual parameter that can include letters, numbers and symbols.
| Parameter | Description | Example/Notes |
|---|---|---|
| _case_sensitive: true | (Optional) Determines whether fill-in-the-blank responses must match the case of the correct answer. | If this parameter isn’t used, responses are accepted without regard to case. |
| _blank_size: N | (Optional) How much space to allow for fill-in-the-blank responses. | Specify the number of characters to allow to be entered in the response box. |
| _never_scramble: true | (Optional) Add this parameter to force Digfir to always present the choices in the order entered by the author rather than a random sequence. | Applies to multiple choice and drop-drop query types. |
| _max_tries: N | Maximum number of attempts to allow student to respond correctly. | If set to 2, and any part of the first response was incorrect, then the student will be allowed to re-enter his or her response a second time and will be graded on the second response. |
| _credit_after_max_tries: N | Percentage credit should the student get if they have not answered correctly within _max_tries. | Default is 0. If set to 100, the student gets full credit; if set to 50, the student gets 50%, and so on. |
| _no_correct_answer | Any answer given is accepted as correct and full credit is given. | To specify feedback in this situation, use only the _feedback parameter, not _feedback_correct/_incorrect. This can be specified for in-line queries by preceding the answer with “??” |
| _feedback: XXX | Text displayed after the student submits an answer | This is used in instances where there is no one correct response, such as essay queries. |
| _feedback_correct: XXX | Text displayed after the student submits a correct response | |
| _feedback_incorrect_hint: XXX | (Optional) Text displayed upon all incorrect responses up to _max_tries. | Used to provide suggestions to the student. For example, if _max_tries is set to 3, then the first and second times the student submits an incorrect response, he or she will see this text. On the third attempt, the text in the _feedback_incorrect will be displayed. If this is not specified, then _feedback_incorrect text is used for every try. |
| _feedback_incorrect: XXX | Text displayed after the student submits an incorrect response | |
| _question_type: XXX | (Optional) Provides more specific description of question type for instructor report if the question has multiple queries. | For questions with single queries like multiple choice and drop-down, those types are automatically placed in the report and this parameter is not needed. This parameter allows for more specificity when multiple queries have been combined into a single question. For example, if the student had to fill in a Punnett square table with multiple blanks, then “Punnett square” could be specified. If this is not specified, then the description in the report defaults to “Mixed”. |
| _question_report_text: XXX | (Optional) Provides more specific description of what information the student was expected to provide if the question has multiple queries. | For questions with single queries then the original query text is used automatically, such as the answers in a multiple choice query. Continuing the Punnett square example, the title “Bean Color” could be specified for this parameter. If this is not specified, the default report text is “See page for question context”. |
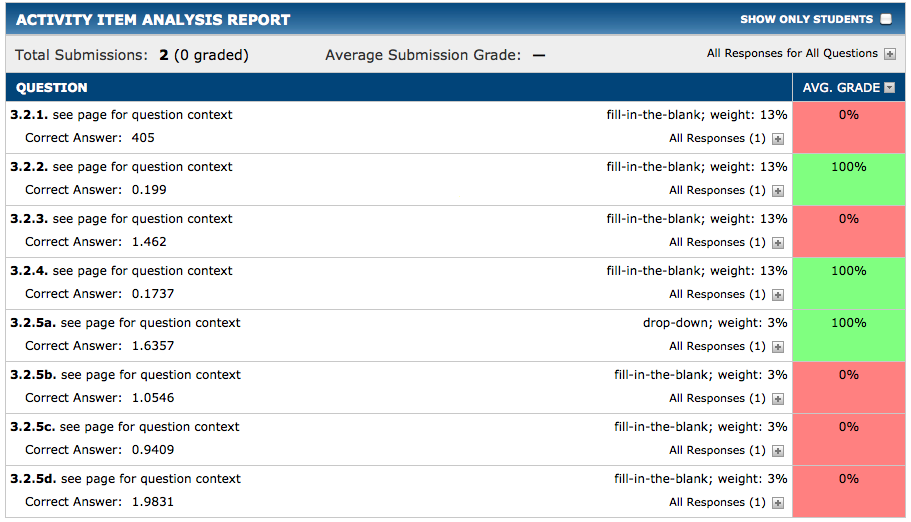
Here's an example of how the information specified in the _question_type and _question_report_text parameters will be reflected in instructor reports:
2.9 Advanced Question and Query Creation
Question Groups: A group of questions can be formatted so that only the first question is displayed initially and subsequent questions are presented after the student responds to each one.
To create a question sequence:
- Add a Box block in the manuscript where you want the question sequence to appear. The box title will not be displayed in the published manuscript so you may wish to use that text as an annotation for the sequence.
- Right-click on the box’s title and select “Block Type…” from the context menu. Enter “question_sequence” in the pop-up box and click “OK.”
- Right-click on the paragraph within the box that was created and use the “Add After” command to add a Question block. You may delete the default paragraph after you have created at least one question.
- Add queries to the question as described in the instructions for creating a basic question.
- Add additional questions by right-clicking on the title of the last question in the box and using the “Add After” command.
Embedded Queries: Fill-in-the-blank and drop-down list queries can also be embedded directly within paragraphs or lists as long as those blocks are within a question. You can then compose questions that request a response within a sentence or table, such as “68% of the lengths should lie between 1.2283 and _____ cm” This is done using a special syntax, using double curly brackets (“{ {” and “} }”) to indicate the start and end of the query rather than using the context menu to add a new block of the Query type.
- Use the “Add After” or “Add Before” commands to add and save a Question block.
- By default, the question will include a Paragraph block. Double click the paragraph to open it for editing. Or, if you want to use a List, use the “Add After” command to add one, edit the text, and save it. You can then delete the original paragraph block.
- See the examples below for details on how to compose the queries and the options available.
- Once you save your edits, Digfir will display the query with the customary green background color and the indicator “FB:” for fill-in-the-blank and “DD:” for drop-down lists, followed by the answer information you entered.
- To delete a query from a paragraph or list, right-click anywhere on the query where the green background appears and select the “Delete” command. (You cannot delete a query by editing the paragraph or list and deleting the curly brackets and text.)
To add a fill-in-the-blank, enclose the answer(s) in curly brackets, for example, you would type:
The sample size is { {55} } out of a population of { {500} }.
or
The { {mean} } is the arithmetic average of a set of data.
In these examples, the values in curly brackets will be replaced by a box in which the student types the answer when the Digfir question is presented.
To indicate multiple valid answers, separate them with underscores (“_”), as shown below:
The median for this sample is { {.9825_0.9825} }
So the student’s response will be marked correct if the answer is input as “.9825” or “0.9825”. Only the first answer listed is shown by Digfir when the correct answer is revealed, however.
To indicate that textual responses must match the case of the correct answer, add double exclamation points (“!!”) before the answer:
A cross between Bb and Bb genotypes will result in the { {!!Bb} } genotype 50 percent of the time.
To indicate that any response is acceptable, precede the answer with double question marks (“??”):
In our study group of { {??} } people, the median age was { {??} }.
To add a drop-down list, separate the response choices using commas and precede the correct answer with an asterisk (“*”):
The median value is { {more than, *less than, equal to} } than the mean in this sample.
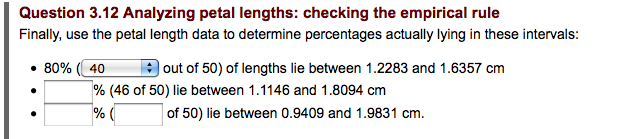
You can combine both types of queries, along with the list block, to create complex response formats such as this:
- 80% ({ {*40, 45, 50} } out of 50) of lengths lie between 1.2283 and 1.6357 cm
- { {92} }% (46 of 50) lie between 1.1146 and 1.8094 cm
- { {96} }% ({ {48} } of 50) lie between 0.9409 and 1.9831 cm.
The above coding would result in a question formatted as in the picture below:
2.10 Creating Tables
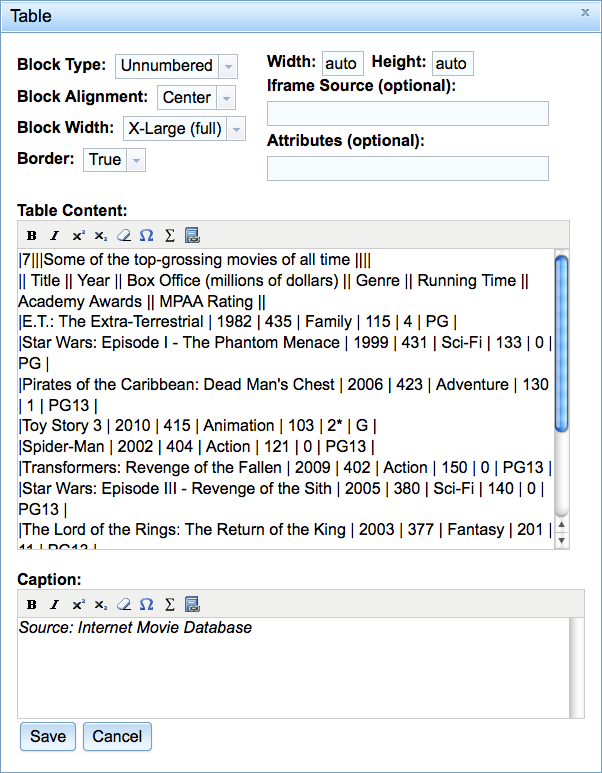
Creating a table is similar to adding a figure, and tables can be given captions and numbered sequentially. To add a new table, use the context menu “Add After” or “Add Before” commands and select “Table” from the submenu. A window will appear with the options for the table and an area where you enter the text that will define the columns and rows, including headers.
Block Type: Select “Numbered” to automatically add a “Table X.X” label before the table’s caption text. The numbering will be sequential, based on the chapter number, such as “6.3” for the third numbered table in chapter six. Select “Unnumbered” to display only the caption text.
Block Alignment: Select where you wish the block to appear on the page relative to the other block to which it is “anchored.” After you have clicked “Save” in the Table window, if the table is not exactly where you want it you can use the “Drag & Drop” context menu command on the image to move the table so that the small gray arrows (shown circled in red in the image below) appear above the paragraph or other block that will serve as the table’s anchor. When you are satisfied with the table’s position, select the “Stop Dragging” button the right side of the Digfir window and wait for Editor window to be refreshed. NOTE: If you move a table to a location above or below other tables, the tables and all references to them will automatically be renumbered their new order.
Block Width: Determines how much space the table is given on the page. If the image is smaller than the Block Width, the box will remain at this size, with the image centered within it.
Border: Select “True” if you wish to have a border added to the box that contains the table, including its caption. Borders for the table’s columns and rows themselves are set based on the stylesheet for the manuscript.
Width/Height: Normally, you can leave these set to “auto” to allow the table to expand horizontally and vertically to fit its contents. If you wish to make the table a specific width or height, enter values in pixels.
Caption: Enter the text that will appear with the table as a caption. You may use the some text formatting such as bold and italics, symbols, and include reference text. [Add explanation of reference text if needed]
Iframe Source: [Details TBD]
Attributes: Additional XHTML attributes if needed for special formatting. Typically a programmer will enter these or tell give authors/editors special instructions on what to enter.
Table Content: You create the rows and columns of the table by entering them with special coding in this box.
- To create a “normal” cell (no text formatting), enclose the text of the cell in “pipes,” (e.g. “| xxx |”) Pipes are the symbol found above the “\” on most keyboards.
- To create a “table head” cell (e.g. bold), enclose the text in two pipes (e.g. “|| xxx ||”)
- To create a cell that spans N columns, where N is a number, type “|N|| xxx |||”
- To create a “title cell” (this will have special formatting) that spans N columns, type “|N||| xxx ||||”
- Cells that are flush-left with the opening pipe(s) but have at least one space before the closing pipe(s) (e.g. “|xxx |”) will be align-left
- Cells that have at least one space both after the opening pipe(s) and before the closing pipe(s) (e.g. “| xxx |”) will be align-center
- Cells that have at least one space before the opening pipe(s) but are flush-right with the closing pipe(s) (e.g. “|xxx |”) will be align-right
Examples:
Table with a title row at the top, followed by a row of heads:
|3||| Caloric values for some fruits ||||
||Type of Fruit || Amount ||Calories ||
|Apple | 1 large |65 |
|Banana | 1 medium |50 |
|Kiwifruit | 1 medium |25 |
|Strawberry | 1 large |10 |
| Caloric values for some fruits | ||
|---|---|---|
| Type of Fruit | Amount | Calories |
| Apple | 1 large | 65 |
| Banana | 1 medium | 50 |
| Kiwifruit | 1 medium | 25 |
| Strawberry | 1 large | 10 |
Table with heads in the first column, instead of the first row (note the double pipe before and single pipe after the first column’s text in each row):
||Mean | 3.14 |
||Median | 4 |
||Mode | 3 |
| Mean | 3.14 |
|---|---|
| Median | 4 |
| Mode | 3 |