Experiment with Note-Taking Methods
There is no single “best” note-taking method: Different methods work well for different people in different courses. In this section we describe four popular methods. As you read about each one, think about the note-taking methods you’ve used in the past. Which ones worked well for you? Which ones didn’t? Keep in mind that note taking is a survival skill. As you gain experience and score more successes, your note-taking skill will improve, and your sense of self-efficacy will grow stronger.
ACTIVITY: After presenting the note-taking methods to the class, ask students to write down on a piece of paper their preferred learning style and preferred note-taking method. Collect the papers and tally the results. Do you see a pattern? For example, were Visual learners drawn to mapping? Were Read-Write learners drawn to outlining? Do any of the results surprise you?
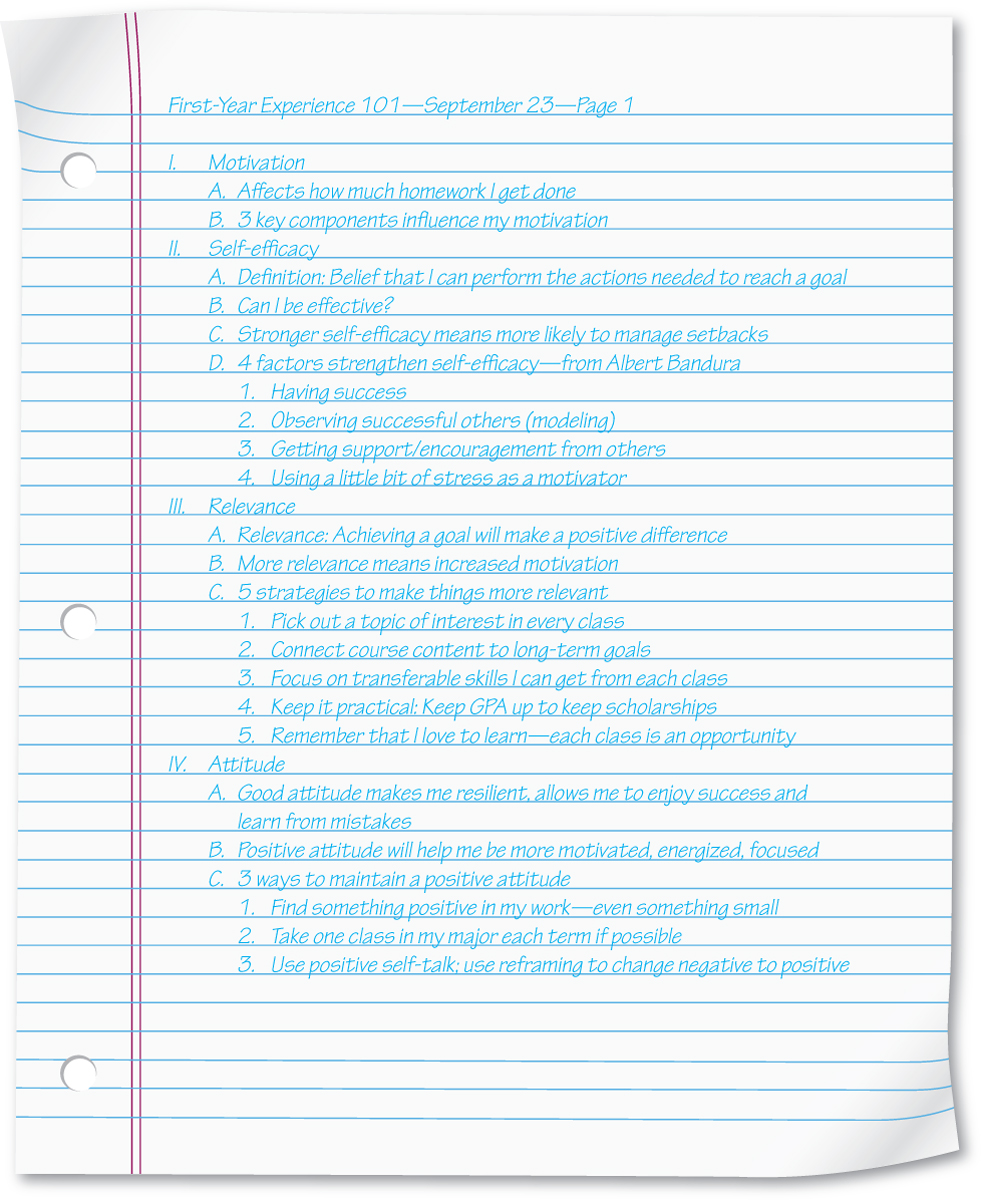
Outlining
Creating an outline is a common, formalized way of taking notes (see Figure 7.2). Outlining helps you organize the material as you record your notes, making it easier to search for and review key information when you study. It works particularly well when instructors use a similar approach in their PowerPoint slides, but outlining can be used in any note-taking situation — inside and outside of class. You’ve probably used outlines to write papers; you can use the same format when taking notes.
ACTIVITY: Divide the class into four groups, assigning each group a note-taking strategy. Show the class a short YouTube clip or a PowerPoint presentation on a topic of your choice. Ask each group to take notes using their assigned method and to present their notes to the class. Compare and contrast the different styles. What were the strengths of each method? The weaknesses?
First level. Use uppercase Roman numerals (such as I, II, III) to represent the main ideas from a lecture or reading. You may be able to identify these before you read by previewing the chapter, or before class by reviewing lecture slides posted by your instructor.
Second level. Use uppercase letters (such as A, B, C) to record the key points that support the first-level headings.
Third level. Use Arabic numerals (such as 1, 2, 3) to record facts, details, or examples that support and illustrate the ideas in the second-level headings.
Additional levels. You can add additional levels by indenting further and using alternating numbers and letters at each level.
Bullet points. If you find letters and numerals too formal, use different levels of bullet points instead.
161
162
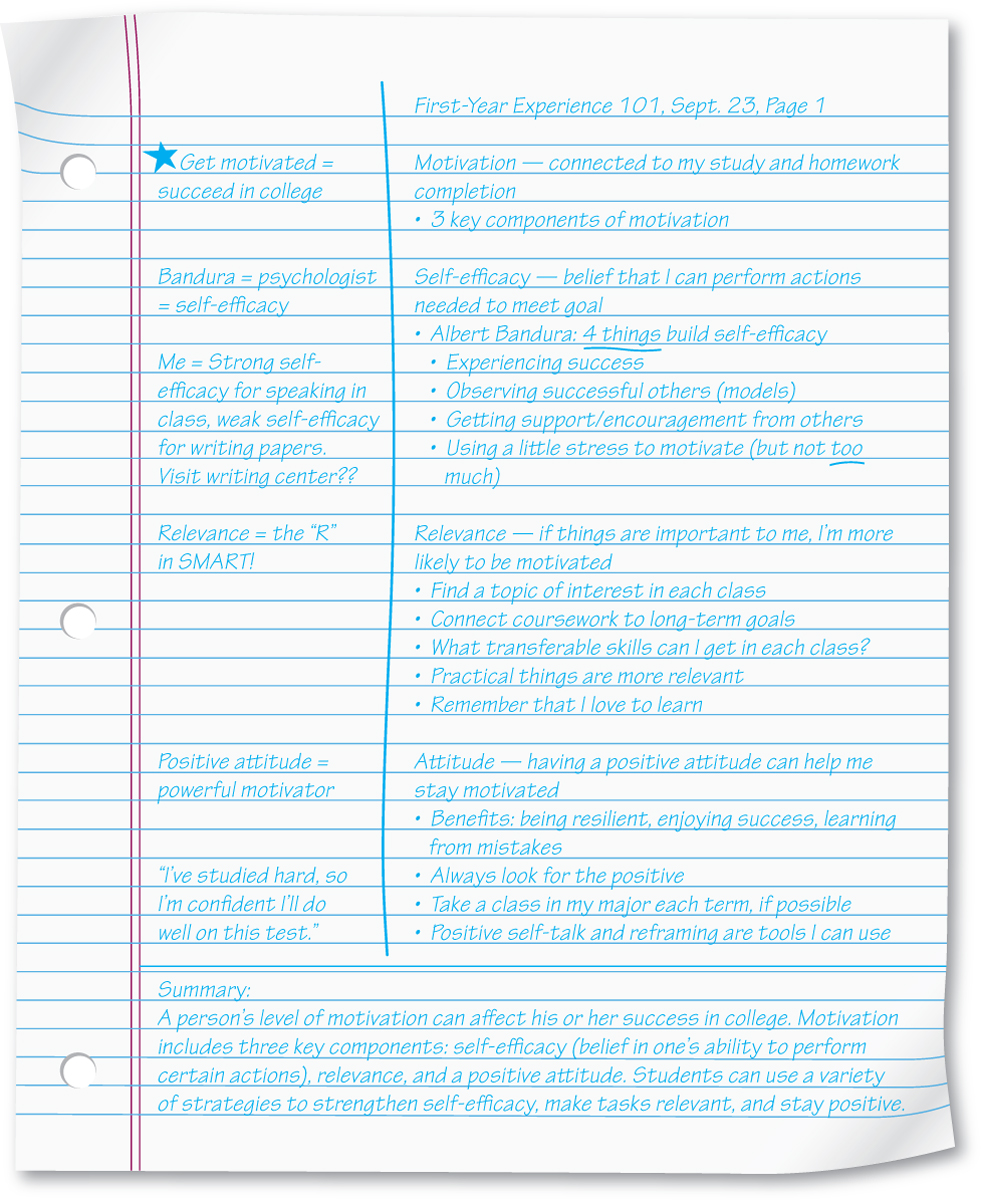
Cornell System
The Cornell system organizes each page of your notes into sections: Your initial notes go on the right, key points go in a cue column on the left, and a summary section goes at the bottom of the page (see Figure 7.3). This system helps you study because after attending class or reading, you return to your notes to expand on the material you just learned. To create notes using the Cornell system, follow these steps.
163
Cornell System: Method of note taking that organizes each page of content into sections: initial notes on the right, key points in a cue column on the left, and a summary section at the bottom of the page.
Divide the page. Draw a horizontal line about two inches from the bottom of the page. The space below the line is the summary section. Next, draw a vertical line about two and a half inches from the left side of the page, meeting the horizontal line across the bottom. The area on the left is the cue column. The area on the right is the notes section, where you’ll write notes during class or while reading.
Take notes. Record information in the notes section in any form you like, such as an outline, paragraphs, or bullet points. Don’t try to write down everything from the instructor’s lecture or your reading material. Instead, focus on key concepts, supporting details, dates, formulas, and examples. Leave space between each idea in your notes. You can add information here later, or just use the space to keep your notes clean and easy to read.
Write cues. Once you finish taking notes, add cues to the cue column. Cues can be main ideas, key words, formulas, questions, diagrams, or examples that correspond to the notes you’ve already taken, or answers to any purposeful reading questions you’ve developed. (See the reading chapter.) Line up your cues with the corresponding content in the notes section. When it’s time to study your notes, use the cues to find information quickly or to create flash cards, with the cue on one side and the content from your notes on the other.
Summarize. After you’ve created your cues, write a brief summary at the bottom of the page that restates the main ideas from your notes. To summarize, you have to understand the material, so writing the summary proves that you’ve grasped what you’ve read or heard. When it’s time to study, use the summary as a quick review of the ideas from that page of notes.
CONNECT
TO MY CAREER
Note-taking skills come in very handy at work. If you’re currently employed, write down two strategies you’re already using to take notes successfully on the job. If you’re not employed, write a short paragraph about how note taking could help you excel in a career you’re considering.

164
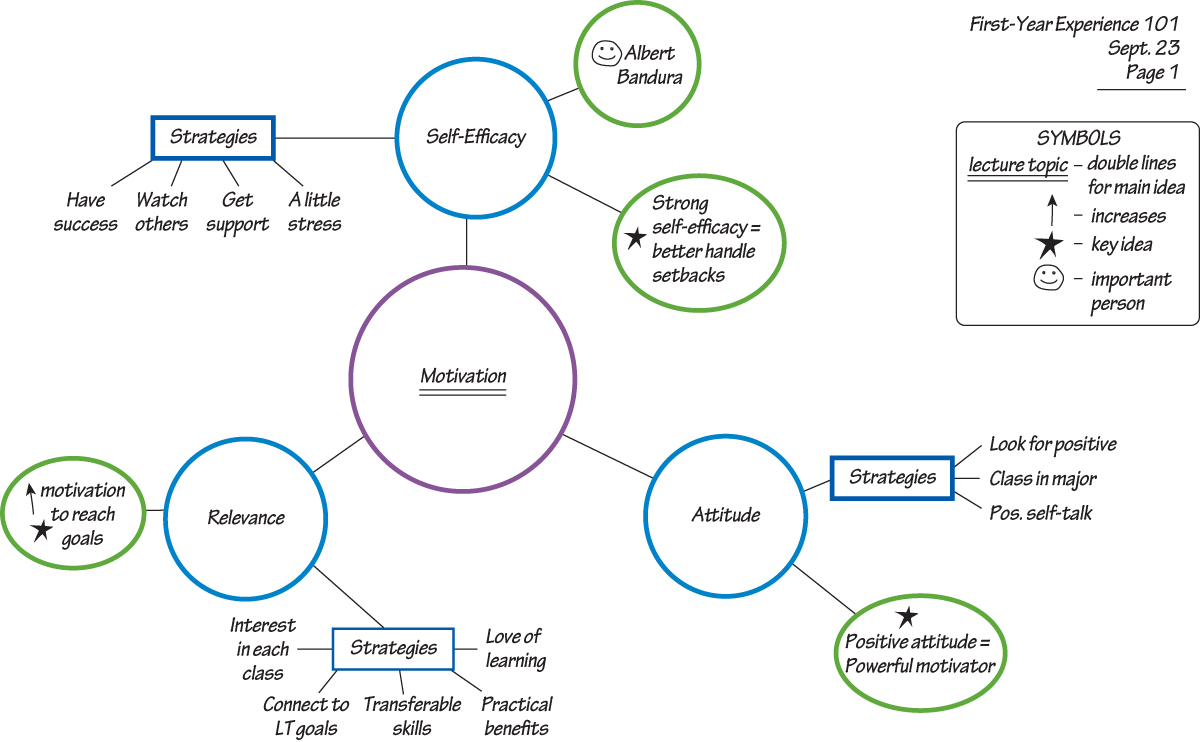
Mapping
A map is a graphical depiction of course material. It includes nodes and branches that show the connections among concepts. Detailed maps also incorporate symbols and other markings that further describe the content (see Figure 7.4). Maps are particularly useful if you’re a Visual learner. Some students sketch their maps before class with main ideas from a textbook chapter and then fill in content while listening to the lecture. For others, maps work best as study tools. The key to effective mapping is to create a consistent system and focus on key words rather than trying to cram in too much detail. With practice, you can learn how to use nodes, branches, and symbols to organize material and make course concepts come alive.
165
Nodes. Nodes represent the main topics and key ideas from the lecture or reading assignment. Create a system of nodes that works for you, either with one main node (topic) in the center of the page or several large nodes on each page. When you create one central node, you can add smaller nodes to represent concepts that support the center node’s main topic. For instance, in Figure 7.4 “Motivation” is the central node, and “Self-Efficacy,” “Relevance,” and “Attitude” are smaller nodes with supporting concepts.
Branches. Branches represent supporting details, such as examples, formulas, and dates. Branches might be smaller circles, squares, or simply a straight line pointing to information. Their shape and location show how the details connect to specific nodes and how different pieces of supporting information relate to one another. For instance, in Figure 7.4 the rectangular branches indicate strategies that can help strengthen each component of motivation.
Symbols. You can use symbols such as stars or exclamation points to emphasize important concepts in your map. For example, a number inside a box might represent an important date; a smiley face might indicate an important person (see Figure 7.4). You can also use different kinds of lines to reflect the nature of connections among details or associations between nodes and branches.
166
FURTHER READING: If you have any Visual learners in your class, invite them to review Sunni Brown’s blog entry on visual note taking. It includes strategies for Visual learners to incorporate doodles into effective notes. Just Google “Sunni Brown visual note taking blog” or go to www.sunnibrown.com.
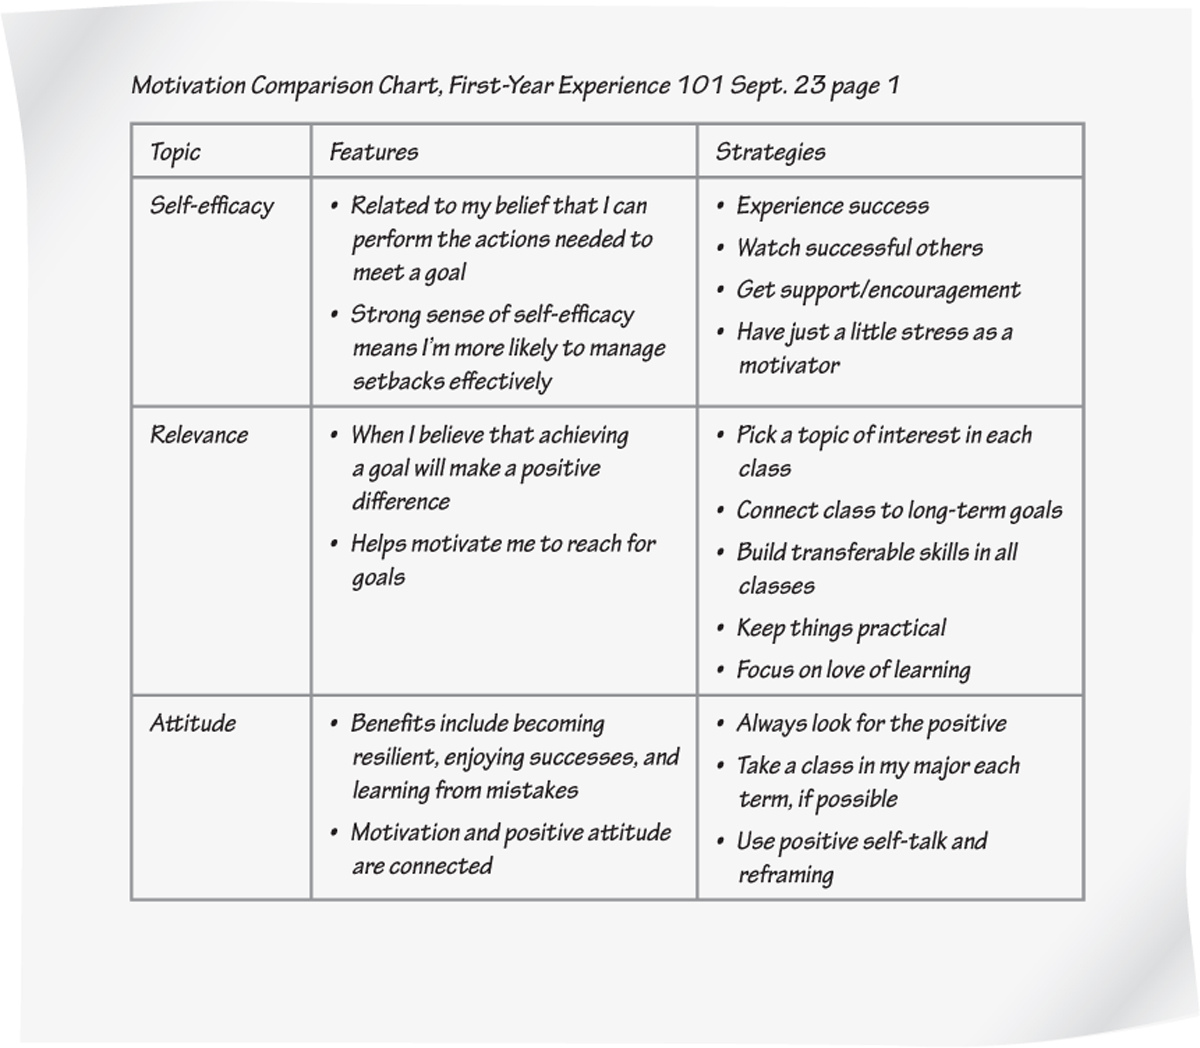
Charting
A chart is a series of rows and columns designed to organize main ideas, key concepts, and supporting details. Charts allow you to record information in a way that’s easy to study from later. Consider the sample chart from a first-year experience class, shown in Figure 7.5. The main topic is found in the left-hand column, and the other two columns highlight defining features and strategies related to the main topic. Charts work particularly well in classes where your instructor always presents course content in the same way. You can sketch out a rough draft of the chart before you go to class and then fill it in during the lecture.
167
voices of experience: student
OUTLINING AND OTHER
NOTE-TAKING STRATEGIES
| NAME: | Nicole S. Williams |
| SCHOOL: | Indiana University–Purdue University Fort Wayne |
| MAJOR: | Business Management |
| CAREER GOAL: | Financial Adviser or Accountant |
“I’ve found the outlining technique to be a very effective note-taking strategy.”
I’ve found the outlining technique to be a very effective note-taking strategy for me. I always use bullet points, main points, and subpoints. I came across this strategy in high school. My high school teacher really didn’t write many notes on the board. She talked most of the time. So, when she did write on the board, I knew the information was important, and I chose it as the main point in my outline. Then I usually added the things she said afterward as my subpoints. I’ve been using this technique ever since.
Outlining is clear and flows nicely for me. I’m an organized person, so I need my notes organized and in order so I can make sense of them. This strategy helped me in many courses, especially those in big lecture halls, such as psychology and anthropology.
I’m always ready to take notes. I always read assignments and books with a pencil in my hand so I can write down information. Also, I listen closely to speakers in class, because they don’t always write down the key points. As a matter of fact, most of the important concepts are verbally stated, so you have to be an active listener.
I also review my notes for clarity, although I admit that I don’t review as much as I should or would like to. But with a test coming around — say that my test is next week — I’ll usually try to review my notes for at least an hour, then take an hour break, and then go back and review them again. I try to do this for the whole week until the test comes up. Then, if I have questions about my notes, I’ll go to professors at least three days before the test. That’s how I usually review.
YOUR TURN: Have you used outlining to take notes? If so, what benefits has this method offered you? What challenges has it presented? If you haven’t used outlining, what’s the reason?