Chapter 2. Laboratory Techniques: Pipets
Learning Objectives
General Purpose
Conceptual
- Understand the different types of pipets.
Procedural
- Gain proficiency in the use of pipets and pipetting.
General Purpose
This lab will help familiarize you with some of the techniques you will be using in the exercises throughout this manual. It will also introduce you to some of the basic equipment needed to conduct the exercises in the manual.
General Background Information
Conducting experiments in biology requires the use of certain specialized equipment and techniques. To perform these techniques and use this equipment accurately and efficiently it is important to understand how the equipment works and to become practiced in the techniques. The techniques include pipetting and spectrophotometry. The instruments you are going to use during this exercise include pipets and spectrophotometers. You will be using these instruments and techniques during many of the other laboratory exercises this semester and in many other courses in the future. These instruments and techniques are also used in a wide variety of fields from industry to health care.
Pipets and Pipetting
During many of the laboratory exercises that you will conduct this semester you will measure and transfer small volumes (10 mL or less) of liquids. This is commonly done using a pipet. Pipets have many forms but all are designed to allow one to accurately measure and transfer volumes. There are several different types and sizes of pipets, which are used for slightly different purposes. Be sure that you know how to identify the different types of pipets and that you can determine the total volume and where applicable the gradations on each.
Types of Pipets
Mechanical pipets
Mechanical pipets or micropipets, are used for very small volume transfers (i.e., less than 1 mL) where a high degree of precision is required.
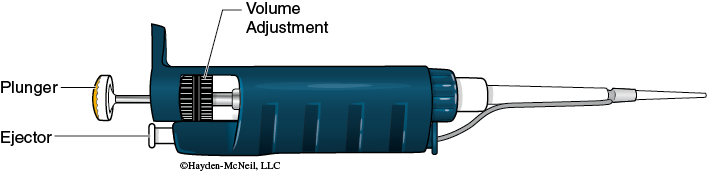
Micropipets come in several size ranges. Depending on the size different color coded disposable tips are used. The 3 most common size ranges are 100 to1000 µl (0.1 ml to 1 ml), 20 to 100 µl (0.02 ml to 0.1 ml) and 1 to 20 µl (0.001 ml to 0.02 ml). The volume to be transferred is set by turning the volume adjustment rings. A disposable tip fits on the end of the pipet. The larger blue tips are used for volumes greater than 100 µl and the smaller yellow tips are used for volumes less than 100 µl. By depressing the plunger to the first stop point you can draw up the exact amount to be transferred. To expel this volume you depress the plunger to the second stop point. In some cases micropipets are fitted with a tip ejector to remove the tip.
Volumetric pipets
Volumetric, or transfer, pipets are designed to deliver a single volume precisely (the volume will be indicated near the top of the pipet (i.e., 5 mL). These pipets do not have gradation markings and only have a single mark or engraved ring above the bulb in the pipet indicating the volume the pipet is designed to contain

Fluid must be drawn up in the pipet to above the ring and then released slowly until the bottom of the meniscus of the liquid is exactly at the engraved ring or mark (the tip of the pipet should be touching the wall of the sample vessel as fluid is released). To transfer this volume to a second container, touch the pipet tip to the new container and allow the liquid to drain out.
Graduated pipets
There two general types of graduated pipets, Mohr and serological. Each of these types comes in various sizes which are used for various volumes. You should try to use the pipet that is just big enough for the volume you are going to transfer. For example if the volume you need to transfer is 1.5 ml the best pipet to accomplish this with the highest accuracy would be a 2 ml pipet (not a 1 ml or a 5 ml or larger).
Mohr pipets are designed to transfer a volume by moving the meniscus to the liquid between to gradation marks on the pipet. The gradation markings on the Mohr pipet do not go all the way to the tip of the pipet but stop before the pipet begins to narrow (see figure 3)
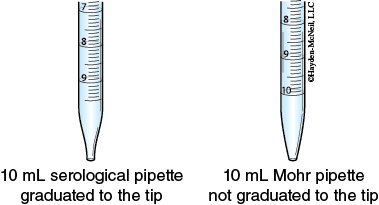
To accurately transfer fluid with a Mohr pipet, the meniscus must be precisely on a calibration mark both at the beginning and at the end of a transfer. Near the top of this type of pipet you will find the total volume indicated and the size of the smallest gradations (i.e., 10 mL in 1/10, the total volume of the pipet is 10 mL and it is graduated in 1/10 mL increments). The marking near the tip of the pipet should be the same as the total volume listed near the top of the Mohr pipet.
Serological pipets are graduated to deliver (there is no base mark). The appropriate amount of fluid is drawn into the pipet (with the meniscus precisely on the correct mark) and the entire amount is transferred. Since serological pipets are labeled with the zero mark at the top of the pipet, you will need to subtract the amount you are going to pipet from the total volume of the pipet to determine the exact mark to fill the pipet to. For example if you are going to pipet 6.5 mL using a 10 mL pipet you would fill the pipet to the 3.5 mL mark. To determine the total volume of the pipet, look near the top of this type of pipet. There you will find the total volume indicated and the size of the smallest gradations. There are two types of serological pipets. Those with a single painted or frosted ring at the top should be allowed to simply drain with the tip placed against the side of the receiving vessel. Those with double rings are designed to be “blown out” by pushing a small amount of air out of the pipet, completely emptying it.
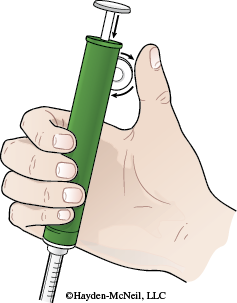
A pi-pump is a device designed to safely and easily draw fluid up into a pipet. The pi-pump has a neoprene gasket with a hole in it designed to fit over the top end of a pipet. Since not all pipets have the same size diameter, there are different sized pi-pumps made to fit the sizes of pipets. To draw up fluid into the pipet, operate the wheel control on the pi-pump. To expel the fluid from the pipet you can either depress the plunger on the top of the pi-pump or for more control rotate the wheel control in the opposite direction.
Pre-Lab Quiz
Proceed to the Pipet Pre-Lab Quiz located in the Pipets and Pipetting folder.