Chapter 2. Introduction to the Use of Microscopes
Introduction
Knowledge is free—bring your own container
Objectives
By the end of the period, students will:
- know the different uses for dissecting and compound microscopes.
- be able to correctly use both the dissecting and compound microscopes.
- be able to find and correctly focus on an object or a structure.
- be able to accurately sketch what is seen with a microscope.
- be able to recognize and compare animal and plant cells.
Useful Website
Thanks to Dr. Wendy Garrison for helping to develop this exercise.
Background
All living things, including humans, are composed of cells, but cells differ enormously in shape, size, and capabilities. Even the cells of a single multicellular organism are likely to be greatly differentiated. For example, in humans and other animals, there are cells that store fat (fat cells), cells that transmit electrical impulses (nerve cells), cells that secrete digestive enzymes or chemical messengers (epithelial cells), cells specialized for absorption of light, cells that secrete the mineral constituents of bone, cells that protect against infection, cells with hairs, cells that move by swimming, and cells that move by crawling. The largest (or at least longest) cell is a neuron or nerve cell found in a giraffe. It may be as many as four meters long!
Cells, no matter what their function, can be grouped into two major categories. The cells of bacteria are prokaryotic. Prokaryotic cells are small (0.2–5 micrometers) and lack a true nucleus or other membrane-bound organelles. Eukaryotic cells tend to be larger (10–100 micrometers long) and have a true nucleus and other membrane-bound organelles. All organisms except bacteria are composed of eukaryotic cells. The nucleus contains the DNA organized into chromosomes.
Despite the many differences that occur in cells, there are certain features common to all cells. All cells, at least at some time in their life, contain one or more molecules of DNA; all cells contain a semi-permeable plasma membrane that surrounds the cell; and all cells contain cytoplasm, the part of the cell between the plasma membrane and the nucleus (in cells that have a nucleus).
Today’s lab has two parts. In the first part, you will be introduced to the dissecting microscope and the compound light microscope. With the compound microscope, you will learn its parts and their functions. You will learn how to bring objects into the correct focus and to manipulate these objects to measure them, thus using your scope as a quantitative instrument. In the second part of the lab, you will observe several cells, including cheek cells (epithelium), muscle cells, and neurons.
By the end of the lab, you will demonstrate to your TA that you can find an object on the microscope and correctly focus it and correctly change the magnification.
THE MICROSCOPE: INTRODUCTION
Scientists will use whatever instruments are available to pursue their research, and advances in science are often the result of the development of new tools. One of the most important tools used by biologists is the light microscope. Light microscopy relies on the bending, or refraction, of visible wavelengths of light to form an enlarged image of the object observed. The light microscope was invented in the early 1600s. Galileo Galilei used it to describe the structure of the eyes of insects. In 1667, the first publication on scientific microscopy appeared by Robert Hooke. Using a microscope that magnified up to 170 times, Hooke observed a thinly sliced piece of cork from a mature tree. The cork appeared to be composed of tiny, empty compartments, which Hooke gave the Latin word cellulae, which means “small rooms,” and is the origin of the word “cell.”
Improvements in lens design in the 1800s allowed the development of light microscopes having a magnification of 1000 times, the limit of magnification with a light microscope before the image becomes blurry. With the development of the electron microscope, which uses electrons to form an image of the specimen, in the 1950s, it has become possible to achieve a magnification of up to 1 million times, allowing observation of the fine structure of cells. Advancements in biology have very much depended on being able to see or image increasingly small structures.
Over the course of the year, we will use two different kinds of microscopes. One is called a dissecting microscope and is very useful for magnification from 2×–40×. We will have a dissecting scope on the side table for you to look at. The second kind of microscope is called a compound light microscope. Most compound scopes can magnify from 40× to 1000×. We will mostly be using a compound scope today.
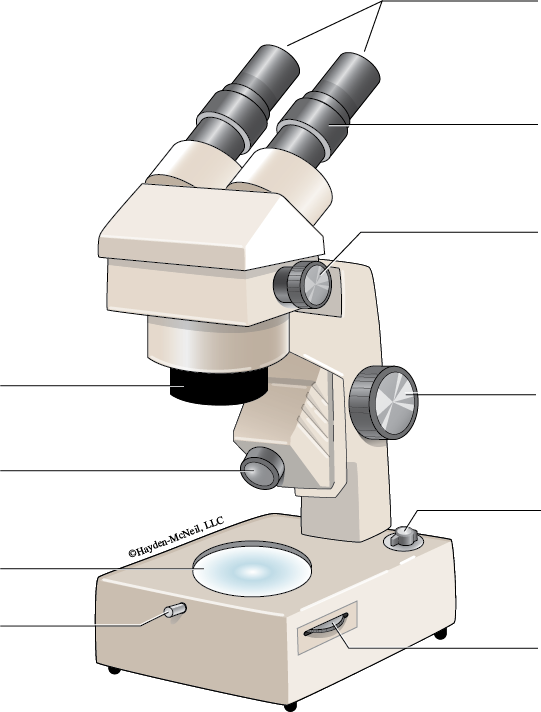
Part 1. The Dissecting Microscope
You should know all bold terms. As your instructor goes over the parts with you, label Figure 3.1.
Dissecting scopes are sometimes called stereo dissecting microscopes, as they have two eyepieces. The two eyepieces allow one to see in three dimensions. This is important for microsurgery as well as sorting small specimens or working with small but visible items. The magnification with this kind of microscope is generally 2× to 40×. We will use it to look at fingerprints and small animals.
THE PARTS OF THE DISSECTING MICROSCOPE
As your instructor goes over the parts with you, label the drawing of the dissecting microscope. Please learn these terms for the quiz and use the terms correctly when using the microscopes.
- Stage
- Ocular lenses and eyepiece
- Direct light source
- Incidental light source
- Stage
- Focus knob
- Magnification knob
Fingerprints: Once you are comfortable with parts of the dissecting microscope, we will use them to look at fingerprints. Our goal is for students to recognize the three basic types of fingerprints. The materials we will use include newsprint, stick-on notes, and the dissecting scopes.
Our fingerprints and footprints are formed during fetal development. As we grow, our fingerprint patterns expand but do not change. In comparing the prints of two or more individuals computers look at not only the three main types (arch, loop, or whorl), but also other details such as the number of ridges, where a ridge splits to form two (a bifurcation), and from which side of the finger the loops originate. The study of fingerprints is called dermatoglyphics and was first used by merchants in 9th century in China.
There are just a few terms you need to know to recognize fingerprints.
A ridge is the raised part of a fingerprint while a furrow is the recessed part of a fingerprint.
There are three basic patterns that can be formed by the ridges and furrows.
- Loop—The ridges appear to “enter” from one side, loop around and “exit” from the same side.
- Arch—The ridges appear to “enter” from one side of the finger, form a small peak and “exit” the opposite side of the finger.
- Whorl—The ridges in the center do not “enter” or “exit” but form a closed circle.
PROCEDURE PART 1
- Rub your thumb on the newsprint provided.
- Using a rolling motion, make a print of your thumb on a piece of tape and transfer it to a stick-on note.
- Put the stick-on note under the dissecting scope and observe it under both levels of magnification. Which magnification is best for this? (Note that higher magification means that you see less of the whole thing!)
- Sketch your fingerprint on your hand clearly showing details which will help you identify it as one of the three types. Please do this under Part 1 of your Hand-In. Write a complete sentence describing your thumbprint.
- Which of the three type of prints is yours? Use the terms correctly: arch, loop, or whorl.
- Put your initials on the back of the stick-on note and then mix your print with 3 or 4 other students. Can you pick out your print based upon your drawing and description?
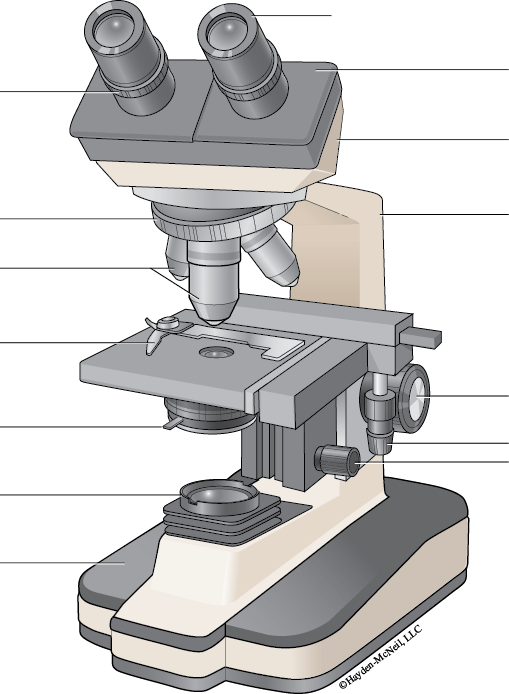
Part 2. The Compound Microscope
Use Figure 3.2 and the descriptions to identify the following parts and learn their functions.
- The base supports the microscope.
- The body tube and adjustment knobs are supported by the arm.
- The lamp is used to send light through the hole in the stage to illuminate the specimen. An on/off switch for the lamp is directly behind it.
- The stage holds the slide over a hole that admits light from the lamp.
- The iris diaphragm is just below the condenser. Using the iris diaphragm lever, the size of the opening in the iris diaphragm is altered to vary the light passing through the specimen. Too much or too little light will make a specimen difficult to see. The higher the magnification of an objective (see below), the less the amount of light that will pass through the objective. Therefore, you will need more light at higher magnification.
- The rotatable nosepiece contains four objectives of different magnifications: 4×, 10×, 40×, and 100×. The “×” indicates the number of times the image is magnified by the objective lens. Notice that the objective lenses differ in length. Higher magnification objectives are longer. The power of the objective lenses can be found by looking on the barrel of each lens. Notice also that the ink on the lens barrels is colored-coded. Rotating the nosepiece will click each objective into place.
- The eyepiece is the upper lens through which you will look to observe a specimen. The eyepieces on our microscopes magnify the image of the specimen by 10×. Total magnification of a specimen is determined by multiplying the magnification of the eyepiece by the objective in use, as further described below.
- An object is in focus only when the objective lens is a specific distance from the specimen. On a microscope there are two focus adjustment knobs that move the lenses up and down. The coarse focus adjustment knob is the large inner grey knob: It is used to move the objective to approximately the desired distance. The fine focus adjustment knob is the outer silver knob: It raises or lowers the objective very slightly, permitting exact focusing.
PROCEDURE PART 2
The following procedure should be used whenever you are using a microscope in BISC 161. This procedure will make using the microscope easy and fun and help protect it from damage.
In general, you will always start and finish on the lowest power. Use only the fine adjustment knob while on high power.
- If there are not microscopes on the tables, obtain one from the storage case and carry it carefully back to your table. Plug the microscope in and turn on the lamp. The stage should be at the lowest position possible.
- Place a microscope slide on the stage. The stage clips are used to hold the slide in the correct postion.
- When viewing an object, you should always start with the lowest-power objective possible. Rotate the 4× objective lens (it’s the shortest one) so that it snaps into position.
- Move the slide on the stage until you can see your specimen.
- While looking at the microscope from one side, turn the grey coarse focus adjustment knob away from you (counter-clockwise) until the 4× objective is as close as possible to the slide without touching it. Look through the eyepiece and slowly rotate the coarse adjustment toward you (clockwise) so the objective is raised and the specimen comes into focus.
- Adjust the iris diaphragm so that lighting is optimal for your eyes. Get in the habit of adjusting the iris diaphragm every time you switch to another objective because the contrast between background and object is directly determined by the light passing through the diaphragm. Your goal will usually be to maximize the contrast. The right amount of light is the amount that allows you to best see what you are looking for. In many cases, less light is better.
- Slowly rotate the fine focus adjustment knob back and forth until the specimen is most clearly in focus for your eyes. For observation of certain parts of the specimen, you may need to manually move the slide on the stage to the proper location.
- At this point you may decide you need more magnification. Slowly rotate the next highest magnification objective (the 10× objective) into place. (If the specimen is too thick for the objective to properly move into place you will not be able to go to the higher magnification.) When going to a higher magnification, the specimen should remain in focus (or close to it) without your having to touch any focus knobs because these microscopes are parfocal, meaning that the lenses are factory adjusted to all be in focus without having to adjust the working distance. If an adjustment is necessary, use only the fine focus adjustment knob. Otherwise, you may accidentally bang an objective into the slide and damage your specimen or the microscope. If your scope seems not to be parfocal, notify your TA before proceeding.
If you are working with a partner, you may need to make slight adjustments whenever you switch places, because everybody’s eyes are a little different.
Remember, as you go to a higher magnification you may need to adjust the iris diaphragm to let in more light.
- To work at a higher magnification still, you need only to move the next highest magnification objective (the 40× objective) into place. Remember to adjust the light, if necessary. At high power, only the fine-focus knob should be used to adjust focus.
- It is as important to remove a slide carefully from a microscope stage as it is to place it on the stage. Before removing a slide from the stage, always rotate the nosepiece so that the 4× objective is in place! Because the 4× objective is short, there is the most space between the slide and this objective. Thus, when you remove a slide with the 4× objective in place there will be the least chance of banging the slide against an objective and damaging it.
Now, find your slide and specimen and sketch what you see. Your TA will help make sure you are looking at the right things. There are directions for making sketches on the Hand-In.
When you are finished using the microscope you should always do the following:
- Turn off the lamp and unplug it.
- Click the scanning lens into place.
- Move the stage completely down, away from the objectives.
- Push the scope to the middle of the table, or return it to the case by carrying it with both hands.
We will start with prepared slides that have objects that are easy to see. We will then look at a plant slide and an animal slide. You will make a sketch of each.
HOW TO SKETCH
- Using a pencil, lightly draw a cross in the circle on your Hand-In to divide the space into four quarters.
- Start with biggest shape in the field of view. Looking through the microscope, mentally divide the field into four quadrants, just like the big circle. Determine where the big shape falls among these four sections.
- Lightly sketch the largest shape with a pencil where the edges of the item are. Check your proportions. Look through the microscope, then at your shape to get the outline as accurate as possible.
- Do the same for the other shapes in the field of view, starting with the next biggest and so on. Lightly sketch each shape, using the previous shapes and mental crosshatches to help determine proper proportions.
- Move on to internal shapes within the already outlined shapes. Repeat for all the visible shapes in the field of view.
- You should have a lightly drawn circle filled with several shapes. Now work to transform these shapes into what you see. Look through the microscope and mimic the curvature of the actual shapes. Start with the simplest shape. Erase unnecessary lines and add new ones until you’re satisfied.
- Add any remaining small structures not yet added. Add texture and shading to the drawing as time allows. At every stage, check your work through the microscope until the drawing is good and looks like what you see.
CHECKLIST FOR THE END OF LAB
When you are finished, each lab must be clean and ready for the next group of students.
❑ Clean up your lab table. Make sure all microscope slides have been cleaned.
❑ Wipe up your table and make sure there are materials ready for the next group.
❑ Clean up around the sinks.
❑ Double-check your microscope: Is the cord wrapped around the base?
❑ Is the scope left on scanning power?
❑ Is the stage of the microscope all the way down?
NOTES TO INSTRUCTORS AND MATERIALS FOR LAB
The slides for this lab include strings, onion root tips, and epithelial cells.
It is very important that students learn to correctly use the microscopes and to begin and end on scanning power, and to lower the stages when the microscope is not being used.
TAs must demonstrate its correct use and then check each students use of the scopes.
Each student must use a microscope and demonstrate its correct use.
The stage must be lowered at the end of each class period!