Chapter 2. DNA Modeling, DNA Extraction, and Electrophoresis Simulation
Objectives
By the end of the period, students will be able to:
- create models of DNA to understand the basic structure of DNA and know how it is replicated.
- extract DNA from strawberries.
- run a simulated electrophoresis study to understand one of the tools for studying DNA.
Introduction
There is an enormous amount of biodiversity in the world. There may be as many as 30 million species of organisms in the different kingdoms. In spite of all of the diversity, there are basic characteristics that all living organisms share. Scientists look both for shared characteristics (from a group) as well as unique characteristics to understand any given organism.
All living organisms are made of cells. All organisms use ATP for energy. And all organisms have DNA, the molecule that is the basis for the genetic code. In addition, all organisms transcribe that DNA into proteins in essentially the same way. The fact that all animals, plants, protists, fungi, and microbes share so many important traits is perhaps the strongest evidence that all living organisms are biologically related to each other.
In this lab we will look at the structure of DNA and we will build models of DNA to understand that structure. In addition, we will extract DNA from strawberries. And finally, we will run a simulated electrophoresis study to see one way that DNA is studied and to prepare for next week.
A quick review. All living organisms are made of cells. You have recently seen plant cells, animal cells, protists, and bacteria. You remember that all eukaryotic organisms have nuclei and that is one of the places where DNA is located. In the eukaryotic organisms, the DNA is in the nucleus and is organized into chromosomes, and those chromosomes become visible when the cell is dividing. In the microscope lab you saw chromosomes and several stages in cell division. In bacteria, the DNA forms a circular strand and there is no nucleus.
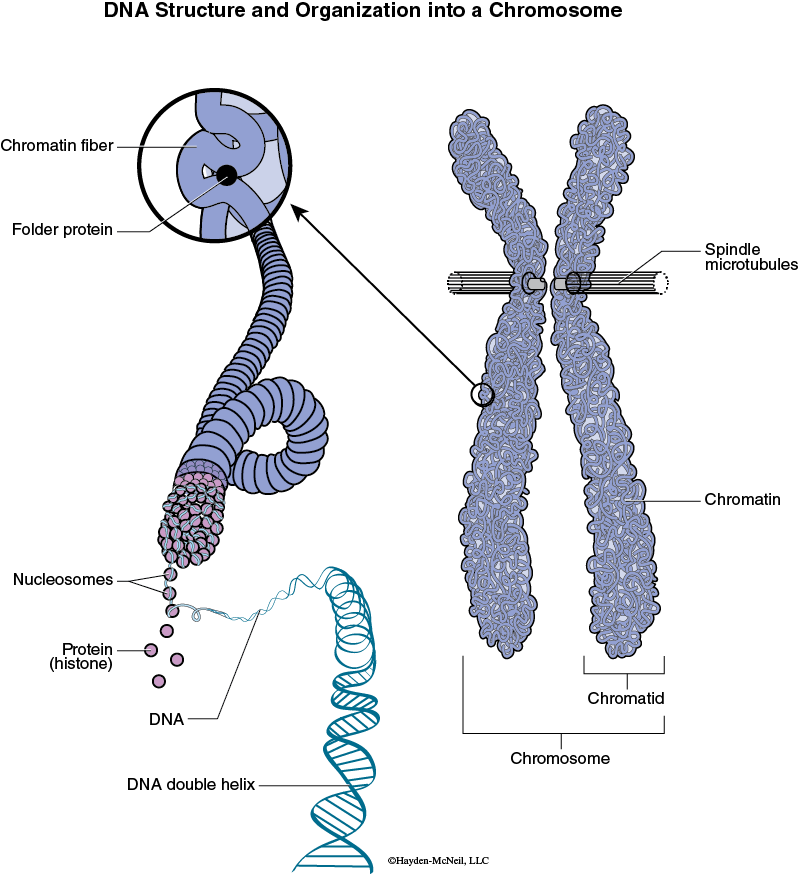
DNA is an extremely long and thin molecule that is packaged very efficiently and effectively. If the DNA from a single human cell could be stretched in a line without breaking, it would be over 2 meters long! Figure 8.1 diagrams how DNA is packaged into chromosomes. The DNA double helix is coiled onto protein nucleosomes, which in turn coil and form a chromatin fiber. The chromosome itself is a mass of chromatin fibers.
The chromosomes are thus long sections of DNA. Portions of the DNA are coding sections and are called genes. Other sections of the DNA do not code for anything. Along the length of each chromosome are thousands of genes. We will focus on eukaryotic cells and for now, will take animals as examples. You recall that all animals start life as a single fertilized egg. The egg of course contains the chromosomes from the mother and the fertilizing sperm contains chromosomes from the father. The genotype of that fertilized egg is thus a combination of the genotype from the mother and the father. Humans have 23 pairs of chromosomes (46 chromosomes total). One of each pair is from the mother, one is from the father. Other species have different numbers of chromosomes. A karyotype is the chromosomal composition of an individual. A karyotype spread is a way of looking at all of the chromosomes from one individual cell. When you make a karyotype from a human, there are 46 chromosomes. The chromosomes are arranged by size so they can be counted.
To go from this single fertilized egg to a complex animal with many working parts requires cell division, and lots of it. With each cell division, it is critical that the DNA gets duplicated and divided between the daughter cells. The DNA in a cell must first duplicate itself (called replication) and then become even more coiled or condensed. It is at this point that the DNA is visible. Finally, the chromosomes must divide in such a way that each daughter cell gets a complete set of the DNA. This process of cell division is called mitosis.
DNA is said to carry the code of life for two reasons:
- Almost all metabolic processes that occur in a cell require certain kinds of proteins, called enzymes, to proceed. DNA carries the code for the construction of proteins from molecular building blocks called amino acids. It is the order of the building blocks of a DNA molecule that determines the sequence of amino acids and thus the nature of the protein.
- DNA, in the form of chromosomes, is passed on from parents to children via gametes (eggs and sperm). Sexual reproduction, which is fusion of an egg and a sperm, results in children (human and otherwise). Offspring inherit traits (characteristics) from their parents by receiving one-half their DNA complement from their mother and the other half from their father.
The above two statements are true for all organisms that reproduce sexually, including plants, fungi, animals, and most protists.
In this lab we will first model DNA and then we will extract DNA from strawberries. We will then run a simulated electrophoresis study to prepare for next week.
Part 1. Modeling DNA
We will be using a 3-D model of DNA. Working in groups of 3 or 4, students will build a double stranded molecule of DNA. Once completed, you need to be able to explain each of the components and what kind of bonds connect each of the components.
Understanding the structure of DNA is essential to understand how DNA is replicated.
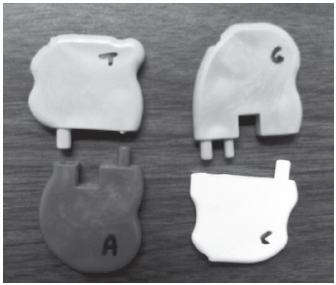
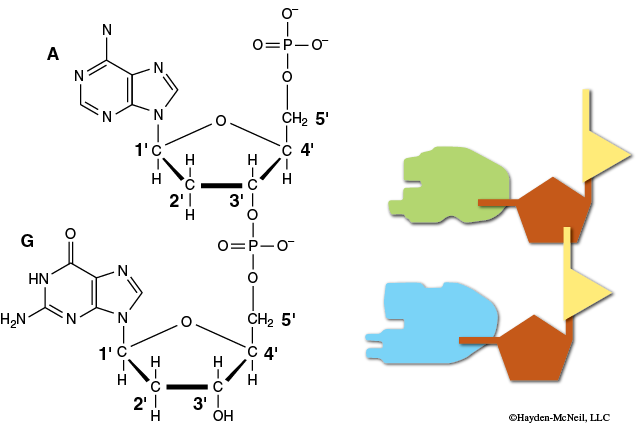
The building blocks of DNA are deoxyribose (a sugar), a phosphate group, and a nitrogenous base. A group of these three is called a nucleotide.
In our Molymod models we have these components:
- Deoxyribose is red
- Phosphate group is purple
- Nitrogenous bases:
- Adenine (blue) binds to Thymine (orange)
- Cytosine (yellow) binds to Guanine (green)
Please note: As you work with your teammates be sure to call each part by the correct name, as in “please pass me three more deoxyribose pieces!”
- Push the rod firmly into the grey stand.
- Join the complementary base pairs (A–T, C–G). Note that the adenine will only fit with the thymine (they are bound by two hydrogen bonds) and the cytosine will only fit with the guanine (they are bound by three hydrogen bonds).
- Slide each pair onto the pole, separated by a spacer. Note that the holes for the side chain must each face the same direction.
- Join the deoxyribose to the phosphate group in this manner:
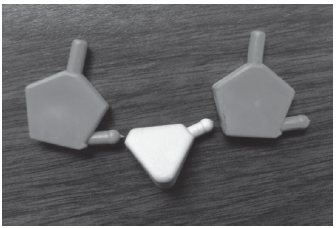
- Make two lengths of the side chains, each with 12 alternating deoxyribose and phosphate group.
- Starting at the bottom of the model, attach the side chain to the base pairs in a counterclockwise fashion.
In this way we are forming the double helix, and one complete turn occurs every 10 base pairs. The large and the small grooves are the major and minor grooves.
Each layer ascends in a counterclockwise direction; there is one complete turn every 10 layers.
As you are building your model, your TA will circulate and ask you questions to be sure you understand the structure! Pick one strand of your DNA to call the sense strand and write out the sequences of bases that forms this strand.
Part 2. DNA Extraction
The extraction of DNA is a straightforward process. When it is extracted from multiple cells, it is visible as translucent strands. We will use strawberries as their cells are octoploid and thus have many copies of DNA.
Once DNA is extracted it can be studied in a variety of ways. Portions of DNA can be used to determine identity, study genomes of organisms, and identify genetic diseases, genetically engineer crops, etc.
DNA extraction involves several steps. Recall that in eukaryotic organisms, most of the DNA is within the nucleus or other membrane-bound organelles. We will need to get the DNA out of those organelles and out of the cell itself. In addition, plants have cell walls made of cellulose that help to protect the cell.
Cell membranes are made of a phospholipid bilayer. Lipids are fats and fatty acids and can be broken down by detergents. We will use detergents to break down the cell membranes. In addition to that, however, we will also need to physically break down the cell wall. We do that physically by mashing the cells. This also allows the detergent to get to the cell membranes. The process of rupturing the cell membrane and cell wall is called lysis.
Once the cells are mashed, there will be cellular debris that we will not need. The salt added to the extraction buffer helps some of the cellular debris to precipitate, while the DNA stays in solution. We will use a filter to remove this debris. Once we have filtered the extract, we will have a liquid extract of strawberry that includes the water soluble DNA. The final step will be to pull the DNA out of solution. We do this by adding ethanol. DNA is insoluble in ethanol and so will precipitate once the ethanol is added. Voila!
Students will work in teams of two and each team will extract the DNA. Each table will have two teams.
MATERIALS FOR EACH TEAM
- Plastic bag and strawberry
- 50 ml tube with lid
- small funnel
- two 15 ml tubes (one for extraction buffer, one for strawberry extract)
- piece of cheesecloth
- wooden stick
- plastic pipette
- scissors for cutting cheesecloth
Extraction buffer will be at the back of the room, as will an ice bath, to keep the ethanol cold.
NOTES TO TAs
Strawberries can be cut in half or quarters.
Rinse and reuse wooden sticks.
5 ml of ethanol can be placed in tubes before lab and be chilled.
10 ml of extraction buffer can be added to tubes before lab.
DIRECTIONS FOR STUDENTS
Put the strawberry in the bag and seal it closed.
Mash the strawberry in your hands for two minutes. (This must be timed!)
Pour 10 ml of the extraction buffer (a type of detergent) into the bag, seal the bag, and mash the strawberry for one more minute. Again, it is important to time this!
Place a funnel in a 50 ml centrifuge tube. Fold and place cheesecloth in the funnel. Pour the strawberry mixture through the cheesecloth. Let it drip through for a few minutes. What is getting caught in the cheesecloth?
Pour 2 ml of the filtered contents into a clean 15 ml tube. Holding this tube at an angle, slowly and carefully add 5 ml of cold ethanol by using a pipette to pour the ethanol down the side of the container.
Watch closely as the translucent strands of DNA become visible as the DNA precipitates out of solution.
You can then spool the DNA onto a wooden stick.
Be able to explain what each step accomplishes in the extraction procedure.
Once you have extracted DNA, in order to study it, you have to go through several steps of “cleaning” it; that is, removing cellular debris.
How do we study the DNA? That will be the focus of this next section!
Part 3. Molecular Genetics Simulation
OBJECTIVES
By doing a simulation, we will review in principle the steps involved with DNA profiling and learn the steps in using electrophoresis to study DNA.
DNA profiling (also called DNA fingerprinting) is now being used in many criminal and legal cases where DNA samples are available to determine identity or parentage. DNA may be extracted from relatively small samples of cells, such as a blood stain the size of a nickel (about 2 drops) or from a semen stain the size of a dime. When performed under properly controlled conditions and interpreted by an experienced forensic scientist, such profiling can link a suspect to a particular incident with compelling accuracy or can completely exonerate a suspect. This simulation activity allows students to work through the theory of DNA profiling and to grapple with some analytical and ethical questions. It can be used to reinforce basic concepts such as base pairing in DNA as well as teach the principles of restriction enzyme digestion, gel electrophoresis, and probe hybridization.
At the DNA level, individual people are about 99.9% identical; they differ on the average in 1 out of 1000 base pairs. Some of these differences are in genes that lead to the visible differences between us.
The most variable sequences known are tandem repeated sequences; the basic unit of a repeat is usually a sequence of 2 to 300 base pairs. In tandem repeats, each unit has the same orientation (e.g., CATCAT). Different repeated sequences appear in different places of the genome. In each case, what is variable is the number of copies of the sequence in an allele. So for example, if the repeated sequence were “CAT,” in one allele there might be 3 copies (CATCATCAT) while in another allele there might be 7 copies (CATCATCATCATCATCATCAT).
These are known as variable number tandem repeats, or VNTRs. In a given population there may be dozens or even hundreds of different alleles. Of course, any individual has only two alleles, one on each of the homologous chromosomes, each of which was inherited from one parent. Since there are so many alleles in a population, most people are heterozygous for alleles of any given VNTR. Because of the great variability in alleles of VNTR, if one examines enough different VNTR (6–12 in a given person), one can put together a molecular picture or DNA profile or fingerprint of that person. This can be used for identification, e.g., of tissue left at a crime scene, or for paternity testing, in which case the VNTR alleles in the child that are not present in the mother must have come from the biological father.
Population studies must be done to determine the frequency of each allele in the population. Using that information, calculations may be made to determine the chance that a random person in the population would have the same alleles as the suspect or alleged father.
TECHNICAL BACKGROUND
What follows is a description of the techniques necessary to distinguish between different VNTR alleles.
- DNA is isolated from the tissue sample (a procedure not included in the simulation but very similar to what we just did with strawberries!).
- DNA is then cut with a restriction enzyme to produce specific fragments. Each kind of restriction enzyme recognizes a specific sequence of bases of the DNA and acts as molecular scissors to cut the DNA strand within the recognition sequence. For performing DNA profiling, it is necessary to use a restriction enzyme that does not cut within the variable sequence, but does cut in flanking regions that are the same in everyone.
- The fragments need to be separated according to size. This is accomplished by gel electrophoresis. The DNA sample is placed in a depression (the well) at one end of an agarose gel and an electric current is applied. Because DNA molecules are negatively charged, they migrate toward the positive electrode in the gel chamber (e.g., DNA “runs to the red”). The agarose molecules in the gel act as a sieve, allowing the smaller DNA fragments to move faster than the larger, more bulky fragments. A standard “ladder” of fragments of known sizes is run along side the unknowns to provide size standards.
- At this point, if all the DNA were stained, there would be so many fragments from each sample that the DNA would appear to be an undifferentiated smear down each lane in the gel. In order to distinguish between the DNA of one individual and that of another, we need to see only the particular fragments of interest—in this case, those containing the VNTR sequences.
For technical reasons, the DNA smear is transferred to a nylon filter to prevent further movement of the DNA fragments, but the bands remain in the same relative places in the filter as they were in the gel. In the process of transferring the DNA from the gel to the nylon filter, the double strands of the DNA are separated, and the filter tightly binds the now single-stranded DNA. This will permit a complementary sequence of DNA to bind to the sample DNA that stuck on the filter.
Radioactively labeled sequences of single-stranded DNA, called probes, have been produced that recognize (i.e., are complementary to) a particular DNA sequence. Under the proper conditions, the probe will bind only to sequences that are complementary to it: e.g., a probe for the CAT sequence will contain tandem repeats of GTA.
NOTE: Complementary strands of DNA are always antiparallel, so to be accurate we should specify the ends as follows:
Also, labeled probes are usually at least 18 base pairs long, but for simplification in our simulation, we are using smaller sizes.
A probe that doesn’t bind is washed away, and the radioactivity is visualized by exposing X-ray film to the gel and letting the radioactive probes make a picture of themselves. This is called autoradiography. This process may be repeated by removing the first probe and adding different probes in sequence. This allows a single filter to be tested with multiple probes, each of which visualizes a different VNTR. Optimally, the VNTRs chosen for examination will come from many different chromosomes.
Electrophoresis Simulation
This is intended as a group activity, with each lab table acting as a research group.
MATERIALS FOR EACH TEAM
- poster board
- tape
- scissors
- a pen
- copies of nucleotide sequences in the samples
- standards and the probe printed on brightly colored construction paper
Envelopes may be used to keep the samples together.
NOTE: This simulation uses only a single strand of DNA throughout the restriction analysis procedure for purposes of simplification.
The activity simulates the following situation. Blood was found at a crime scene where one person (a male named John) was assaulted. Police have a blood sample from the victim, and from three other people: one is the victim’s best friend, one was a high school buddy that showed up late one night, and the third was the victim’s girlfriend.
The police were able to type the blood and they know it was from at least two people. They are sure that some of the blood is from a male (how might they know that?) and more than that, they know it is from John, the victim. They strongly suspect that the rest of the blood was from the assailant. Who assaulted John? Molecular biology will solve this puzzle!
To simulate the restriction digest, each group must first cut out the strips of DNA sequences for all individuals present. Next, scan the sample strip for the target sites: CAT. Next, mark the sample strip at the recognition sites for the restriction enzyme HindIII (AAGCTT). Then cut the strip all the way across between the two As of each restriction site.
To simulate running the gel, the standards should be placed first onto the poster board. Exact distances from the origin in the well are not important, as long as all fragments of the same length are placed the same distance from the well. The larger fragments are placed closest to the well and the smaller ones are placed further away in descending order beneath the well. The standards should span almost the whole distance, leaving perhaps 5 cm at the bottom. Tape the fragments in place with a small amount of tape.
Place the envelope for the victim’s sample to the right of the standard sample envelope and then simulate running this gel by placing the fragments of DNA from the mother. Note that the victim’s 12-base fragment should be the same distance from its well as the standard 12-base fragment is from its well.
Continue placement of the remaining samples in the same manner, moving to the right across the poster board in the following order: best friend, high school friend, and girlfriend. When complete, each sample contains five fragments.
These fragments would still not be visible to us. They must next be differentiated from one another by use of the probe. Construct DNA probes by cutting 1 cm by 2 cm rectangles from the brightly colored construction paper containing the probe sequences. These DNA probes will be used to see or visualize the VNTR sequences.
(Remember that the probe sequence, 3'GTAGTA5', is complementary to the VNTR sequences, 5'CATCAT3'.)
With a probe in hand, scan the gel and position a probe on each complementary sequence. Each labeled fragment represents a part of one chromosome of a homologous pair.
Who assaulted John? (Note that different tables may get different answers!)
NOTES TO ISNTRUCTORS AND MATERIALS FOR LAB
This lab combines teaching about the structure of DNA, DNA extraction, and studying DNA through electrophoresis. It is important preparation for the next week, when we will use electrophoresis to examine DNA.
Part 1. We will have models for students to work with. It will be important for the TA to move around the tables and quiz students about the structure of the DNA.
Part 2. Extracting DNA. Before lab each TA should cut small pieces of cheese cloth for each team. The ethanol will be chilled and will be in ice chests at the back of the room.
TAs SHOULD PREPARE
14 5 ml aliquots of ethanol, and leave in the ice.