Chapter 1. LAB 13 Molecular Techniques 3: Detecting GMO
Introduction
Learning Goals
- Understand the issues of genetically modified organisms from a scientific and consumer perspective
- Know the basic steps in polymerase chain reaction (PCR)
- Determine if common food items have been genetically modified
- Understand the importance of PCR in identifying the presence of particular genes even in small samples
Lab Outline
PCR I (complete during a previous lab)
Activity 1: Isolation of Chromosomal DNA from GM Food
Activity 2: Amplification of Template DNA
PCR II
Activity 3: Gel Electrophoresis of Amplicons
Activity 4: A GMO Debate
Scientific Inquiry
Plants and animals can now be raised to contain genes for making pharmaceutical and industrial chemicals. A huge percentage of food plants, especially corn and soybeans, raised in the United States have been genetically modified to increase yields and reduce costs. For example, some GMO crops contain the engineered delta-endotoxin gene which confers insect resistance to plants.
How Do You Genetically Modify Crops?
Although plants have been genetically modified using cross-breeding since ancient times, this question refers to a totally new technological method that makes it possible to insert genes into plants that come from organisms quite foreign to the plant itself. For example, genetic engineers can insert the gene for delta-endotoxin from the bacterium Bacillus thuringiensis into a plant, using common recombinant DNA technology. This gene makes a toxin that, when eaten by herbivore pests, kills them and prevents their colonization of the plant.
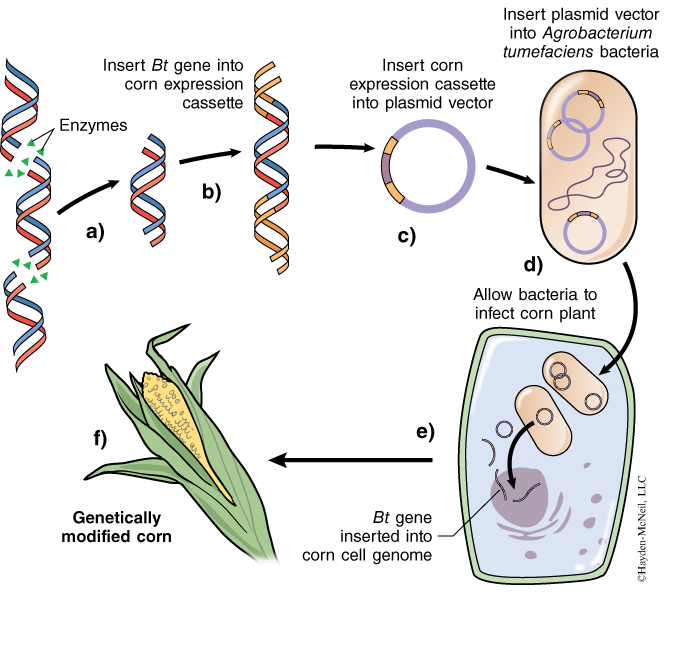
Although many different plasmid vectors can be used to place foreign DNA into plant cells, most researchers use standard plasmids to transfer genes that result in successful transplanted gene expression in plant cells. The gene of interest must first be isolated from its original host organism. Although this gene works in its species of origin, it may not work when transplanted into a new species. Since DNA is DNA, it may seem odd that the DNA from the new organism wouldn’t simply be treated like the rest of the DNA in the new host. However, RNA polymerases that make mRNA from DNA are relatively sequence-specific—plant RNA polymerases recognize promoter sequences that are slightly different from promoter sequences recognized by bacterial RNA polymerases or animal RNA polymerases. Therefore, the foreign Bt endotoxin gene (or any gene) must be attached to a piece of DNA called an expression cassette. As its name implies, it is DNA that contains specific sequences that allow expression of a gene in plants. One of those sequences is the 35S promoter from Cauliflower Mosaic Virus (CaMV). This promoter works well in most plants because it is recognized by plant RNA polymerases, thus it is commonly used in the cloning of genes that are expressed in plants.Through the use of restriction enzymes and ligase, the delta-endotoxin gene (Bt gene) is cut from B. thuringiensis genomic DNA and attached to the “expression cassette” DNA (Figure 1a and b). This “expression cassette” DNA with the Bt gene is not usually transformed directly into the plant as one might expect. Instead, the transformation occurs via an indirect, but efficient, method that requires Agrobacterium tumefaciens. Agrobacterium tumefaciens is a bacterium that in nature infects and “transforms” plants. The “expression cassette DNA” plus Bt gene is ligated to a plasmid that can replicate in A. tumefaciens. This chimeric plasmid (expression cassette + Bt gene + plasmid) is placed into Agrobacterium through a procedure known as transformation (Figure 1c and d). The chimeric plasmid has the property of conferring antibiotic resistance to its host bacteria to allow selection for transformed bacteria. This plasmid also contains the nopaline synthase (nos) gene from Agrobacterium to increase its infectivity. A culture of A. tumefaciens containing the Bt gene is applied to plant tissues. The plant tissues become infected and take up the recombinant plasmid from the bacteria into their cells. The expression cassette with the Bt gene gets integrated into the plant genome (Figure 1e). The Bt gene (delta-endotoxin) is expressed in the plant tissue, and the plant tissue is cultured and raised into a complete GM plant (Figure 1f).
How Do You Confirm the Presence of GMO Sequences?
An obvious answer to the question of whether or not your plant has the Bt gene is to test for the presence of the delta-endotoxin protein. But what if your samples are food items made from highly processed GM crop plants and processing destroyed the endotoxin proteins? How would you, for instance, detect the GMO in a tortilla chip or pastry? Although it may be difficult to detect proteins in highly processed foods, it is usually possible to retrieve DNA even from cooked foods since DNA is rather stable. The amounts of DNA will be small, many orders of magnitude too small to visualize on a gel. Is it possible to make more copies of whatever DNA is present so it can be studied? The answer is yes, if you use a revolutionary technique known as Polymerase Chain Reaction (PCR). That is the subject of the laboratory technique for this lab—the power of PCR to allow us to monitor the genetic makeup of our food. Although we can genetically modify plants (and monitor the process), is there a downside to the benefits of genetic modification? What do we really know about the consequences of the release of GMOs? As you complete this lab, you are challenged to think about and address these important issues.
Background
Polymerase Chain Reaction (PCR) was invented in 1989 by Kary Mullis. He received the 1993 Nobel Prize in Chemistry for this achievement. PCR technology makes it possible to amplify a specific region of a DNA molecule, for instance, a specific region in an organism’s genome. Using PCR, a scientist can prepare a gene for cloning; detect gene mutations, such as those that lead to cancer; monitor cancer therapy; and quickly detect bacterial and viral infections. PCR makes it possible to detect the presence of bacteria or other species that cannot be cultured or identified. PCR is used in widely different ways, from using prenatal cells in determining the sex of unborn fetuses to investigating extinct species from fossils or museum collections.
PCR allows replication of DNA outside of cells in a test tube (in vitro), making it possible to produce virtually unlimited copies of a desired piece of DNA. The method requires an enzyme called DNA polymerase that strings deoxyribonucleotides together using single-stranded DNA templates as a blueprint. DNA is a double helix that can be denatured into its component single strands by heating the double strands. DNA polymerase attaches to single DNA strands that become templates for adding successive nucleotides to the growing molecule. If there is an “A” on the DNA template, DNA polymerase adds a “T” to pair with the “A.” If the next nucleotide in the template happens to be “G,” what nucleotide will DNA polymerase add?
An important property of DNA polymerase is that it will not bind to DNA on its own. DNA polymerase requires a small stretch of complementary DNA with a free 3′OH end. These short (~10–30 base pairs) segments are called primers. The reaction requires two primers, which are each designed to bind to one strand of the template helix. The forward primer binds to the beginning of the desired gene at the 3′OH end of one strand of DNA and the reverse primer binds to the end of the desired gene at the 3′OH end of the complementary strand of DNA. Because PCR requires multiple cycles of heating (to 95 °C), the DNA polymerase used in the reaction must be heat stable. Most enzymes, including most DNA polymerases, are destroyed at high temperatures. This obstacle was overcome with the discovery of heat-stable DNA polymerases from thermophilic bacteria living in hot springs. One common heat-stable DNA polymerase is Taq polymerase from the bacterium Thermus aquaticus.
To complete its role in making new copies of DNA sequences, the polymerase chain reaction requires additional reagents. A buffer is necessary to maintain proper pH and ionic composition. Mg++ is a cofactor required for DNA polymerase activity and is believed to shield the enzyme from the negatively charged phosphates on the DNA backbone. The deoxyribonucleotide triphosphates (dNTPs), or free-floating dATPs, dGTPs, dCTPs, and dTTPs, serve as the substrate for the polymerization reaction. These nucleotides possess three phosphate groups at their 5′ end instead of one. Hydrolysis (loss) of two of these phosphate groups provides the energy necessary to drive polymerase reactions.
How Does PCR Produce Large Quantities of DNA?
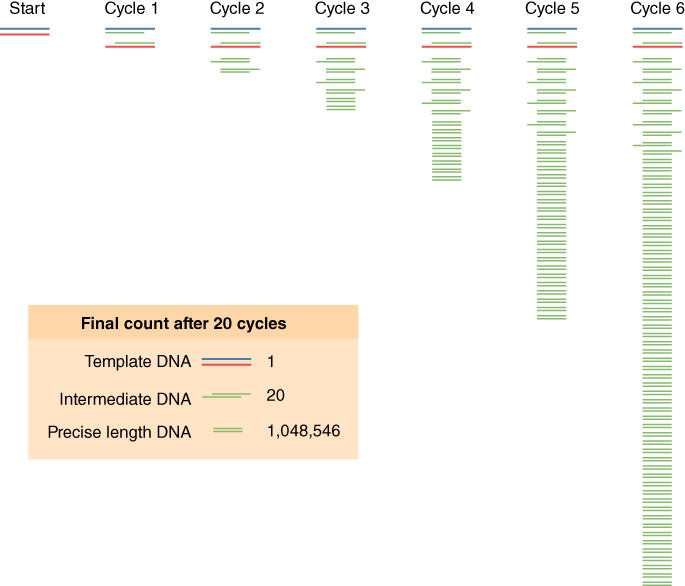
One DNA polymerase reaction would only double the DNA in the reaction tube, but PCR reactions repeat DNA duplication reactions over and over again—2 DNA molecules give rise to 4 DNA molecules, 4 give rise to 8 DNA molecules, and so on. This is the “chain reaction,” where each step in the process is repeated or cycled over and over again (see Figure 2). There is an exponential increase in the amount of DNA for each cycle of the process. You can mathematically model this using the equation X*2N, where X is the number of DNA molecules you start with and N is the number of complete PCR cycles (this assumes the efficiency of the reaction is 100% for each cycle). If you start with 5 DNA molecules, how many DNA molecules would you have after 5 cycles of PCR?
Cycling Step by Step
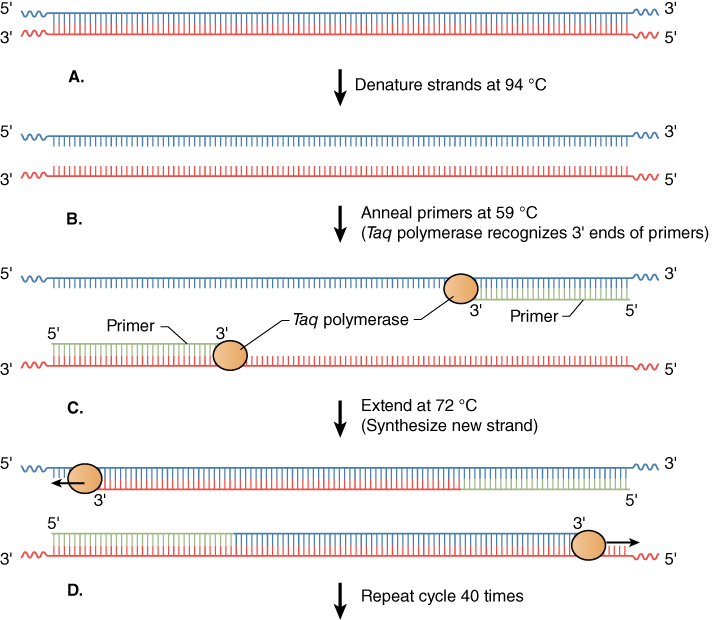
Exponential increases in the number of copies of DNA made in PCR are achieved in three basic steps in a cycle—denaturation, annealing, and extension (Figure 2). Cycling is accomplished by placing the reaction tubes, containing DNA polymerase, dNTPs, buffer with Mg++, template DNA, and primers, in a PCR machine called a thermal cycler. As its name implies, this machine can rapidly and repetitively change its temperature over time.
The denaturation step is a short pulse at 94 °C that denatures any double-stranded DNA molecules into single strands for subsequent rounds of amplification (Figure 2A). The temperature is lowered in the second step to allow the primers to anneal (i.e., base pair) to their complementary sequence in the now single-stranded template DNA (Figure 2B). As soon as the primers anneal, the Taq polymerase binds to the 3′OH end of the primer to start making new DNA using the dNTPs. In the third step (Figure 2C), the temperature is raised to 72 °C, which is the optimal polymerization temperature for Taq polymerase allowing for maximal synthesis of the new DNA strands. These three cycles are repeated as many as 40 times (Figure 2D), such that billions of DNA molecules can effectively be produced from a few initial DNA templates. The outcome of such amplification is modeled in Figure 3.
How Will You Identify GMO Foods in Lab?
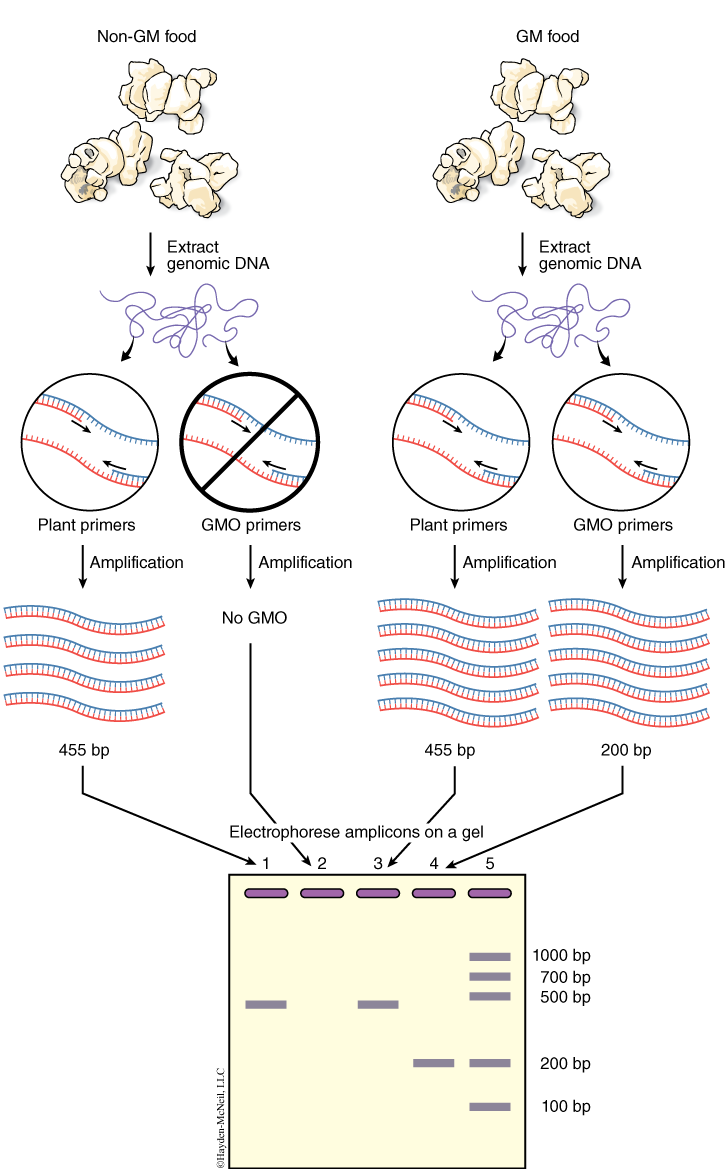
You will isolate genomic DNA from your food items. You will amplify this DNA using two kinds of primers. The first set of primers is specific for plant sequences, called PSII primers. The second set of primers, GMO primers, is specific for GMO sequences. If genomic DNA was properly isolated, then all plant-containing foods should produce a PCR product (amplicon) with the PSII primers, which are specific for sequences present in all plants. This amplicon should be 455 base pairs in size (see Figure 4). If GMO sequences are present in the food, then the reactions with the GMO primers should produce an amplicon of 200 base pairs. The GMO primers used in this study recognize regions of the CaMV 35S promoter and the nos gene, not the Bt gene, because these two sequences are present in greater than 80% of known GMO foods. You will run the PSII reaction and the GMO reactions with positive and negative control DNA. What is the purpose of these controls?
Resources
1.1 Lab Preparation
Lab Preparation
Watch the vodcast and read this lab. Write all notes in your lab notebook.
Activity 1: Isolation of Chromosomal DNA from GM Food
Learning Objectives
After successful completion of this activity, you should be able to:
LO97 Draw a flowchart of the steps required to isolate genome DNA from processed foods
LO98 Describe the function of InstaGene matrix
Materials
Possible GM food—provided by the student
InstaGene matrix—tube with 500 μl
Heating block—95–100 °C
Digital balance
Microcentrifuge tubes
Microcentrifuge
Micropipettors, regular tips and wide-bore tips
Micropestles
Place each food item to be tested in a new plastic bag and pulverize it in the bag prior to lab. If the item is large and bulky, you may need to slice it into small pieces or place it in a plastic bag and hammer it to break it up into smaller pieces. All items that you use in your food preparation, for example, a knife, should be thoroughly washed and preferably cleaned with 10% bleach prior to use (this destroys any contaminating DNA present).
Prevent cross-contamination! PCR is a very sensitive technique, so use sterile technique throughout this process and, as much as possible, while handling your food items. Any contamination of one food item with another can lead to erroneous results.
Activity 1 Procedure
Homogenization of Food (Steps 1–4)
Each group will bring two food items to lab and test them for the presence of GMOs. In this part of the procedure you will grind up your food further in preparation for DNA isolation and purification. Use a separate pestle for each of the two samples that you prepare.
- Weigh 0.1 g of each food item. Use a separate sheet of weighing paper for each item.
- Place the weighed food items into labeled 1.5 ml microcentrifuge tubes. Using a separate sterile pestle for each, grind the material into smaller pieces for a minute.
- Add 5 volumes of sterile water (5 ml per every gram of food stuff) and homogenize the material to make a slurry. Record the amount of water that you added.
- Add as much as an additional 5 volumes of sterile water and homogenize until the food is smooth enough to be pipetted.
DNA Isolation and Purification (Steps 5–10)
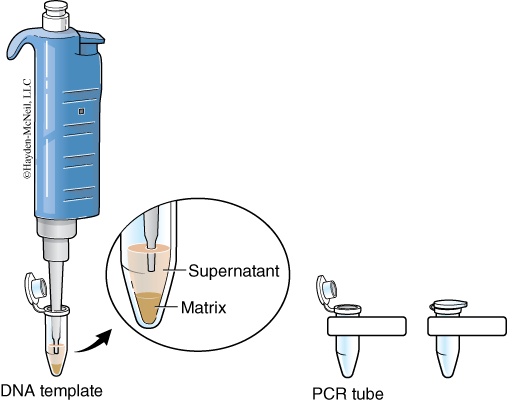
The cellular contents that you are releasing from homogenizing your samples contain enzymes (DNAses) that can degrade the DNA you are attempting to extract. The InstaGene matrix is made of negatively charged microscopic beads that “chelate” or grab metal ions such as Mg2+, which are needed as cofactors in DNAse reactions. By binding these ions, DNA can be extracted with little enzymatic degradation. Boiling is another technique that destroys these enzymes. After centrifuging the samples to remove the InstaGene matrix and debris, the supernatant will contain extracted genomic DNA (Figure 5) ready for amplification.
- Label two tubes each containing 500 μl of InstaGene beads for food item 1 and food item 2. Pipette 50 μl of each food slurry into the correct tube of InstaGene beads. Use wide-bore tips to pipette the slurry if necessary.
- Mix the contents by inverting or vortexing the tubes a few times. Shake the tubes to bring all droplets to the bottom.
- Incubate the tubes in a 95 °C heating block for 5 minutes. Use forceps to remove the samples and allow them to cool briefly at room temperature.
- Spin the samples for 5 minutes at maximum speed (~13,000 rpm) in the microcentrifuge. During the 5 minute spin, label two new microcentrifuge tubes DNA 1 and DNA 2.
- Following centrifugation, carefully remove 100 μl of supernatant from the top of the InstaGene beads without disturbing them. This supernatant contains your purified chromosomal DNA. Note that the InstaGene beads have formed a pellet at the bottom of the tube.
- Place your DNA tubes on ice. Your DNA is ready to be amplified.
Activity 2: Amplification of Template DNA
You will determine whether your food samples contain GMO sequences by amplifying the DNA of the food in two different PCR reactions using two different master mixes. The master mixes contain all the reagents necessary for the amplification process except template DNA, but one master mix contains the PSII primers and the other the GMO primers. The master mix has been prepared for you at 2× concentration. When your sample DNA and master mix are combined, all the components needed for gene amplification are present. Your samples are ready to be placed into a thermal cycler that will heat and cool them in a carefully regulated sequence resulting in exponential rates of DNA amplification for the primer sequences. You will review this process in detail in Activity 3.
Learning Objectives
After successful completion of this activity, you should be able to:
LO99 Write out the ingredients in master mix and state the function of each component
LO100 Prepare samples for amplification in the thermal cycler
LO101 Diagram or sketch the cycling steps of the thermal cycler and what occurs during each
LO102 Describe the role of the plant PSII and GMO primers in the PCR reactions
Materials
GMO-positive DNA template
GMO-negative DNA template
2× PCR master mix + plant PSII primers (2 tubes per group)
2× PCR master mix + GMO primers (2 tubes per group)
Activity 2 Procedure
- Place four tubes of master mix on ice, two each with 10 μl of 2× PCR master mix + PSII primers and two each with 10 μl of 2× PCR master mix + GMO primers.
- Label the tubes with your section and group number and with the kind of DNA sample each will contain. There are two master mix tubes for each DNA sample, one containing PSII primers and one containing GMO primers. You should have two kinds of DNA samples, making a total of four tubes.
- Add 10 μl of your DNA 1 sample isolated from food item 1 to one of the master mix + PSII primers. Add 10 μl of your DNA 1 sample isolated from food item 1 to one of the master mix + GMO primers.
- Repeat this for the DNA 2 sample isolated from food item 2. You should have two PCR reactions for each of your DNA samples, one using PSII primers and the other using GMO primers.
- Flick each tube to mix the contents. Place the tubes in adaptors in the microcentrifuge to prevent loss of your samples. Briefly spin down the contents by holding the momentary (MOM) button.
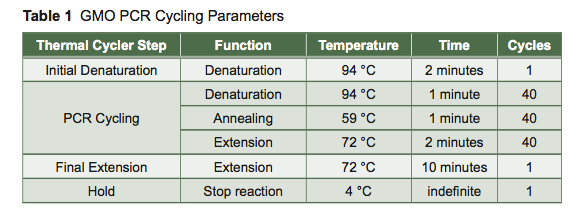
- Place the PCR tubes in the box on the instructor bench. The samples will be placed in the PCR machine for you by the professional staff and amplified according to the PCR cycling parameters in Table 1. Place your leftover DNA samples in the other side of the same box for storage.
- At the end of the cycling, the machine will hold the PCR samples at 4 °C. The samples will be removed and frozen until the next lab period.
Activity 3: Gel Electrophoresis of Amplicons
In this activity, you will run your amplicons (amplified DNA) on a 2% agarose gel and look at the resulting pattern of PCR products. You will use a DNA marker to size your fragments and determine whether the GMO genotype appears in any of your food items. The sizes of these DNA fragments are rather small—less than 500 base pairs. Small DNA fragments resolve better on a higher percentage agarose gel (such as 2%) or a polyacrylamide gel. The pore size of the gel matrix for polyacrylamide is smaller than that for agarose. Agarose is normally used for DNA and polyacrylamide for proteins, because DNA molecules are much larger in size on average than most individual proteins. Proteins or DNA can be electrophoresed in either type of gel matrix.
Learning Objectives
After successful completion of this activity, you should be able to:
LO103 Calculate the amount of agarose needed for a given % gel
LO104 Describe how to prepare an agarose gel
LO105 Load samples into the wells of an agarose gel and run the gel
LO106 Calculate the amount of loading dye needed to add to samples to produce a final concentration of 1×
LO107 Describe the role of all the reagents in agarose gel electrophoresis: SYBR Safe, bromophenol blue and xylene cyanol dyes, agarose, and 1× TAE buffer
LO108 Photograph DNA fragments in a gel using a Gel DOC and save as a graphic file
LO109 Label the sizes of the standard bands in the DNA marker based on a key
Materials
Amplicons (from Activity 2)
Micropipettes
Microcentrifuge
6× Loading dye (contains glycerol and the two dyes, bromophenol blue and xylene cyanol)
2% agarose gels containing Sybr Safe, 8 wells, 1 per group
Agarose
10× TAE buffer
Activity 3 Procedure
Preparation of a 2% Agarose Gel (Steps 1–6)
- The agarose gel has been prepared by a previous lab section or professional staff and should be ready to load. You will prepare a 2% agarose gel for the section to follow. Work carefully; your instructor will evaluate your technique.
- Make 400 ml of 1× TAE from the 10× TAE and RO water provided.
- Weigh ______ g of agarose powder into a 250 ml flask to make a 2% gel in 50 ml 1× TAE.
- Plug the flask with a paper towel and microwave it until the agarose dissolves (i.e., boiling).
- Allow the agarose to cool to 65 °C on the bench (~5 minutes), while you set up your casting tray with comb.
- Once the agarose solution is cool, add 4 μl SYBR Safe to it and swirl quickly to mix. Pour the gel into the casting tray. Allow the gel to solidify for 20 minutes, then remove the tray and wrap it in plastic wrap for the next lab section.
Higher percentage agarose gels (>2%) are harder to make than lower percentage (<1%) gels. You may need to bring the agarose to a second boil to ensure that all of the agarose is in solution. The agarose should be clear when completely dissolved.
Running the Amplicons on a Gel (Steps 7–14)
- While the gel is setting, retrieve your PCR samples and thaw them at room temperature. Add enough 6× loading dye to each of your samples to bring the final concentration to 1×. You will add ___ μl of 6× loading dye to the 20 μl sample for a total volume of ___ μl.
- Line up your samples (containing loading dye) in a rack in the order in which they will be loaded onto the gel along with the DNA marker.
- Pipette each sample into the correct well according to the gel loading key provided in lab. Load the DNA marker as well.
- Place the lid onto the electrophoresis tank so that the connector covers make proper contact with the gold tank connectors: red to red and black to black.
ALWAYS double-check your connections. DNA will travel toward the positive (red) electrode so make sure that the wells of the gel are near the negative (black) electrode.
ALWAYS watch the gel for the first 5 minutes of a run to ensure that the DNA is migrating in the right direction.
ALWAYS turn off the power before disconnecting the leads or removing the lid.
- Attach the leads to the power supply: red to red and black to black.
- Switch to the low setting on the power supply. Turn on the power and turn the knob until the display reads 140 Volts. Make sure that you see a stream of bubbles coming up from the electrodes in the tank. If not, check your lead and lid connections.
- Run the gel for the time designated by your instructor (~ 45–60 minutes).
- During the gel run, complete the data analysis for the transformation lab Activities 1 and 3.
Viewing the Amplicons on the Gel (Steps 15–17)
- Turn off the power at the end of the gel run. Wearing gloves, remove the casting tray containing the gel. Place it in a tray for transport.
- View the gel under ultraviolet light using the Gel Logic 100. Invert image contrast on the computer screen using the software so that the bands appear black on a white background. Save your gel picture to your section folder on the desktop in graphic format (TIFF or JPEG). Your instructor will print a copy of the picture for each group member (4 per page). The graphic files will also be uploaded to Blackboard.
- Discard your gel in the proper waste once you are done (make sure you saved the picture before discarding the gel).
Data Analysis
- Return to your bench with your gel picture.
- Label the lanes of each well and note which lanes have DNA present.
- Label the fragment sizes of your DNA standard using your marker key.
- Make a table in your lab notebook and collect the data from each of your samples.
- Place the data for each group, as well as that from the controls, into the class spreadsheet.
- Analyze your results by considering the following questions:
- Did your test foods 1 and 2 produce amplicons with the GMO primers? If so, what were their approximate sizes? What does this result tell you about the presence of GMO in your food?
- Did your test foods produce amplicons with the PSII primers? If so, what were their approximate sizes? The PSII-specific PCR reactions serve as your positive control. In what way do they allow you to interpret your results from that of your GMO-specific PCR reactions?
- What additional information would be useful in the confirmation of test foods as positive for GMO?
- What are some suggestions for improving this lab?
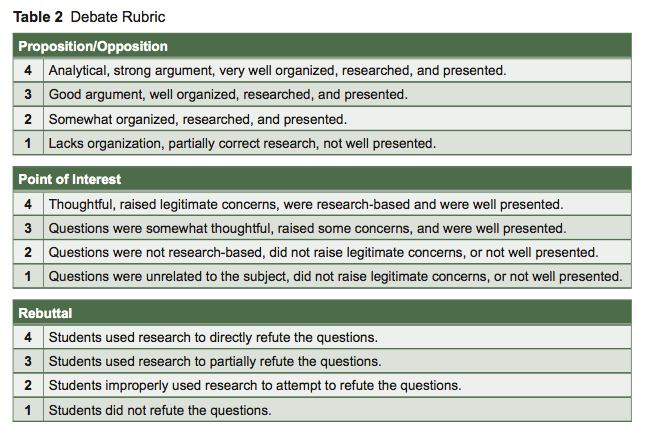
Activity 4: A GMO Debate
Do you approve of the use of genetically modified crops? Some have suggested that these crops may lead to “super weeds” from cross-pollination with herbicide-resistant crops, or “super bugs” that will evolve resistance to pesticides or insecticides. Many people are concerned about potential allergic reactions to these new proteins or other unforeseen effects on public health. However, proponents of genetically modified foods argue that these crops are actually better for the environment. Fewer toxic chemicals are used in their growth. Modified crops can preserve arable land by reducing the stresses on the land. Genetically modifying plants can improve the nutritional value of food in developing countries, and allow crops to be grown on previously unfarmable land. What do you think? Can you defend both sides?
Prior to Lab
- Prepare a proposition or opposition for the use of genetically modified crops within our society.
- Conduct research using the pro/opp data sheet below.
- Compile the research from all your group members.
- Write a 3-minute statement and assign components for each group member to present.
Pro/Opp Data Sheet
- List reasons why we should use GM crops (include references). Find research that supports each of these propositions. Include the citation for each reference.
- List reasons why we should NOT use GM crops (include references). Find research that supports each opposing viewpoint. Include the citation for each reference.
During Lab
On the day of lab, the instructor will assign each of the six lab groups as either for or against the use of genetically modified crops.
- The 1st proposition will be heard, and then the 1st opposition, then the 2nd proposition, 2nd opposition, 3rd proposition, and 3rd opposition will be heard. A 3-minute maximum time limit for each will be enforced by the instructor. Each group should take notes and grade the other groups using the rubric provided.
- There will be a 5-minute break. During this time, prepare one POI (point of interest) for the opposing groups. These are used to highlight weak points in the opponent’s argument.
- Each group will have the opportunity to present a POI to one of the three opposing groups.
- The opposing group will be given the opportunity to offer a brief rebuttal to the POI.
- Each group will be graded by their instructor, their peers, and their group members (see Table 2 for a debate rubric).