Online Presentation Platforms
Printed Page 234
Online presentation platforms include videos, pod/vodcasts, Webinars, and graphical presentations, any of which may be streamed in real time or recorded for later delivery.
Video
Many people get their message out by presenting it visually via video: from individuals using a personal Flip camera or Web cam, to professional companies sending out messages using high definition digital video cameras. With video capture software, such as CamVerce and Debut, you can seamlessly incorporate video clips into an online presentation.
You can also use video capture software, dedicated screencasting software, to create screencasts. A screencast captures whatever is displayed on your computer screen, from text to slides to streaming video. Screencasts can be streamed in real-time or recorded for playback or export to a hosting Web site. The screencast format is especially useful for training purposes. For example, a presentation relying on screen captures can be used to demonstrate how to create a screencast using QuickTime Player on the Mac.
Podcasts and Vodcasts
A podcast is a digital audio recording of a speech or presentation captured and stored in a form that is accessible via the Web. A vodcast (also called vidcast and video podcasting) is a podcast containing video clips.
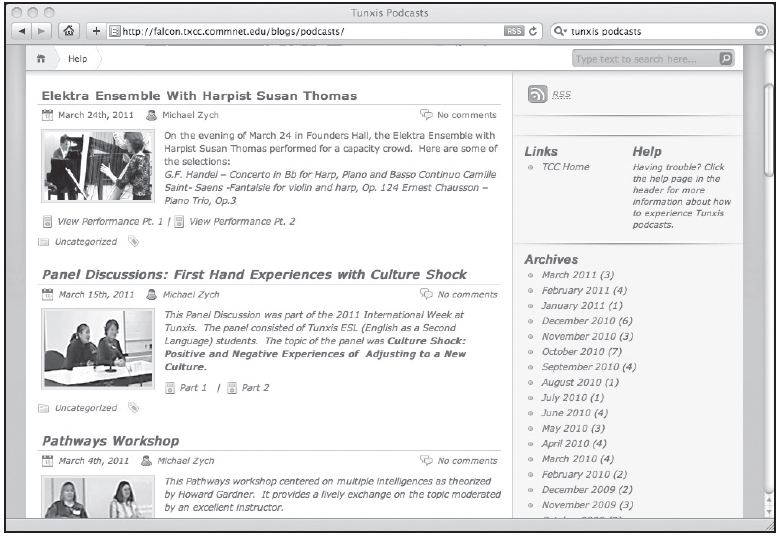
News sites, government information repositories such as the Library of Congress (www.loc.gov/podcasts/), and academic institutions offer countless examples of podcasts and vodcasts (see Figure 26.1). Commercial recording outlets such as iTunes also provide a wide selection of pod- and vodcasts.
Recording, storing, and delivering a speech via podcast requires a microphone attached to a computer; simple, cost-free digital audio recording software (e.g., Audacity); and a Web site to host the podcast and provide your audience with access to it. Using PowerPoint, you can use the “Record Narration” feature in the slide creation function to produce a podcast-like presentation file; the file can be used and distributed as you would any PowerPoint file, even via e-mail.
Checklist: Creating a Podcast
Checklist: Creating a Podcast
Most current models of desktop, laptop, and tablet computers include the basic equipment and software needed to create a podcast. The only other pieces you may need are an external microphone and audio recording software such as Audacity (http://audacity.sourceforge.net/). Then try these steps:
![]() Plan what you want to say.
Plan what you want to say.
![]() Seat yourself in an upright, direct position facing your computer, with the microphone no more than eight inches from your mouth.
Seat yourself in an upright, direct position facing your computer, with the microphone no more than eight inches from your mouth.
![]() Make sure that your external microphone is plugged into your computer, or that your built-in microphone is operational.
Make sure that your external microphone is plugged into your computer, or that your built-in microphone is operational.
![]() Open your audio recording software. Be familiar with how to start, pause, and stop a recording.
Open your audio recording software. Be familiar with how to start, pause, and stop a recording.
![]() Activate the recording software and begin speaking into the microphone. You’re now making your presentation.
Activate the recording software and begin speaking into the microphone. You’re now making your presentation.
![]() At the conclusion of your presentation, stop the recording.
At the conclusion of your presentation, stop the recording.
![]() Save the new recording as an audio file, such as .mp3.
Save the new recording as an audio file, such as .mp3.
![]() Close your audio recording software and disengage the microphone.
Close your audio recording software and disengage the microphone.
![]() Go to the new audio file saved to your computer, and open and play it. Now you are listening to your recorded presentation.
Go to the new audio file saved to your computer, and open and play it. Now you are listening to your recorded presentation.
![]() Transfer the saved file to a Web site, blog, or podcast hosting site.
Transfer the saved file to a Web site, blog, or podcast hosting site.
Webinars
Webinars are real-time seminars, meetings, training sessions, or other presentations that connect presenters and audiences from their computers or mobile devices, regardless of where they are in the world.2 Webinars typically include video capture and screencasting, as well as interactive functions such as chat and polling.
As in any speech or presentation, planning a Webinar starts with considering the audience’s needs and wants. Many Webinars are team presentations, so use the guidelines on p. 245 during the planning stages.3
- Start with a title that indicates what the Webinar will do for the audience (e.g., “How the New Healthcare Regulations Will Affect You”).
- Time each aspect of the Webinar and distribute the following information to each presenter:
Introduction of speaker(s) and purpose
Length and order of each speaker’s remarks
Length of question-and-answer session, if separate
- Rehearse the Webinar (remotely if necessary).
- Check meeting room for noise and visual distractions; check equipment.
- Have printouts on hand and create backup plans in case of technical problems.
Quick Tip
Put a Face to the Speaker(s)
To encourage a feeling of connection between yourself and the audience during a Webinar, consider displaying a photographic headshot, captioned by your name and title. A second slide might announce start and finish times; a third, a list of speech objectives.4 During the presentation, you can alternate displays of text and graphic slides with views of your photograph (and/or other presenters) or, in some cases, side-by-side with the aids.