Compose a Presentation in Prezi
In contrast to applications like PowerPoint and Keynote that operate from software on a desktop, laptop, or tablet computer, Prezi is a Web-based application that requires only an Internet connection. Another key difference is that instead of the “slide” format of PowerPoint and Keynote, Prezi utilizes a “canvas” format. Whereas the slide format provides a relatively lockstep or linear sequence moving from one slide to the next, the canvas format follows a continuous path, presenting a stream-like flow from one path point to another, zooming in or out, scrolling up or down, and panning across the canvas to provide transitions among points.
Getting Started
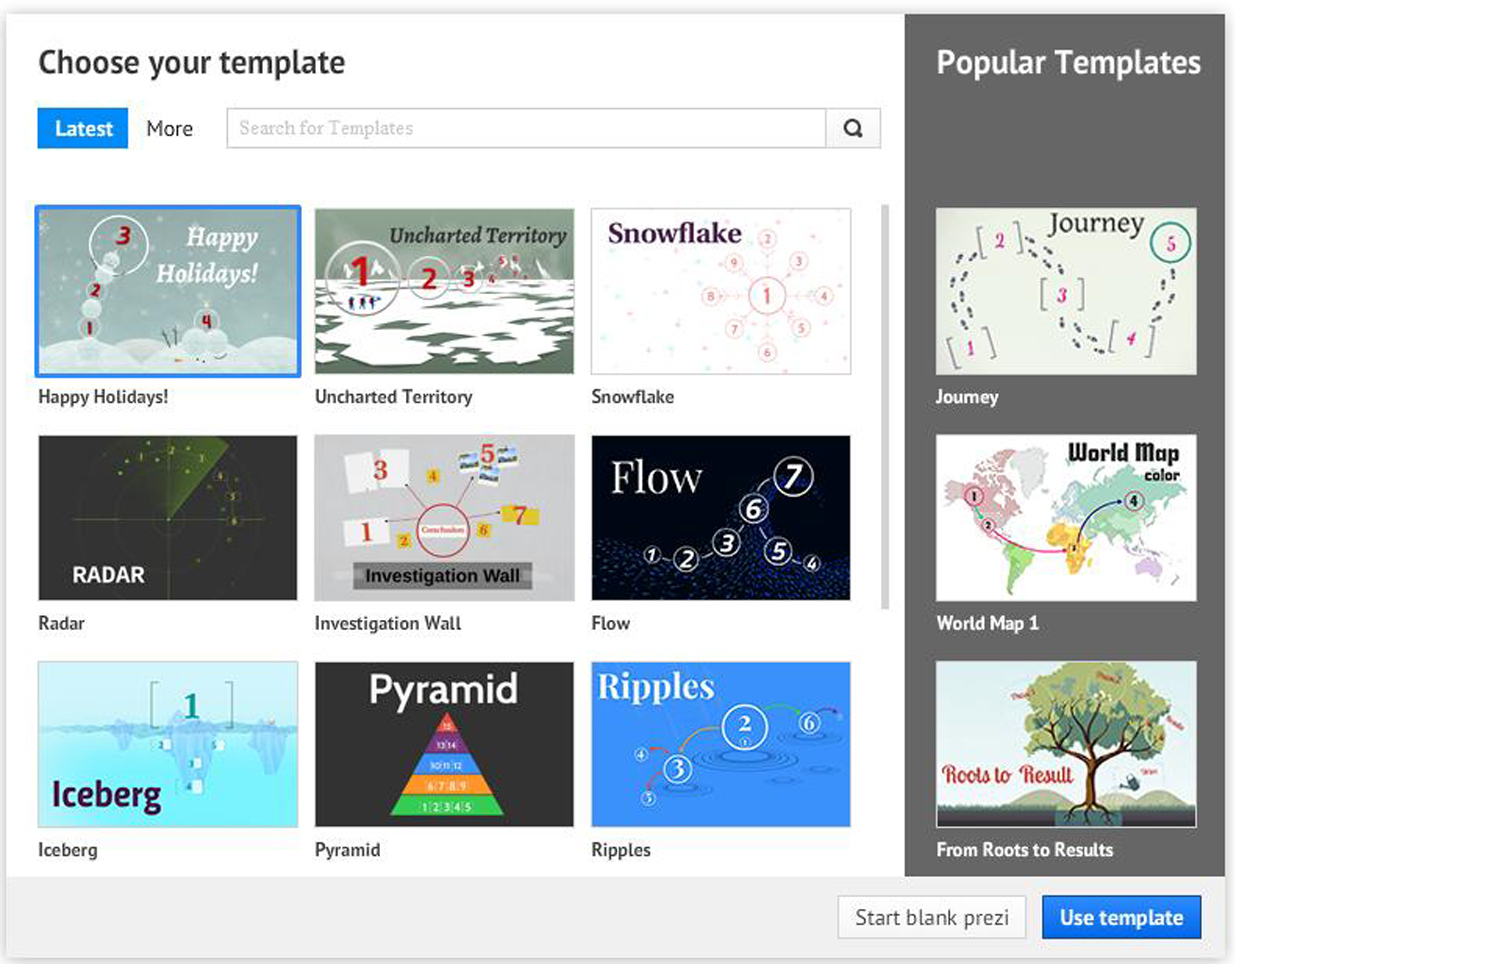
To begin composing a Prezi presentation, go to www.prezi.com. Press the Get Started button. You can sign up with a free account, or click the Student and Teacher Licenses button to register a student account. Once logged in, you will see a screen labeled All Prezis. Click the New Prezi button to open a new presentation. On the next page you can select a template similar to those in PowerPoint and Keynote, or opt to start with a blank format. Beginning with one of the dozens of available templates will familiarize you with how Prezi operates before trying a blank canvas.
Menus
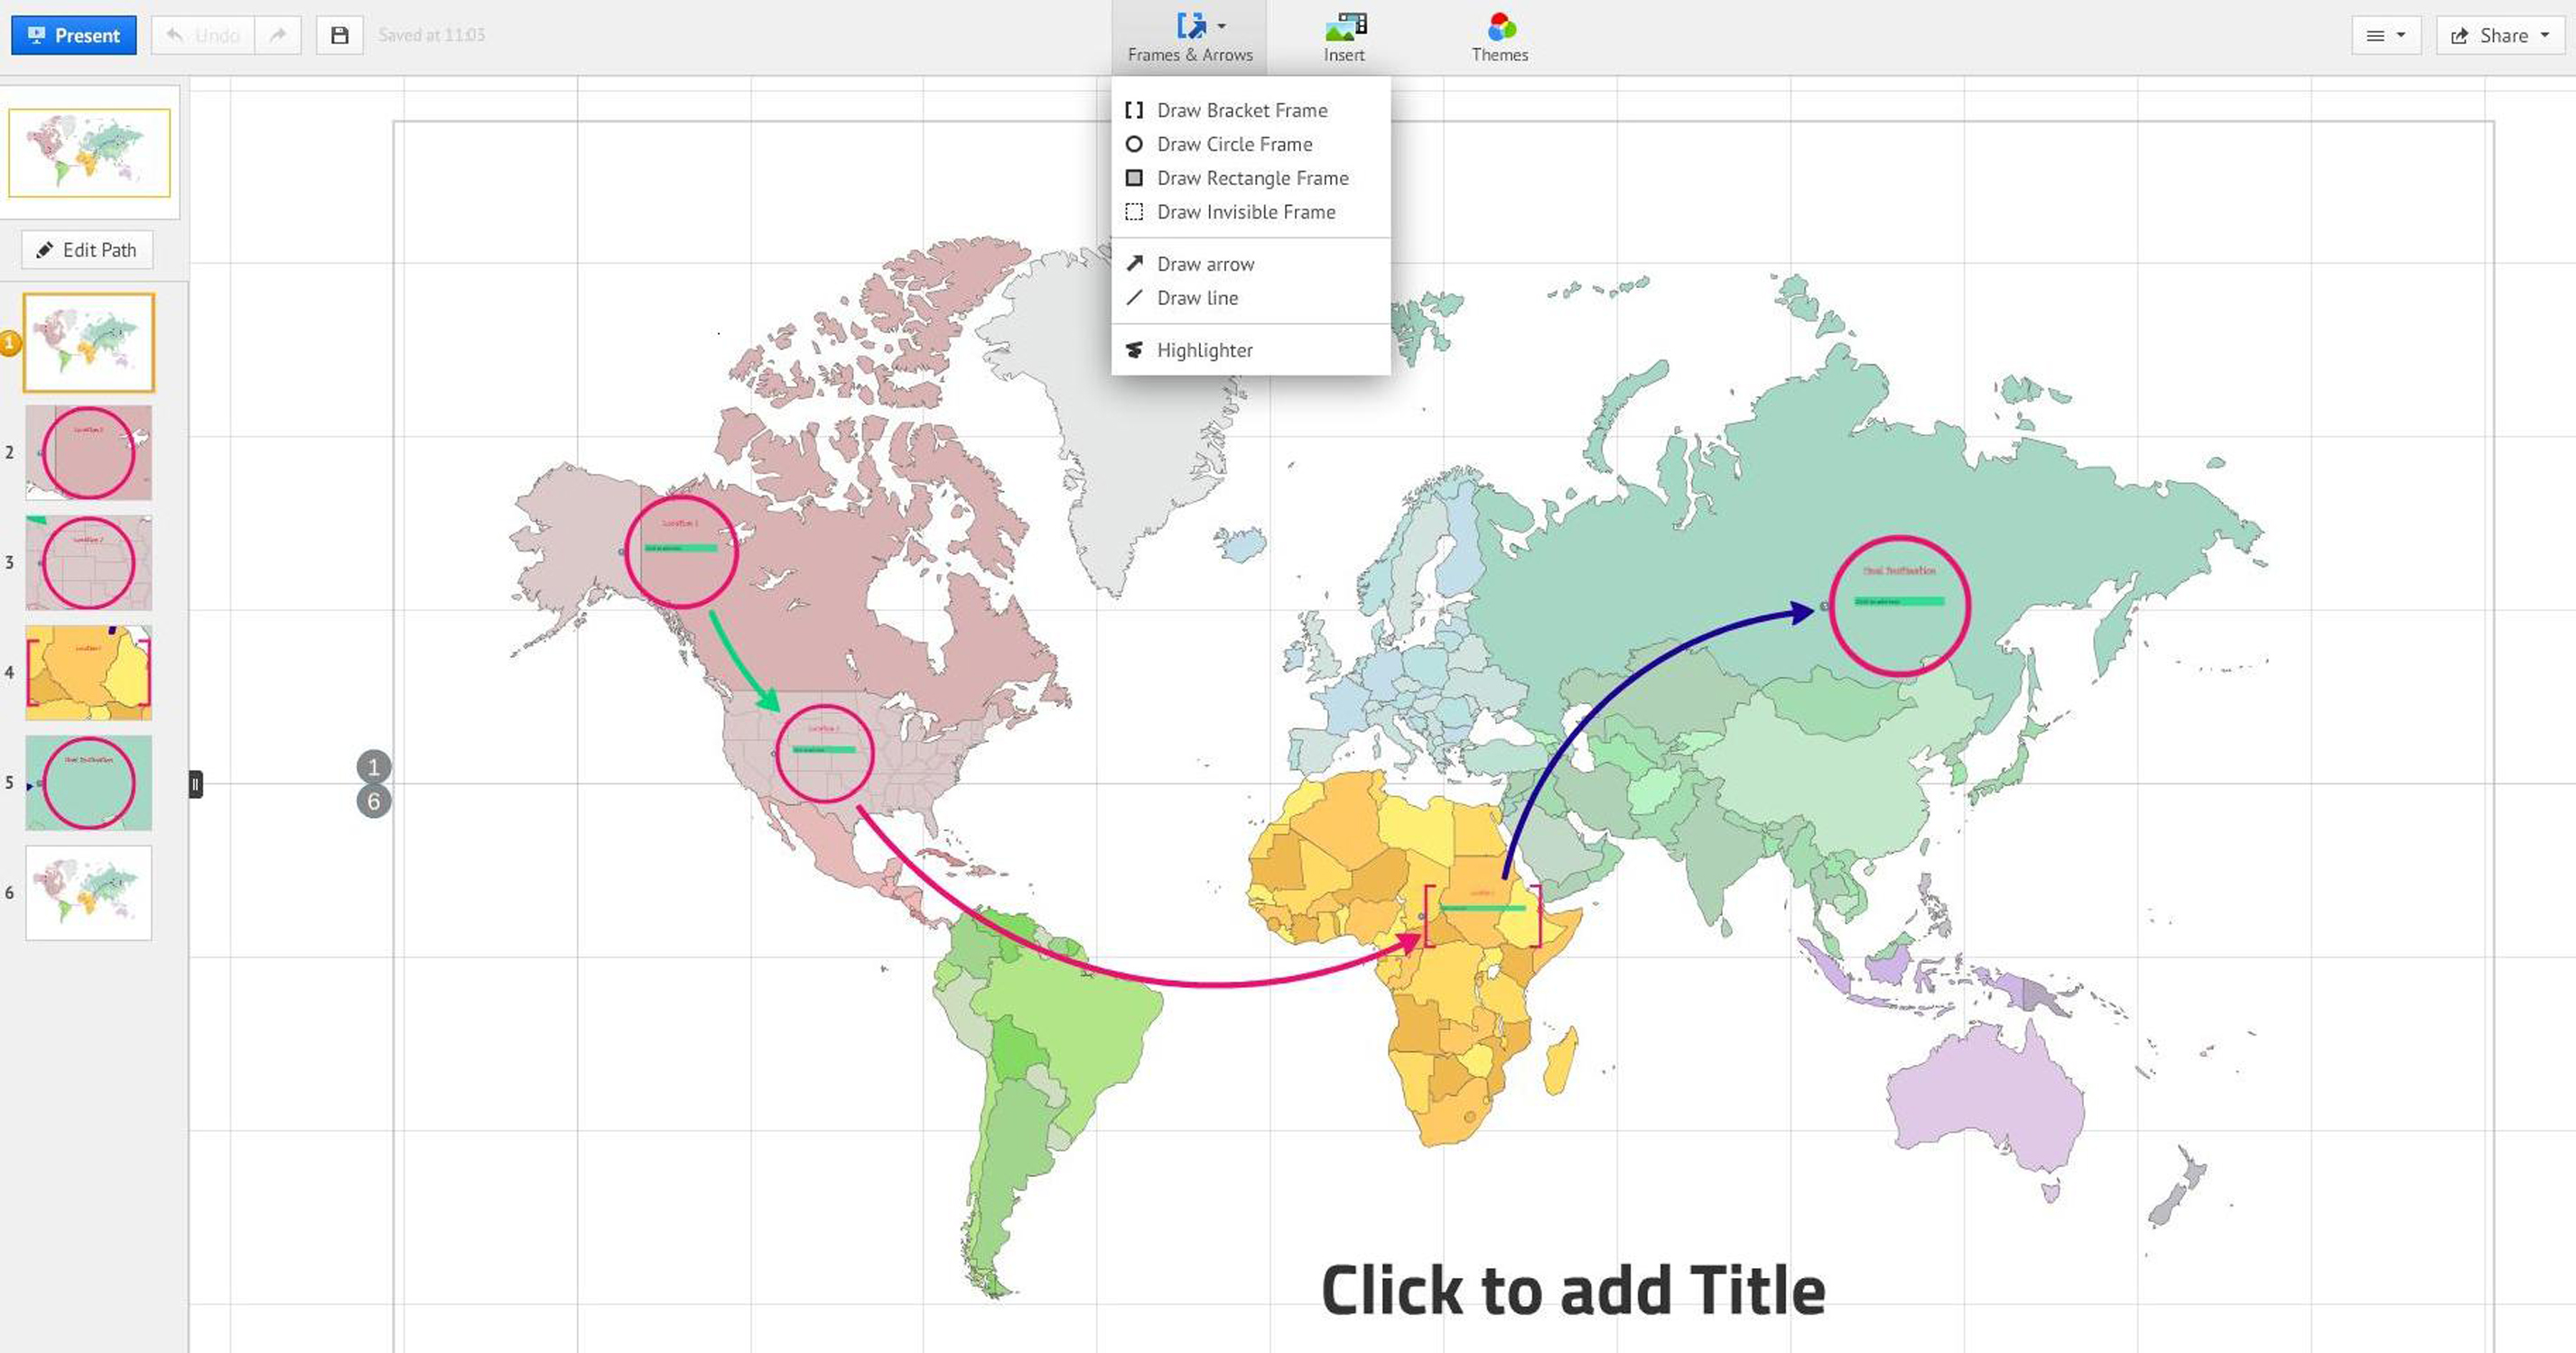
Upon opening a template, you should see in the main panel of the window an overview of the elements of the template. At the top center of the window are three pull-down menus giving you options to modify frames and arrows; insert objects such as media, pictures, and hyperlinks; and select from various themes to change colors to preset formats. The Present button at the top left of the window is to put your Prezi into presentation mode, as your audience will see it. Next to it are a button to undo the last action taken in composing your Prezi and a button to save your work. At the top right of the screen is a help and support menu (the one with three short horizontal lines), a menu for selecting different ways to share your Prezi, and a button to close out of the current Prezi session. Place your cursor over the center of the right-hand margin of the screen to see a set of zoom buttons. These are useful to move in and out of different parts of your presentation.
Path Points
In PowerPoint and Keynote, the left-hand pane in the slide editing view shows the thumbnail images of the series of slides comprising the presentation. In Prezi, the left-hand pane shows thumbnail images of the path points in the presentation. Path points serve the same purpose as slides—presenting the key and supporting points of information constituting the body of your speech. The first thumbnail, path point 1, is the overview of the entire canvas, highlighting each path point with a number corresponding to its position in the sequence pane on the left-side pane. Clicking on either the thumbnail images or on the numbered path points in the overview activates a zoom-in view of that path point. This view allows you to edit the text and other objects for that portion of your speech content.
Inserting Objects
As with PowerPoint and Keynote slides, a Prezi template has labeled fields where you can add text and other objects. To add a shape, image, or media file to a Prezi presentation, click the Insert menu at the top of the window and select the type of object—Image, Symbols & Shapes, Diagram, YouTube video, Background Music, Document or Media file, or even PowerPoint file. To insert a picture from your own digital photo file, for example, select Image in the Insert menu. A task pane will open on the right-hand side of the window. You have options to select files, search for images on the Web, or use images already provided by Prezi. Click Select files if you are using your own picture. This will open the Explorer (on Windows) or Finder (on Macs) on your computer where you can access your photo files. Select the preferred file and click Open. The image will appear in a new frame in the path point you are editing. Follow similar steps to add other objects as support material in your Prezi presentation.
Navigation
In the overview (path point 1), click any object to reveal the Navigation tool, consisting of three buttons—a plus (+) sign, a hand icon, and a minus (–) sign—arranged in a vertical rectangle, hovering over or in the object selected. Clicking the plus sign zooms into or enlarges the object, and the minus sign zooms out of or reduces the object. Clicking the home button reverts to the full overview of the canvas. Clicking and holding down the frame surrounding the object will enable resizing the object. Similar functions are accessible in the Frames & Arrows menu at the top of the window.
Clicking on an object frame brings up another part of the Navigation tool containing a Zoom button, an icon that activates a shape selection menu, and a Delete button. This is the Transformation tool. It enables the selection, sizing, and moving of the frame and the text or objects in it. The frame shape can be changed from rectangular to circular, for example. The Zoom button will bring the object to nearly full screen to view space for other elements and objects that can be used as path points in the presentation. Other editing functions can be activated when clicking on the object in close view. For example, a text editing tool will appear when you click anywhere inside the frame so that text can be added to the object.
You can also navigate the canvas and frames with mouse gestures. Scroll forward or backward with your index finger to zoom in and out. Click and hold, then move the mouse left or right, up or down to pan across the canvas.
To view your Prezi as your audience will see it, click the Present button at top left of the screen. The Prezi will open in full screen, with a dialog box asking whether you want to stay in the full screen mode, which also gives you keyboard control of the presentation. Click Allow. Your presentation will begin with the path point you were on when you clicked Present. Be sure to begin with path point 1, the overview (you can easily zoom out to the overview using mouse gestures as noted earlier). Two directional arrows are located at the footer of the screen. Click the right arrow to proceed forward through your path points. Click the left arrow to back up or repeat. As you proceed through your speech, click to the path point in your Prezi that corresponds to where you are in your speech.