14.3 
How Can 3D Modeling and Visualization Be Used with Geospatial Technology?
ArcGlobe a 3D visualization tool used to display data in a global environment, which is part of Esris ArcGIS program
ArcScene the 3D visualization and design component of Esris ArcGIS program
There are numerous 3D design and modeling programs on the market today, and many commercial geospatial programs offer some sort of capability of visualizing or working with 3D data (and there’s no way this chapter can get into all of them). For instance, Esri’s ArcGIS program contains the 3D Analyst extension, which enables numerous 3D features related to terrain and modeling, but also two other interfaces for working with 3D data—ArcGlobe and ArcScene. As its name implies, ArcGlobe allows for 3D visualization on a “global” level. If you’re examining 3D surfaces and objects in Los Angeles, you can fly north across the globe to view other 3D spatial data in San Francisco, then continue north to look at the landscape in Seattle. ArcGlobe functions like a virtual globe program, and works with all types of Esri file formats (such as 3D shapefiles). ArcScene contains a full set of 3D visualization tools for ArcGIS, and allows for the same type of 3D modeling, except on a “local” scale. If you were modeling one section of a 3D Los Angeles, that’s the extent of the data you’d be working with.
SketchUp a 3D modeling and design software program distributed online by Trimble
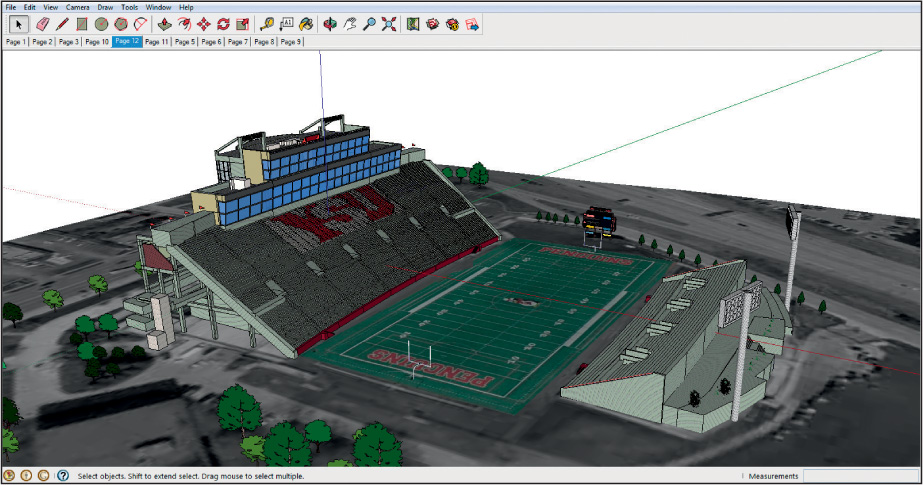
Google Earth also supports 3D visualization. Back in Geospatial Lab Application 1.1: Introduction to Geospatial Concepts and Google Earth, we examined a 3D representation of places in South Dakota. Google Earth contains many more 3D objects, and features representations of 3D buildings and structures across the world (buildings in New York City, London, and other cities around the world). It’s easy to create 3D objects, structures, buildings, landforms—and more—through the use of the SketchUp software program and then view them in Google Earth. The regular version of SketchUp (called “SketchUp Make”) is made freely available for download by Trimble (SketchUp was formerly owned by Google), while a Pro version with additional features is available for purchase (you’ll be downloading and using the free version of SketchUp in this chapter’s Geospatial Lab Application). SketchUp is a very versatile (and intuitive to use) program that allows for a full range of 3D design capabilities. Structures created with SketchUp can be as realistic and detailed, or as basic, as you want them to be. See Figure 14.7 for an example of a football stadium in SketchUp.
452
Shapes can be molded, extruded, bent, and moved to build any type of structure you can envision. Realistic textures can be applied to faces for a better appearance, and digital photos can also be resized and applied to a face for a more photo-real appearance. SketchUp also features a process called Match Photo, which enables you to design the polygon dimensions of a building straight from a digital photo. From there, the photo can be directly applied to the faces for a realistic-looking 3D design.
components pre-designed (or user-designed) objects in SketchUp
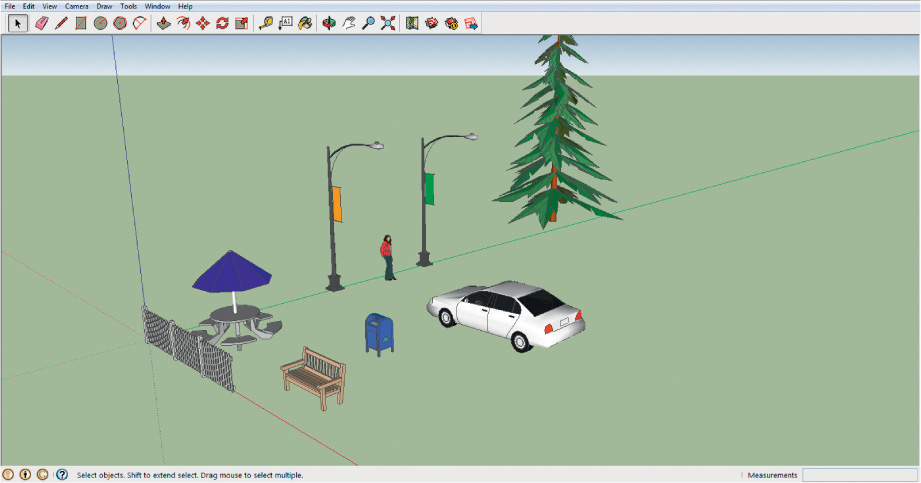
SketchUp also enables the use of components (or pre-made 3D objects) for added realism and detail in designing 3D models. Components give you a quick way to insert trees, cars, furniture, landscaping, and similar features into 3D models (see Figure 14.8 for examples of components used in SketchUp). Like other 3D objects, components are constructed using shapes and textures, but can be stored for re-use throughout the construction of a model. For instance, if you’re designing a 3D version of a car dealership, you can quickly add a couple dozen different car components and customize them, rather than design each 3D car model individually. Components are also useful for elements you’ll use multiple times in a model. For example, if you’re designing a 3D version of a school building, you could design a window once, store it as a component, and then easily re-use the same model of a window multiple times around the school.
453
SKP file the file format and extension used by an object created in SketchUp
Geospatial Lab Application 14.1 will introduce you to several aspects of using SketchUp for 3D design. You’ll begin with a building’s footprint, use tools to create a shape, design elements of the building (such as the entranceway), and adapt components to fit in with your own ideas. A file created with SketchUp (like the one you’ll make in the lab) uses the “*.skp” file extension. The SKP file consists of information about the polygons that make up the structure, the textures applied, and the geometry of how these objects fit together. However, the SKP format is native to SketchUp. You (or whoever you share your data with) have to be running SketchUp to open and examine an SKP file. In addition, you can open only one SKP file at a time, which causes some difficulties if you’ve designed multiple buildings that go to make up a city block (each in its own SKP file) and want to see how they look next to one another.
KMZ a file that is the compressed version of a KML file
KML Keyhole Markup Language—the file format used for Google Earth data
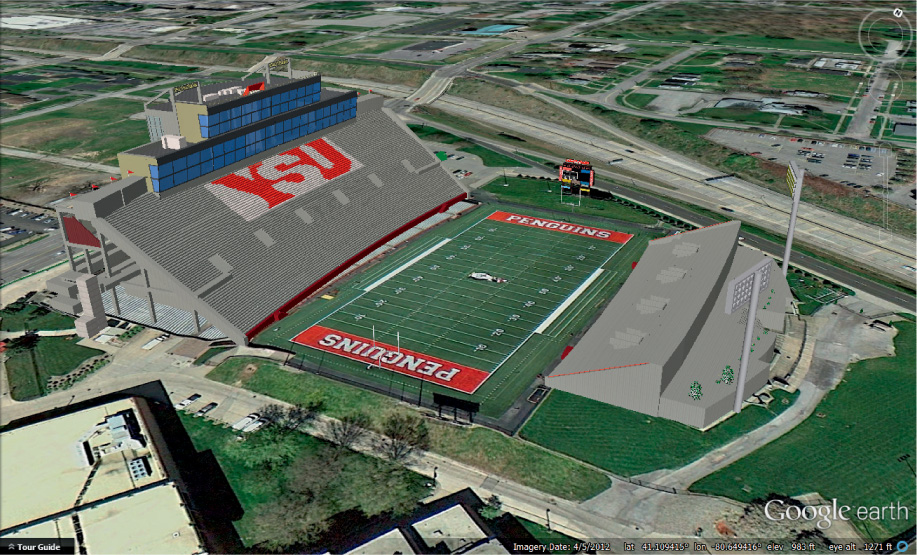
One way around these issues is to convert the SKP files into another format called a KMZ, which can be used in Google Earth. Each building becomes its own KMZ file, and many KMZ files can be opened at once in Google Earth. KMZ is a compressed version of another file format called KML, which is short for Keyhole Markup Language. KML and KMZ are file formats that can be interpreted using Google Earth. By converting an SKP file into a KMZ file, your SketchUp model can be viewed interactively in Google Earth. Figure 14.9 shows an example of this—Youngstown State University’s stadium complex (containing both sides of the stadium, stadium lights, scoreboard, and goal posts) was converted from an SKP file into a KMZ file. The KMZ file can be opened in Google Earth, which overlays the 3D model of the stadium over the Google Earth imagery, and allows the user to rotate around the stadium, fly across the field, zoom into a bleacher seat, or utilize any of the other usual uses of Google Earth. KMZ has become a standard for creating objects or overlays to view in Google Earth—other file formats can be converted to KMZ (such as satellite imagery), and then be placed or draped across Google Earth (recall how you examined KMZ files of EOS imagery in Google Earth in Geospatial Lab Application 12.1).
454
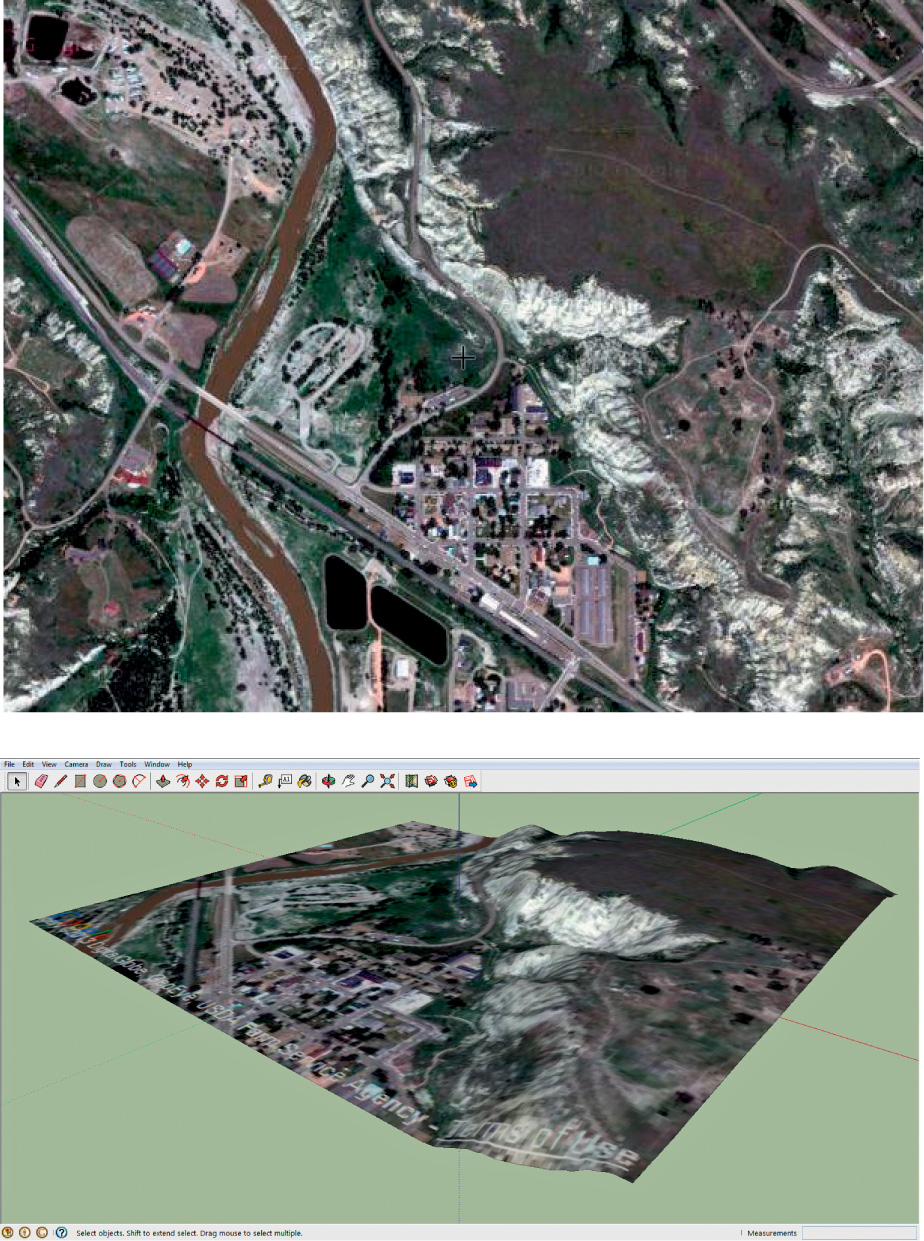
The big question that should be asked at this point is: How does Google Earth know where properly to place that KMZ file? If Google Earth knows just where to place it, the Youngstown State University stadium must have had some sort of spatial reference attached to it, so that it ends up placed over the imagery of the stadium’s location and not at some random point on the globe. The best way of going about this is to know the object’s spatial location before you start to do any modeling—otherwise, you’ll find yourself trying to georeference the 3D model’s location after the fact. SketchUp works hand in hand with Google Earth to obtain this data. SketchUp has the capability to take a “snapshot” of imagery (like the area you can see with Google Earth), and to import that snapshot into SketchUp (complete with a model of the terrain being shown, and the relevant spatial reference information). With SketchUp, you’ll have a color overhead image with spatial reference information to use as a starting point for your modeling efforts (see Figure 14.10 for examples of this geolocation). When you’ve completed your work in SketchUp, you can convert your SKP file (*.skp) into a KMZ file (*.kmz), which will then contain the necessary information to place the model in its proper spatial location in Google Earth. This is how you’ll begin 3D modeling in Geospatial Lab Application 14.1—first by obtaining a “snapshot” of the overhead view of the building, and then by creating the building’s footprint from this starting point.
455
3D Warehouse Trimbles online repository of 3D objects created using SketchUp
With the popularity of SketchUp and Google Earth, it’s become easy for people to create spatially referenced data in SketchUp, and then place it in Google Earth. To help facilitate the use of the programs (and to help foster a geospatial 3D modeling community), Trimble maintains an online 3D Warehouse as a central repository of 3D models from users around the world. In the 3D Warehouse, you can find new components, objects, and a wide variety of 3D buildings, ranging from state capital buildings to national monuments, sports arenas, and many other architectural constructions from around the world. SketchUp makes it easy to interact with the 3D Warehouse—the software allows you to upload your model to the warehouse and to download items from the warehouse either into SketchUp or directly into Google Earth. The 3D Warehouse is a great resource for models created by users of all levels of ability, and the site contains guidelines on how to model for inclusion into Google Earth (see Hands-on Application 14.2: Digging into Trimble’s 3D Warehouse for more information about the 3D Warehouse).
456
 HANDS-ON APPLICATION 14.2
Digging into Trimble’s 3D Warehouse
The Trimble 3D Warehouse is full of all sorts of 3D models from around the world. To start digging through the 3D Warehouse, open your Web browser and go to: http://sketchup.google.com/3dwarehouse. Take a look at several of the categories, starting with “Popular Models,” “Featured Collections,” and “3D Building Collections.” Each category contains several subcategories (such as Cathedrals and Churches of the World, and Sports Venues of the World), which contain numerous 3D models that users have uploaded to the Warehouse. Take a look at some of them, select their particular Warehouse page, and then download the model (you’ll see the option for it on its page) into Google Earth, so that you can interact with it.
Expansion Questions:

Question
Look for structures and buildings of your local area in the 3D Warehouse, and download them into Google Earth. What types of structures have been created and uploaded to the 3D Warehouse for your own local area?
-
Question
Search for the model of “Christ the Redeemer,” the famous statue in Rio de Janeiro, Brazil. Download the model and view it in Google Earth. Zoom in to view the statue and its surroundings overlooking Rio de Janeiro. What other features did the designer of the model create besides just the statue itself? Why is this?
With these types of 3D modeling and design techniques, all manner of 3D features can be created and utilized with other geospatial data. It’s one thing to look at a flat map of a university campus, but it’s another thing entirely to have it laid out in a realistic 3D environment that you can interact with. Prospective students are likely to get a better sense of place by viewing a 3D representation of their dorms and understanding where they are in relation to the urban areas surrounding the campus. The same idea holds true for designing any area in interactive 3D (see Hands-on Application 14.3: 3D Hawaii for an example of this).
HANDS-ON APPLICATION 14.3
3D Hawaii
For an interactive example of 3D with Google Earth, open your Web browser and go to http://3dhawaii.com. Note that you’ll first need to load the Google Earth plug-in (see also Hands-on Application 1.8: The Google Earth Plug-In) in order to work with this Website (you can download and install the plug-in from http://www.google.com/earth/explore/products/plugin.html). From the available options, you can select an island (Oahu, Maui, Hawaii Island, Kauai, Molokai, or Lanai), and view the island’s building features and natural landscape in interactive 3D. The main window will let you pan and zoom around your chosen island the same way you can in Google Earth. Check out the variety of features available in interactive 3D, and select the option for 3D Tour to take an animated tour around various parts of your island.
Expansion Questions:
-
Question
What are some of the advantages of using 3D models of resort areas as a marketing tool, rather than just using 2D maps and photographs?
-
Question
How are features such as palm trees, pools, fountains, and hotel windows visualized in 3D in these models?
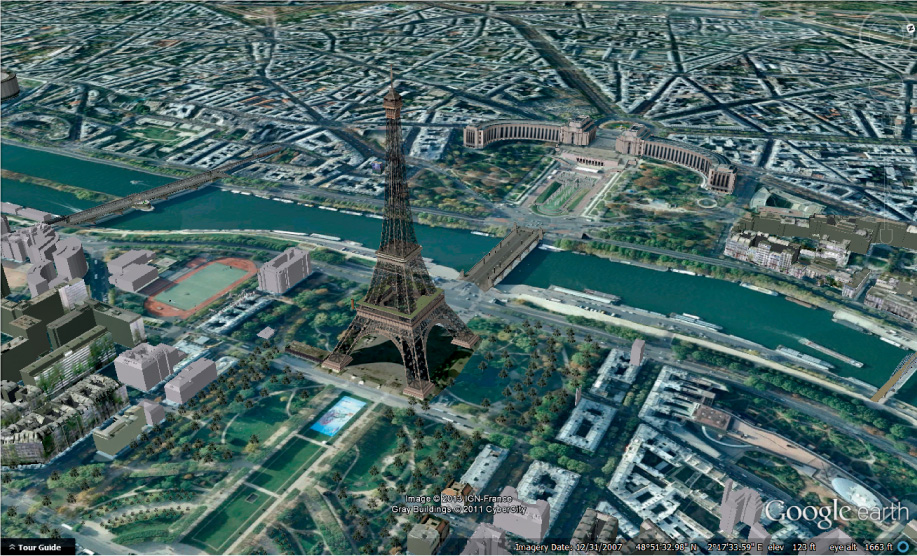
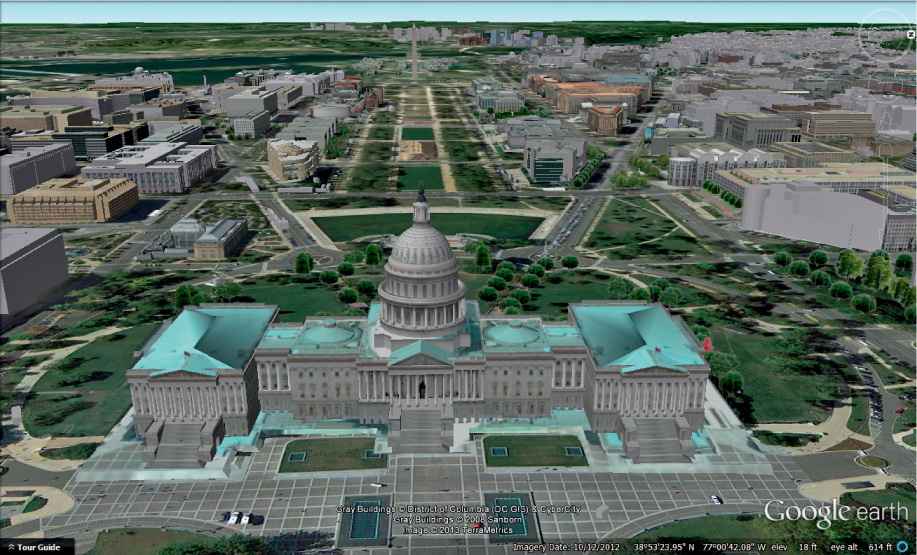
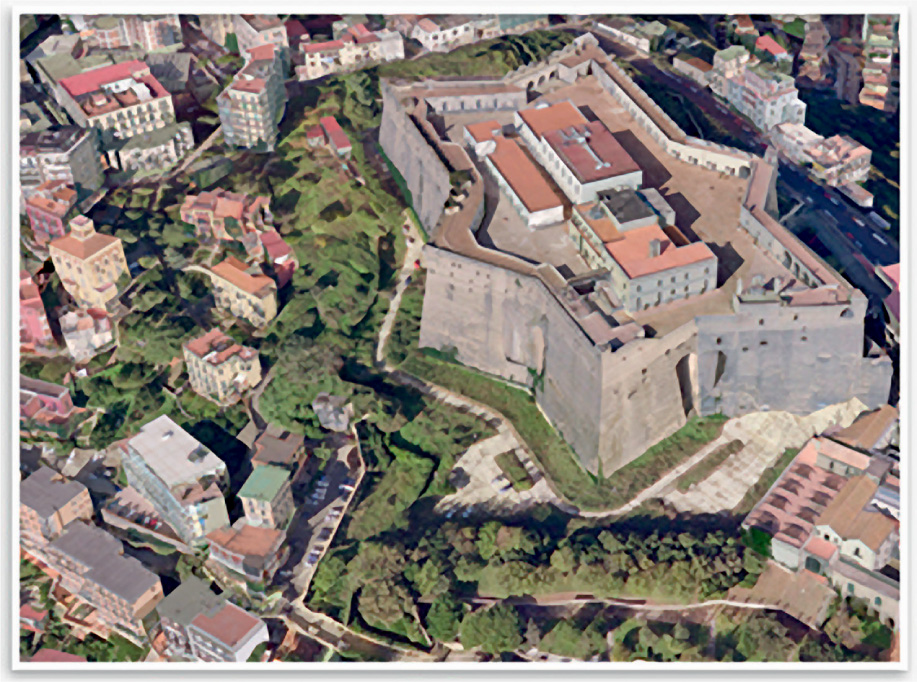
Future planning efforts can be better implemented when the planners can actually see the visual impact that various types of building plans would have on the neighborhood (with respect to height, texture, and landscaping). With 3D geospatial data, the locations of items and structures can be seen in relation to each other and to the surrounding terrain. For example, in Google Earth, turning on the “3D Buildings” layer activates a wide range of 3D content tied to spatial locations that you can interact with (see Figure 14.11 below and 14.12 for examples of rendered 3D features in a geospatial technology environment, and Hands-on Application 14.4: 3D Buildings in Google Earth for how to interact with this data in Google Earth). 3D modeling techniques, and other methods of shaping and designing geospatial data are advancing rapidly. Esri’s CityEngine program enables users to work rapidly on the construction of entire rendered 3D cities, without having to extrude and model individual buildings. Other companies, such as PLW Modelworks, utilize remotely sensed imagery and aerial photography to create remarkably realistic large-scale 3D models (see Figure 14.13 for an example).
457
458
HANDS-ON APPLICATION 14.4
3D Buildings in Google Earth
Figures 14.11 and 14.12 are both images of 3D buildings in Google Earth, but they’re far from being the only places that have been built and placed in Google Earth. For this application, start up Google Earth, zoom to Boston, Massachusetts, and look around Boston Common and the downtown area. From the available options in the Layers Box (if necessary, see Chapter 1 for more information about Google Earth’s layout), select the option for 3D Buildings and place a checkmark in it. Tilt your view down so you’re looking at Boston from a perspective view, and you’ll see various buildings and structures start to appear in 3D. Fly around the city and see how Boston has been put together in 3D.
When you’re done, try looking at the 3D design of 3D buildings in other cities, such as New York City, Washington, D.C., and Las Vegas, Nevada (as well as non-U.S. destinations like London, United Kingdom, or Moscow, Russia). Check some more cities to see if their buildings have been designed in 3D for Google Earth.
Expansion Questions:
-
Question
Check out your own local city in Google Earth. Has the city been created in 3D for Google Earth? If not, what features of it have been added to Google Earth under the “3D Buildings” option?
-
Question
Use Google Earth to examine the Las Vegas Strip using the “3D Buildings” option. What areas and features of the Strip had to have been designed as 3D models, to accompany the extruded buildings with textures added to them?
459