 1.1 Geospatial Lab ApplicationIntroduction to Geospatial Concepts and Google Earth
This chapter’s Geospatial Lab Application will introduce you to some basic concepts of geospatial technology through the use of the Google Earth software program. This lab also provides an introduction on how to use Google Earth, and will help familiarize you with many of its features. Although the Geospatial Lab Applications in later chapters will use a variety of software packages, you’ll also be using Google Earth in many of them. The investigations in this introductory lab may seem pretty basic, but labs in later chapters will be more in-depth, and will build on concepts learned here.
Objectives
The goals for you to take away from this lab are:
 to familiarize yourself with the Google Earth (GE) environment, basic functionality, and navigation using the software.
- to use different GE layers and features.
Using Geospatial Technologies
The concepts you’ll be working with in this lab are used in a variety of real-world applications, including the following:
- Cable and network news, which frequently incorporate Google Earth imagery or flyovers into news segments to show areas of interest, to demonstrate visually the spatial relationships or distances between cities, or to make visual links between locations of news items.
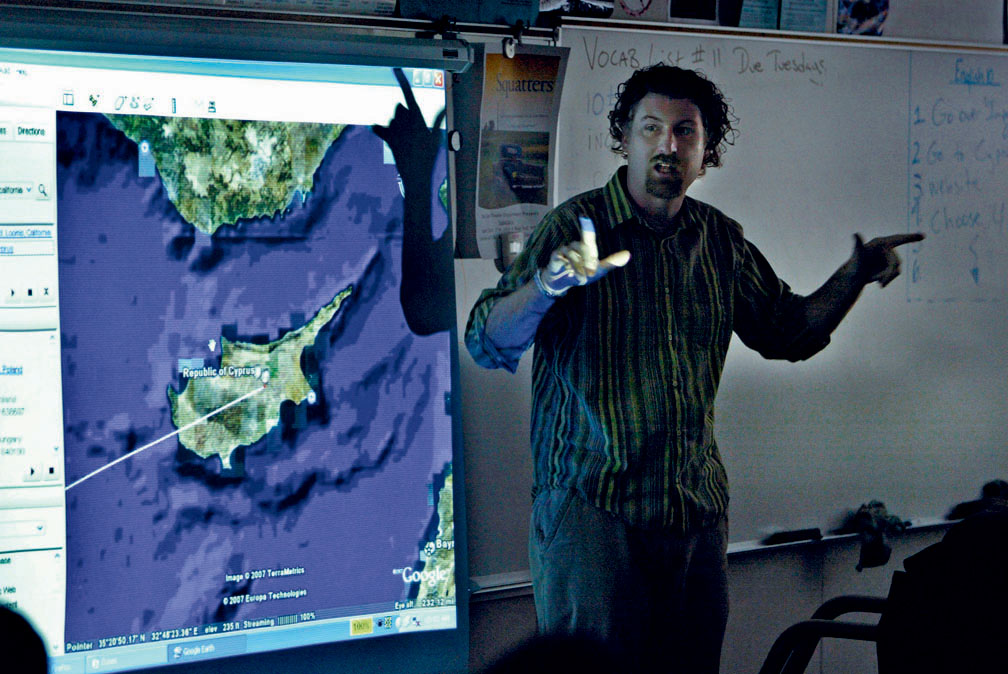
- K–12 teachers utilize Google Earth imagery (overhead views, 3D models, flyovers, or directions) to help illustrate a variety of concepts in class, including geography, history, and science.
20
Obtaining Software
Google Earth (the current version, 7.1) is available for free download at http://earth.google.com.
Important note: Software and online resources sometimes change fast. This lab was designed with the most recently available version of the software at the time of writing. However, if the software or Websites have significantly changed between then and now, an updated version of this lab (using the newest versions) is available online at http://www.whfreeman.com/shellito2e.
Lab Data
There is no data to copy in this lab. All data comes as part of the GE data that is installed with the software or is streamed across the Internet when using GE.
Localizing This Lab
Although this lab visits popular locations in a tour around South Dakota, the techniques it uses can be easily adapted to any locale. Rather than using GE imagery and features of South Dakota, find nearby landmarks or popular spots and use GE to tour around your local area.
1.1 Starting to Use Google Earth
- Start GE (the default install folder is called Google Earth). GE will usually open with a startup tip box, which you can close. Also, make sure the GE window is maximized, or else some features may not show up properly.
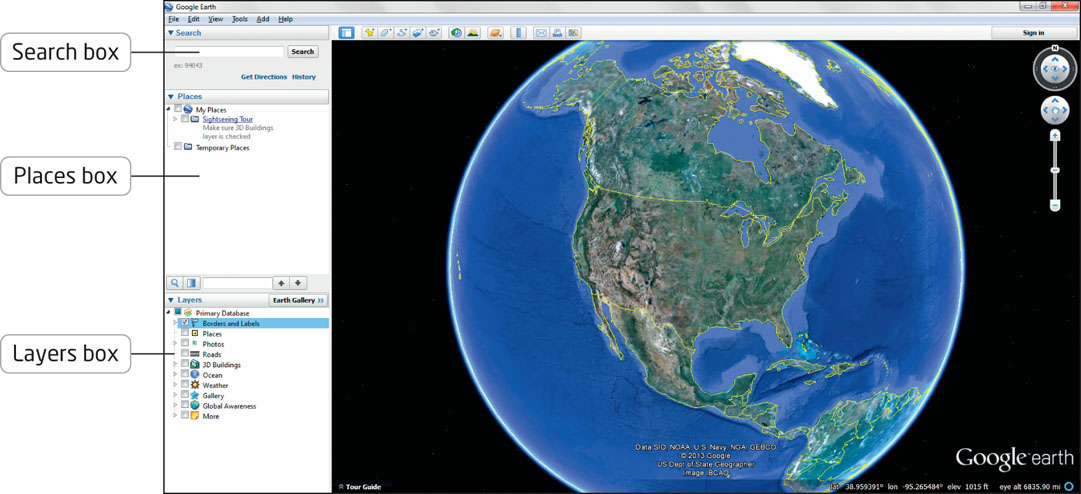 (Source: Google Earth, Data SIO, NOAA, U.S. Navy, NGA, GEBCO, US Dept of State Geographer)
A popular use of GE is to view the ground (whether physical landscapes or structures) from above by using the aerial photography or satellite imagery streamed in from Google’s servers. The Search box is used for this. - In the Search box, type in Mitchell, SD. Next, click on the Search button.
- GE will rotate and zoom the view down to eastern South Dakota. One of the popular attractions in Mitchell is the Corn Palace, a historic building of fanciful design that now serves as a civic arena, presenting cultural and sports events, and attracting the attention of millions each August when the murals that cover the building’s façade (which are completely constructed from corn) are reconfigured to illustrate the theme of that year’s Corn Palace Festival. More information about the Corn Palace is available at http://www.cornpalace.com/index.php.
- In the Layers box, place a checkmark next to Panoramio Photos. This enables linking of locations on the ground to photos that users have taken. The locations that have linked photos have small blue squares over the imagery. You’ll see numerous photo locations clustered together in one place—that would be the Corn Palace. Double-click on some of them to see some photos (taken from the ground) of the Corn Palace.
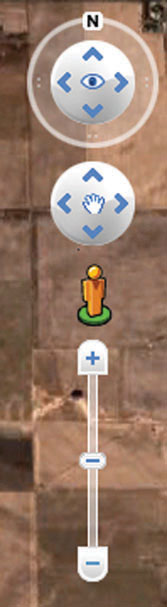
- In GE, you can rotate and zoom your view to get a closer look at the imagery on the ground. Move the mouse to the upper right-hand side of the screen and a set of controls will appear. These fade out when not in use and reappear when the mouse rolls over them.
- There are five controls. The first one (the ring with the N at the top) allows you to change the direction you’re facing. Grab the N with the mouse (by placing the pointer on N and holding down the left mouse button) and drag the N (that is, slowly rotate it) around the ring (this is commonly called “grab and drag”). You’ll see the view change (north will still be the direction in which the N is pointed). Clicking on the N will return the imagery so that the north direction is facing the top of the screen.
 (Source: Google)
 - The second control is the Look control (the arrows surrounding the eye). By selecting one of the directional arrows and pressing it with the mouse, you can tilt your view around the terrain as if you were standing still and looking about. You can also grab the control and move it (by holding down the left button on your mouse), to simulate looking around in various directions.
- The third control is the Move control (the arrows surrounding the hand). By grabbing this control, you can pan around the imagery in whichever direction you choose.
- The fourth control is the Street View icon (the yellow figure of a human—referred to as the “pegman”—standing on a green circle). This icon will appear when Google Street View imagery is available to see on the ground. We’ll spend more time on Google Street View in Chapter 8, as it’s a utility that allows you to see what places look like as if you were standing on the street in front of them. To use Street View, you would grab the icon from the controls with the mouse and drag it to a street that’s visible in the view to enter the Street View mode. This control will only be visible if there are streets in the view through which you can enter Street View mode (which is why you won’t initially see it when you start GE and are looking at the entire planet).
- The last control is the Zoom Slider. By pushing forward (moving the bar toward the plus sign), you zoom in, and by pulling backwards (moving the bar toward the minus sign), you zoom out. By default, when GE zooms in, it tilts the terrain to give you a perspective view, rather than looking from the top directly down. To always use the top-down option rather than tilting the ground when zooming, select the Tools pull-down menu and choose Options. In the dialog box that appears, click on the Navigation tab, and then select the radio button that says “Do not automatically tilt when zooming.” To have GE tilt while zooming, select one of the other radio buttons.
- You can also use the mouse for navigating around GE. Grab the imagery and drag it to sweep across the map. To zoom in and out, roll the mouse wheel back and forth. Pan and zoom over to the location of the Corn Palace. To confirm that you’re in the right place, type the address of the Corn Palace into the Search box as follows: 604 North Main Street, Mitchell, SD 57301 (GE will automatically adjust to that location).
- For now, turn off the Photos options by removing the checkmark from the box).
- Zoom in on the Corn Palace so that it fills most of the view and you can make out some details about it.
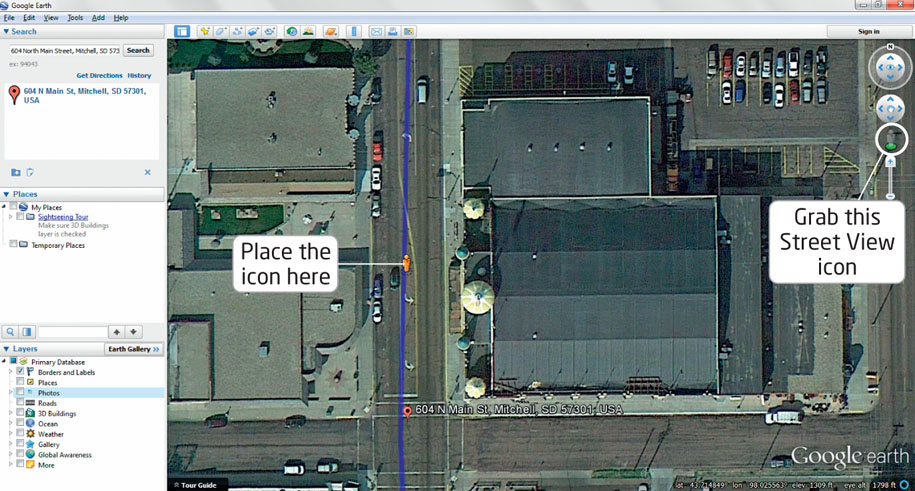
- Grab the Street View icon from the controls and drag it to the street right in front of the Corn Palace. You’ll see the street turn blue (this indicates that Street View imagery is available for this street). Release the icon on the street and the view will shift from an aerial view to imagery that looks like you’re actually standing on Main Street in front of the Corn Palace.
 (Source: Google)
 - In this Street View, use the mouse to pan around the image (you can see 360 degrees around your position) until you can see the entrance of the Corn Palace. You can pan and zoom with the mouse as necessary (and also click on the road—or elsewhere in the image—to advance your view).
- Examine the Corn Palace and its surrounding area. Then answer Question 1.1. To return to the aerial view, click on the Exit Street View text in the upper right corner of the Street View. We’ll do more with Street View (and street networks) in Chapter 8.
Question 1.1
By being able to view the Corn Palace from above and from standing on the ground in front of it, what details from the aerial view can help identify just what the building is? (You may need to switch back and forth between the aerial view and the street view to answer this question.)
- When dealing with remotely sensed imagery, it’s important to consider that you’re viewing the ground from above and that many features you can view from a street level are difficult to perceive from an aerial view. Chapter 9 delves further into interpreting aerial images, and offers some strategies and tips for doing so, while Chapter 10 deals with how this type of remotely sensed imagery is acquired. Chapters 11 and 12 explore the acquisition of imagery from various satellites.
- Here’s another way of looking at the Corn Palace—a 3D representation. From the GE Layers options, select 3D Buildings. A 3D representation of the Corn Palace will appear on top of the imagery of the building. Use the zoom and tilt controls and navigate around the building to get a better look at the 3D model of the Corn Palace, including its façade and turrets. Note that if the 3D model of the Corn Palace doesn’t appear, select the Tools pull-down menu, select Options, then select the 3D View tab, and make sure a checkmark is not in the Use 3D imagery (disable to use legacy 3D buildings) box. After viewing the 3D model of the Corn Palace, turn off the option for 3D Buildings when you’re done.
- There are numerous buildings and objects that have 3D representations designed for use in GE. In Chapter 14, you’ll investigate more about working with 3D versions of geospatial data, as well as constructing your own 3D buildings and viewing them in GE.
1.2 Finding Your Way Around with Google Earth
- From the Layers box, turn on the Roads layer. You’ll see major Roads (interstates, state highways) identifiable as their labels appear, and local roads will be identifiable too when you zoom in close.
- We’re going to leave the Corn Palace behind and continue west through South Dakota to Wall Drug, a famous tourist location. More information on Wall Drug can be found at http://www.walldrug.com.
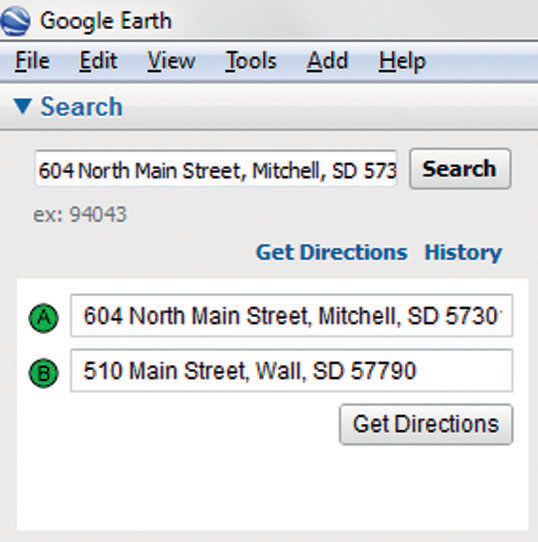
- In the Search box, click on the Get Directions option.
- In the A option (this is where you’re traveling from), type in the Corn Palace’s address as follows: 604 N Main St, Mitchell, SD 57301.
- In the B option (this is where you’re traveling to), type in Wall Drug’s address as follows: 510 Main Street, Wall, SD 57790.
 (Source: Google)
 - Click the Get Directions button. GE will zoom out to show you the path (in purple) it has calculated for driving distance between the Corn Palace and Wall Drug, while the Search Box will fill with directions featuring stops and turns along the way.
Question 1.2
By viewing the expanse of South Dakota between Mitchell and Wall, you’ll realize there are many possible routes between the two. Why do you suppose GE chose this particular route to go from the Corn Palace to Wall Drug?
Question 1.3
Based on the route that GE calculated, what is the driving distance (and approximate time equivalent) to get from the Corn Palace to Wall Drug?
- This capability to take a bunch of letters and numbers and turn them into a mapped location and the capability to calculate the shortest driving distance between points are further developed in Chapter 8. Matching addresses and calculating shortest routes are key reasons for utilizing geospatial technologies, and the Chapter 8 lab will go into more depth on how these types of operations are performed.
- In the Search box, scroll down through the list of directions and click on the Wall Drug address next to B and Google Earth will zoom to Wall Drug’s location. Press the X at the bottom of the Search Box to clear the directions and remove the route.
1.3 Using Google Earth to Examine Landscapes
- There’s a lot more to the South Dakota landscape than tourist attractions. Wall Drug is located in the town of Wall, which is named for the line of magnificent land formations nearby, and lies directly adjacent to Badlands National Park. The Badlands are located to the south and southwest of Wall. For more information about the Badlands visit http://www.nps.gov/badl.
- To see the boundaries of Badlands National Park in Google Earth, go to the Layers box and expand the option for More (click on the triangle to the left of the name). In the options that appear under the expanded heading, put a checkmark in the Parks/Recreation Areas option. Zoom out from the boundaries of Wall, and (to the south) you’ll see the northernmost boundary of Badlands National Park highlighted in green.
- Zoom out so that you can see the entire park in the view. New icons for the locations of Visitors Centers and other features will also appear.
- Pan over to the eastern edge of the park and you’ll see a large Question Mark icon indicating a park entrance as well as a green arrow indicating an overlook.
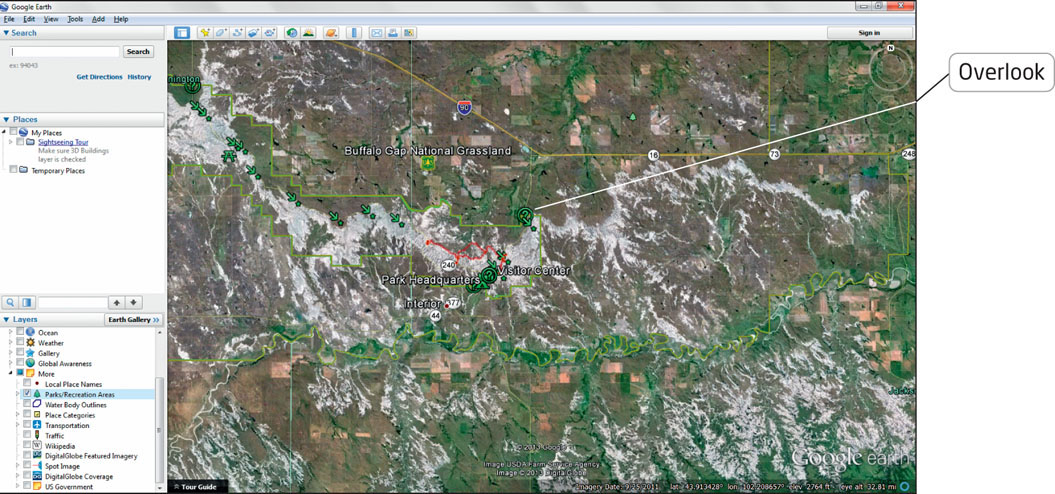 (Source: Google/DigitalGlobe/USDA Farm Service Agency)
 - Zoom in to the point representing the overlook. At the bottom of the view you’ll see numbers representing the latitude and longitude of the point, as well as the real-world elevation of that spot.
Question 1.4
What is the elevation for this particular overlook in Badlands National Park?
- The imagery in GE is placed on top of a model of Earth’s vast array of terrains and landscapes (hills, valleys, ridges, and so on). It’s very difficult to make out the pseudo three-dimensional (3D) nature of the terrain model from above, so use the Zoom Slider to tilt the view down so that you can look around as if you were standing on the overlook point (in a perspective view of the planet). Once you’ve tilted all the way down, use the Look controls to examine the landscape. From here, use the Move controls to fly over the Badlands from this overlook point. When you’re done cruising around the Badlands, answer Question 1.5.
Question 1.5
How does the terrain modeling (with the tilt function) aid in the visualization of the Badlands?
- This ability to model the peaks and valleys of the landscape with aerial imagery “draped” or “stretched” over the terrain for a more realistic appearance is often used with many aspects of geospatial technology. Chapter 13 greatly expands on this by getting into how this is actually performed as well as doing some hands-on terrain analysis.
27
1.4 Using Google Earth to Save Imagery
It’s time to continue to the next leg of our South Dakota journey by heading to Mount Rushmore. Carved out of the side of a mountain in the Black Hills, Mount Rushmore is a monument featuring the faces of presidents George Washington, Thomas Jefferson, Theodore Roosevelt, and Abraham Lincoln. For more information about Mount Rushmore visit http://www.nps.gov/moru.
- In GE’s Search box, type Mount Rushmore. GE will zoom around to an overhead view of the monument. Like the Badlands, Mount Rushmore is a national park—zoom out a little bit and you’ll see the extent of the park’s boundaries (still outlined in green).
- You can also save an image of what’s being shown in the view. GE will take a “snapshot” and save it as a JPEG graphic file (.jpg), which is like a digital camera picture. Position the view to see the full outlined extent of Mount Rushmore, select the File pull-down menu, then select Save, and finally select Save Image. Name the image moru (GE will automatically add the .jpg file extension), and save it to your computer’s hard drive.
- Minimize GE for now and go to the location on your computer where you saved the image, and then open it to examine it (using a simple program like Microsoft Office Picture Manager).
Question 1.6
Note that even though the graphic contains the locations of Mount Rushmore, the outline of the park, and information concerning location (including latitude and longitude, and elevation) at the bottom, it doesn’t have any spatial reference for measurements. Why is this?
- Close the image and return to Google Earth. Even though the saved image doesn’t have any spatial reference, Chapter 3 describes how to take unreferenced imagery (and other unreferenced data) and transform it to match referenced data. In Chapter 3’s lab, you do this in a hands-on fashion. You can also turn off the Parks/Recreation layer for now.
1.5 Using Google Earth to Make Placemarks and Measurements
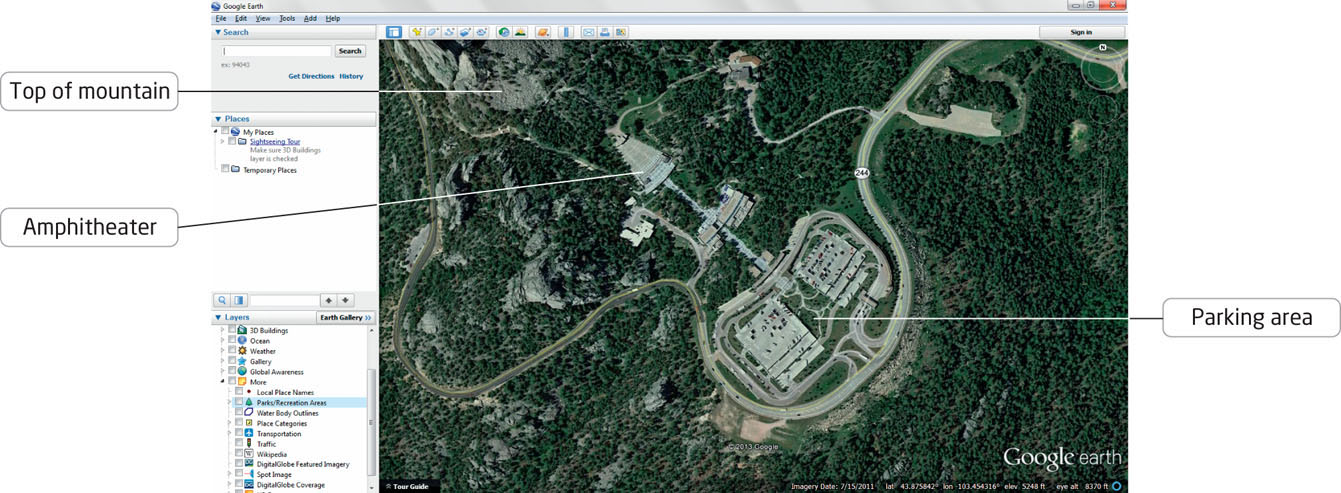
While you’re examining Mount Rushmore imagery, you can set up some points of reference that you can return to. GE allows you to create points of reference as Placemarks. There are three points to mark on the map—the top of the mountain, the amphitheater, and the parking area (see the graphic below for their locations).
28
- From the GE toolbar, select the Add Placemark button:
 (Source: Google)
 - A yellow pushpin (labeled “Untitled Placemark”) will appear on the screen. Using your mouse, click on the Pushpin and drag it to the rear of the amphitheater so that the pin of the placemark is where the path meets the amphitheater.
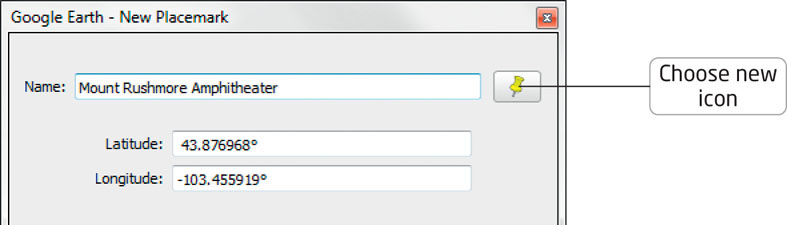
- In the Google Earth New Placemark dialog box, type the name Mount Rushmore Amphitheater.
- By pressing the Placemark icon button next to where you typed the name, you can select a different icon rather than the yellow pushpin. Choose something more distinctive.
 (Source: Google)
 - Click OK to close the dialog box.
- Repeat the process by putting a new placemark at the top of the mountain where the monument is. Name this new placemark Top of the Monument.
- Zoom GE’s view in tightly, so that you can see the two placemarks clearly in the view (with the two placemarks in diagonally opposite corners of the view).
- Next, select the Show Ruler button from the GE toolbar:
 (Source: Google)
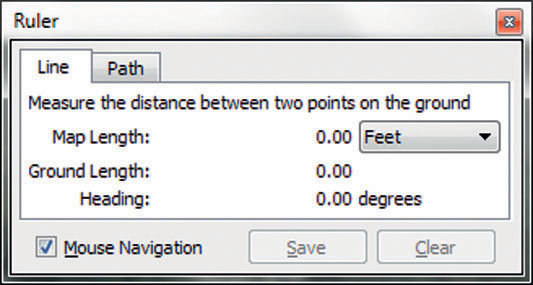
 - In the Ruler dialog box that appears, select Feet from the Length pull-down menu.
 (Source: Google)
 - Use the options under the Line tab. These will let you compute the distance between two points. The Path option will enable you find out the total accumulated distance between more than two points.
- Click the mouse on the point of the placemark in the amphitheater and drag it to the placemark on top of the mountain (your heading should be about 310 degrees or so). Click the mouse at the top of the mountain placemark.
- Answer Question 1.7. When you’re done, click on Clear in the Ruler dialog box to remove the drawn line from the screen, and then close the Ruler dialog box.
Question 1.7
What is the measured distance between the rear of the amphitheater and the top of the monument (keep in mind this is the ground distance, not a straight line between the two points)?
- This ability to create points of reference (as well as lines and area shapes) and then compute the distance between them are functions of a very basic GIS tool, which forms the basis for performing numerous tasks that will be discussed in upcoming chapters. Chapter 5 introduces GIS concepts, Chapter 6 expands on how spatial analysis can be performed with GIS, and Chapter 7 demonstrates how to take your data and create a professional quality map of the results.
- Use the tilt functions of GE to get a perspective view on Mount Rushmore (as you did with the Badlands), and take a look at the mountain from a pseudo-3D view. Make sure the 3D Buildings option is turned off. While you can see the height and dimensions of the mountain, the famous four presidents’ faces can’t be seen, however you zoom or rotate the model.
30
Question 1.8
Even with the terrain turned on and the view switching over to a perspective, why can’t the presidents’ faces on the side of the monument be seen?
- Turn the 3D Buildings option on. If you cannot see the separate Mount Rushmore 3D model (which lets you see the faces), select the Tools pull-down menu, select Options, then select the 3D View tab, and make sure a checkmark is not in the Use 3D imagery (disable to use legacy 3D buildings) box.
1.6 Using Google Earth to Examine Coordinates
- You’ll notice next to the elevation value at the bottom of the GE screen there’s a set of coordinates for lat (Latitude) and lon (Longitude). Move the mouse around the screen and you’ll see the coordinates change to reflect the latitude and longitude of whatever the mouse’s current location is.
- Zoom in closely on the road that enters the parking structure area of Mount Rushmore.
Question 1.9
What are the latitude and longitude coordinates of the entrance to the Mount Rushmore parking area?
- You can also reference specific locations on Earth’s surface by their coordinates instead of by name. In the Search box type the following coordinates: 43.836584, −103.623403. GE will rotate and zoom to this new location. Turn on Photos to obtain more information on what you’ve just flown to. You can also turn on the 3D Buildings layer (if necessary, again using the legacy 3D building option, like as you did with the Corn Palace and Mount Rushmore), to look at the location with a 3D version of it there. Answer Questions 1.10 and 1.11, and then turn off the Photos (and the 3D Buildings option) when you’re done.
Question 1.10
What is located at the following geographic coordinates: latitude 43.836584, longitude −103.623403?
Question 1.11
What is located at the following geographic coordinates: latitude 43.845709, longitude −103.563499?
Chapter 2 deals with numerous concepts related to coordinate systems, reference systems, and projections of a three-dimensional Earth onto a two-dimensional surface.
1.7 Other Features of Google Earth
As noted before, you will be using GE for several other labs in this book and exploring some of these applications of geospatial technology. GE has a multitude of other features beyond those covered in this first lab. For instance, if you had a GPS receiver (say, one from Garmin or Magellan) you could import the data you’ve collected directly into GE.
31
- From the Tools pull-down menu, select GPS. You’ll see several options for offloading information you collected in the field (such as waypoints) from the receiver into GE.
Chapter 4 will introduce you to several concepts related to GPS, as well as collecting data in the field and some pre-fieldwork-planning options. - Close the GPS Import dialog box now (unless you have a receiver you want to plug into a computer on which you can view your data in GE).
There are many other GE layers and features to explore, especially in relation to how geospatial data is visualized. To look at one of these features, return to the Badlands once more and do the following: - In the Layers box, expand the options for Gallery, and then place a checkmark in the box next to 360 Cities.
- Fly back to the Badlands, scroll to the western edge of the park; and you’ll see another symbol on the map—a red circle marked “360.” Hover your cursor over it, and the text should read “Mako Sica aka The Badlands.”
- Double-click on the 360 circle. You’ll zoom down and see a sphere on the surface, and then the view should dive inside the sphere. The view will change to a new view of the Badlands (use the mouse to move about and look around a full 360 degrees). In essence, this tool simulates what the Badlands would look like from that position, all around you. You can look in any direction, as well as zooming in or out of places. Answer Question 1.12. When you’re done looking around, click on the Exit Photo button in the view to return to regular GE. Chapter 14 will present information about some more cool visualization techniques for geospatial data.
Question 1.12
How does the 360-degree image of the Badlands aid in visualizing the scenery (keep in mind this image has been tied to a particular location)?
Geospatial technology is such a rapidly changing field that new advances come quickly. Chapter 15 also explores some of these current developments on the frontiers of geospatial technology.
Google Earth is always changing, and new versions and upgrades are constantly being made available by Google for this program. Some of the newer options you may want to explore are Google Mars, Google Sky, and Flight Simulator.
Google Mars
From the View pull-down menu, select Explore, and then select Mars. The view will shift to the familiar-looking globe, but this time covered with imagery (from NASA and the USGS) from the surface of Mars. The usual controls work the same way as they do with GE, and there’s a lot of Martian territory to be explored. When you’re ready to return to GE, from the View pull-down menu, select Explore, and then select Earth.
32
Google Sky
From the View pull-down menu, select Explore, and then select Sky. GE’s view will change: instead of looking down on Earth, you’re looking up to the stars—and instead of remotely sensed aerial or satellite imagery, you’re looking at space-telescope (including the Hubble) imagery. There’s plenty of imagery to be explored in this new mode. When you want to get back “down to Earth” again, select the View pull-down menu, select Explore, and then select Earth.
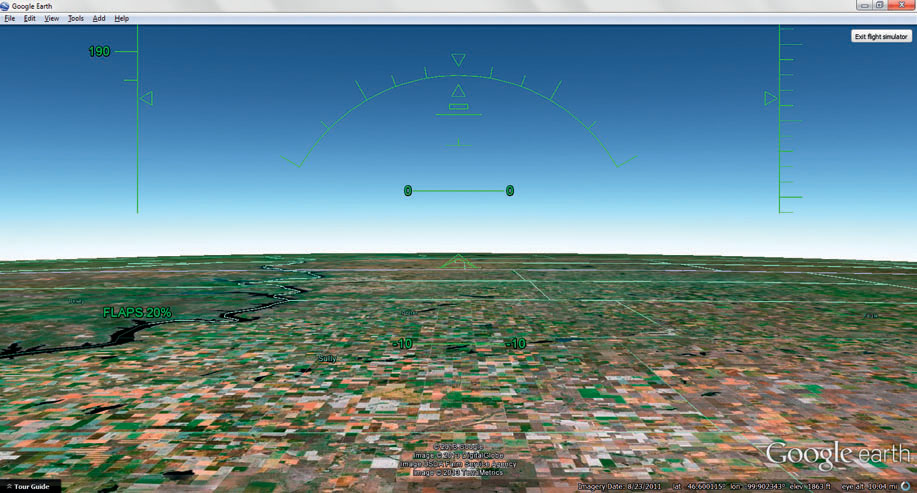
Flight Simulator
From the Tools pull-down menu, select Enter Flight Simulator. A new dialog box will appear asking if you want to pilot an F-16 fighter jet or an SR-22 propeller airplane. Select whichever plane you want to fly; GE will switch to the view as seen out the cockpit of your chosen plane, and you can fly across South Dakota (and the rest of GE). Try not to crash (although you can easily reset if you do).
Closing Time
This introductory lab was pretty straightforward, but it served to introduce you to the basic functions of Google Earth, as well as providing examples of many geospatial concepts you’ll be working with over the course of this book. Chapter 2 starts looking at location concepts (like various coordinate systems) and returns to Google Earth to start applying some of the topics you’ve worked with in this chapter. You’re all set, and now you can exit GE by selecting Exit from the File pull-down menu. There’s no need to save any data (or Temporary Places) in this lab.