9.4 
How Can You Make Measurements from an Aerial Photo?
photogrammetry the process of making measurements using aerial photos
Once identification of objects in an image has been positively made, these objects can be used for making various types of measurements. Photogrammetry is the process of obtaining measurements from aerial photos. Photogrammetric techniques can be used for determining things like the height and depth of objects in an aerial photo. For instance, the lengths of visible features in a photo and the heights of buildings visible in a photo can be calculated. There are a lot of possible photogrammetric measurements, and the following are two simple examples of how photogrammetric measurements can be made.
photo scale the representation used to determine how many units of measurement in the real world are equivalent to one unit of measurement on an aerial photo
As every map has a scale (we discussed this in Chapter 7), so every photo has a photo scale, which is listed as a representative fraction. For example, in a 1:8000 scale aerial photo, one unit of measurement in the photo is equivalent to 8000 of those units in the real world. Using the photo scale, you can determine the real-world size of features. Say you measure a section of railroad track in an aerial photo as a half-inch, and the photo scale is 1:8000. Thus, 1 inch in the photo is 8000 inches in the real world, and so a measurement of 0.5 inches in the photo (i.e. the length of your section of railroad track in the real world) will be 4000 inches (0.5 times 8000), or 333.33 feet.
The scale of a photo relies on the focal length of the camera’s lens and the altitude of the plane when the image is captured. The problems start when you try to make measurements from an orthophoto, if you don’t know the photo’s scale. If you don’t know how many real-world units are equal to one aerial photo unit, you can’t make accurate measurements. The photo scale of a vertical photo taken over level terrain can be determined by using a secondary source that has a known scale, as long as an item is visible in both the photo and the secondary source, and as long as you can measure that item in both. A topographic map (see Chapter 13) with a known scale will make a good secondary source because it will contain many of the features that will also be clearly seen in an aerial photo (like a road, or a section of road, where the beginning and end are visible). When you make these types of measurements, it’s important to remember that a regular aerial photo will not have the same scale everywhere in the photo, whereas an orthophoto will have uniform scale throughout the image.
By being able to make the same measurement on the map (where the scale is known) and on the aerial photo (where the scale is unknown), you can determine the photo scale. This is the way it works. Your photo could be 1:6000 or 1:12000 or 1:“some number.” Just like the representative fraction (RF) discussed in Chapter 7, the photo scale can be written as a fraction—1:24000 can be written as 1/24000. So, assume your unknown photo scale is the RF—this is equal to the distance measured on the photo, known as the photo distance (PD), divided by the real-world distance measured on the ground, known as the ground distance (GD), or:
317

Say you have a 1:12000 scale map showing an oceanfront boardwalk, and you also have an orthophoto of unknown scale of the same area, showing the same features. For the photo to be useful, you have to determine its scale. You can find the same section of boardwalk in both the map and the photo. By measuring the boardwalk section on the map, you find it is 0.59 inches. However, that’s not the ground distance, or how long that section of the boardwalk is in the real world—because of the map scale, every one inch measured on the map translates into 12,000 inches in the real world. So, 0.59 inches on the map is actually 7080 inches in the real world. This measure is the GD variable in the equation above (the ground distance):

You can measure the same section of boardwalk on the photo and find that it’s 1.77 inches. This measurement is the PD variable in the equation (the photo distance):

Doing some quick division, you find that RF is equal to 1/4000.

So the photo scale is 1:4000. One unit measured on the photo is equal to 4000 units in the real world.
A second type of measurement that you can make from the elements found in an aerial photo is to calculate the height of an object in the photo simply by examining its shadow. At first blush, you might think you’ll need to know all sorts of other information—where the photo was taken, what time of day it was taken, the date on which it was taken—all variables related to the relative location of the Sun and how the shadows would be cast. Chances are you won’t be able to get your hands on a lot of this type of information easily, so you’re probably thinking there must be a better way to do this.
You’d be right—photogrammetric measurements give you a simple way of determining the heights of objects in a photo from their shadows, without needing all that other data. They rely on three things: (1) knowing the scale of the photo (which we just figured out); (2) being able to see, fully and on level ground, the shadows of all objects (from the top of each object) whose height you want to measure; and (3) already knowing the height of one object with a shadow you can measure. If you have all three, measuring heights is a snap.
318
Let’s take that hypothetical 1:4000 photo from the last example and assume that it’s got a number of large hotels casting shadows on the boardwalk. You know the height of one building (115 feet), and its shadow in the photo (from the base to the top) is 0.10 inches. You can use this information to calculate the angle of the Sun, which is casting the shadows in the photo, as follows:

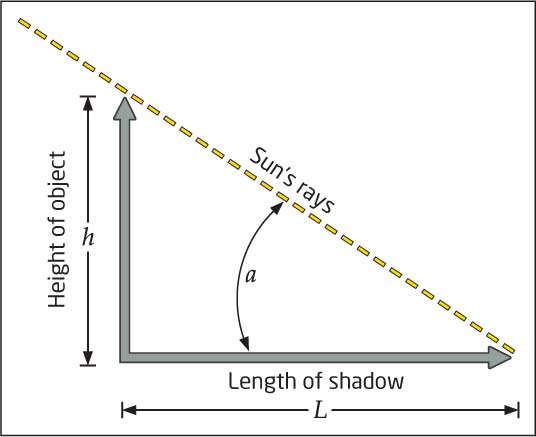
In this equation, a is the angle of the Sun, h is the real-world height of the object, and L is the real-world length of the shadow. From basic trigonometry, the tangent of a right angle (tan a) is equal to its opposite value (h) divided by its adjacent value (L). See Figure 9.13 for a diagram that shows how this works. You already know the height, h (115 feet). The length, L, can be found by taking the length of the shadow measured in the photo (0.10 inches) and multiplying it by the photo scale (1:4000). 0.10 inches on the photo is 400 inches in the real world, or 33.33 feet. This means that if you want to check your calculations by getting into a time machine and traveling back to the boardwalk on the day the aerial photo was taken, you’ll find the shadow of the building will be 33.33 feet long. Plugging these numbers into the formula, we find that:
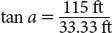
and that the tangent of angle a (or “tan a”) is equal to 3.45.
319
Now, since an aerial photo represents a single snapshot in time, we can assume that the angle of the Sun is going to remain the same across the photo for all of the buildings casting shadows. So, the measure for “tan a” will be the same value when applied to all heights we’re trying to determine. We can use this information to calculate the height of any object in the photo casting a shadow that we can measure. Say you measure the shadow cast by a second building in the photo on the boardwalk and find it to be 0.14 inches, the 1:4000 photo scale tells us that the length of this shadow in the real-world will be 560 inches, or 46.67 feet. The only thing that’s unknown now is the actual height of the building. Using the equation:

and solving for h, we can find that the height of the new building is about 161 feet. This type of calculation can be applied to other objects casting shadows—meaning we can quickly determine the height of multiple objects in a single photo. Be cautious, however, when you employ these techniques— to determine height from shadows, the object must be straight up and down, and it must cast a full shadow on level ground.