Chapter 1. Early Animal Development and Introduction to Animal Tissues
I. OVERVIEW
In this first lab, we will focus on early animal development and on animal tissues. We will also start learning about diversity within the Animal Kingdom. As the semester progresses, we will build on your knowledge of diversity and look in detail at the structure and function of a model vertebrate.
In this lab we will first look at the very early stages of development in two different kinds of animals: a sea star and an amphibian. We will then compare the early development of protostomes and deuterostomes, two of the main categories of animals. Finally, we will look at the four main categories of tissues that are found in all animals. In this lab we will also start keeping a laboratory notebook. Before beginning, review the key parts of keeping a good and useful notebook.
II. EARLY DEVELOPMENT IN ANIMALS
Certainly, one of the marvels of life is that organisms develop from a single fertilized cell to a full grown organism. The orchestration of that process is a complex series of steps involving genes turning on and off, proteins forming and tissues and organs developing. In BISC 162 and 163, we just touch on this process. Upper level classes in Animal Development are available in the Biology Department and are taught by Dr. Brad Jones. You can see a poster of his research on the nervous tissue on the first floor of Shoemaker Hall.
Fertilization is the process of the fusion of two gametes. In animals, the gametes are haploid (each gamete has one set of chromosomes); once fertilization takes place there is a diploid zygote. When an organism is diploid, it has two sets of chromosomes, one set from the sperm and one set from the egg.
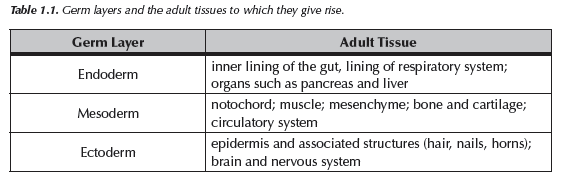
Once fertilization takes place, the fertilized zygote undergoes numerous divisions called cleavage divisions so that there are first two cells, then four cells, eight cells, etc. During these first divisions, the zygote does not change size, but the individual cells get smaller and smaller as there are more and more of them. A morula is a solid mass of cells that results from these divisions. Shortly after the morula is formed, a fluid-filled cavity forms within the embryo called the blastocoel. At this point the embryo is called a blastula and is a hollow ball of cells. Gastrulation is the process where specific layers are formed. In its simplest form, gastrulation is like taking the blastula and poking it such that there is now an indentation in the side of the embryo. This new indendation and cavity that is being formed is the archenteron, or primitive gut. The opening to the archenteron is the blastopore. In some animals, the blastopore becomes the mouth (protostomes, see below) and in some the blastopore becomes the anus and a second opening becomes the mouth (seen in deuterostomes). At this point the zygote is a gastrula, and it has three layers of embryonic tissues called germ layers. These three layers will develop into all of the adult tissues. The three germ layers are called the endoderm (the inner most layer that forms the archenteron and becomes the digestive tract); the ectoderm (the outside layer, which becomes the outer layer of the adult and also becomes the nervous system); and the mesoderm, a middle layer which becomes muscle, bone and the circulatory system. The way the mesoderm forms is different in different groups of animals. Table 1.1 summarizes the fate of the three germ layers.
EARLY DEVELOPMENT IN SEA STARS
Sea stars or starfish are a group of animals in the Phylum Echinodermata, Class Asteroidea. Echinoderms are only found in the marine system (none are in freshwater or on land!) and their fossil history dates back nearly 600 million years. Sea stars are among the most familiar of the echinoderms. They are predators, and they move via their many tube feet. It is difficult to tell males from females except by the gametes they produce, and like many marine animals, they have external fertilization. Males and females synchronize when they shed their gametes directly in the ocean and fertilization can take place in the water. The fertilized eggs develop and become a planktonic larva. It is the larval stage that is the most mobile!
Sea stars (and other echinoderms) have long been used for studying early development for several reasons. One individual (males and females both) can produce millions of gametes, and thus it is possible to get a large number of developing eggs. And, since an early stage is a free-swimming larvae, there is very little yolk in the egg and so it is possible to see details in the development that are not possible to see in organisms that have more yolk, such as the frog. The stages of development in an echinoderm is shown in Fig. 1.1.

EARLY DEVELOPMENT IN AMPHIBIANS (AN EXAMPLE OF EARLY DEVELOPMENT WHERE THERE IS YOLK IN THE EGG)
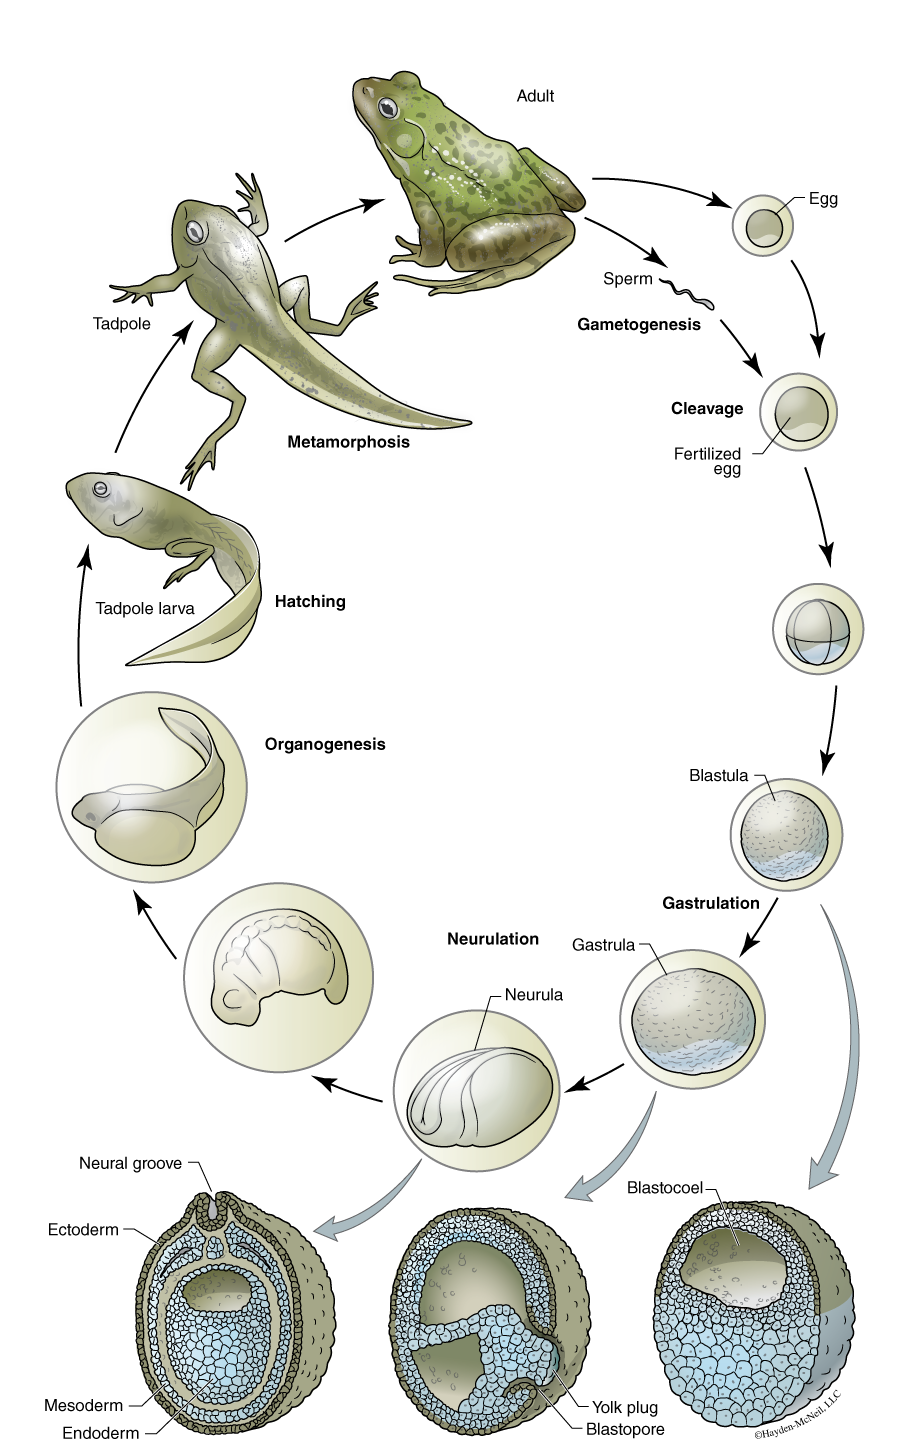
The initial stages of division in an amphibian are very similar to the starfish, except fairly quickly the cell divisions are not equal and some cells are larger than others. In addition, the presence of yolk makes the early divisions more difficult to see. As with the sea star, an amphibian goes through the stages of being a morula and a blastula, and it goes through the process of gastrulation. During gastrulation in amphibians, yolk plugs the blastopore, and this yolk plug is visible from the outside of the embryo (Fig. 1.2).
Amphibians continue to develop through a neurulation stage, organogenesis, a stage where organs are formed; a larval stage (called the tadpole in a frog); and finally, through the process of metamorphosis, the adult is formed.
COMPARISON OF PROTOSTOMES AND DEUTEROSTOMES
We noted earlier that in some groups of animals, called protostomes, the blastopore develops into the mouth. And, in the deuterostomes, the blastopore becomes the anus. These differences and others described below is one of the ways that defines major groups of animals. It is not surprising that these early developmental stages are highly conserved in evolution and are consistent within large groups.
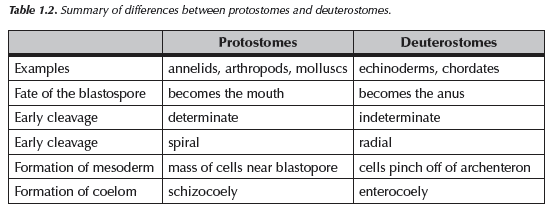
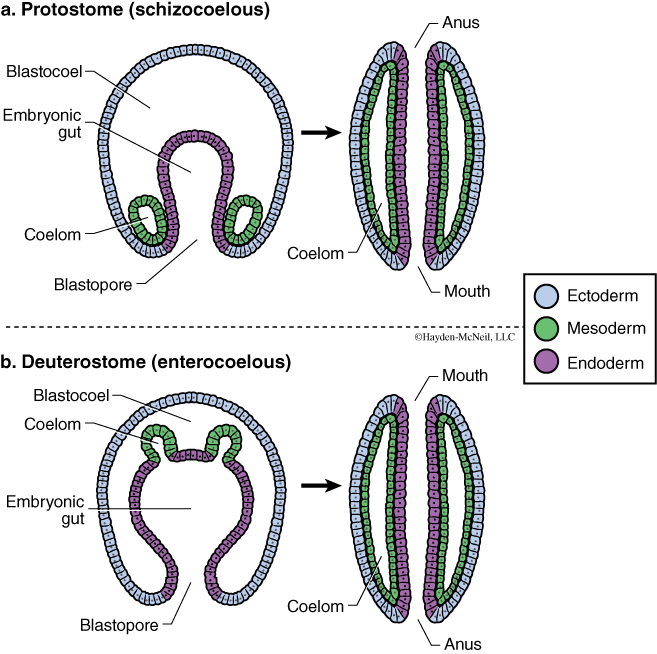
Protostomes include all of the arthropods, as well as the molluscs, annelids, and several smaller phyla. The name “protostome” reflects the embryonic origin of the mouth: “proto” refers to first opening, “stome” refers to mouth. A second opening to the digestive system, the anus, develops later. In addition, protostomes have determinate, spiral cleavage. When cleavage is determinate, it means that the fate of the cells is determined very early. If the cells are separated at an early stage, it is not possible to get a complete embryo. With spiral cleavage, the first cell divisions are diagonal to the long axis of the egg, resulting in spiral arrangement of the cells. In protostomes, the mesoderm develops as pockets of tissue near the blastopore and starts as a solid mass of cells. At some point a fluid-filled space develops in the mesoderm, and this space becomes the coelom, or body cavity. This process of coelom formation is called schizocoely (Fig. 1.3). The formal definition of a true coelom is a fluid-filled body cavity, lined by tissue of mesodermal origin. This body cavity is important in a variety of ways, and something we will discuss in more detail in a later lab.
In contrast, in deuterostomes, which include the chordates, vertebrates, and echinoderms, the blastopore will become the anus and a second opening becomes the mouth. The name “deutero” means second and “stome” again means mouth. Deuterostomes have radial, indeterminate cleavage. With radial cleavage, the early division are either parallel or perpendicular to the long axis of the egg. From this kind of cleavage, upper cells are directly above the cells beneath them. Indeterminate cleavage means that the fate of the cells is not determined early. For example, in the deuterostomes, if the cells of the zygote is a 4-cell stage get separated, four separate embryos can develop. If separation happens at the 2-cell stage, the result is identical twins. In deuterostomes, the mesoderm forms as outpockets of the gut in a process called enterocoely. These outpockets pinch off and eventually become the coelom or body cavity. Table 1.2 summarizes the main differences between these groups.
PROCEDURE
- Review proper use of microscopes.
We will assume that you remember the parts of the microscope and appropriate use of the microscope from last semester (BISC 161). Please see your TA if you have any questions about the microscopes. You should review this information before lab today.
Dissecting scopes: Useful for objects or specimens that are barely visible with the naked eye.
Compound scopes: Useful for those things that are not visible with the naked eye.
Rules of microscope usage: - Pick out a slide labeled “Starfish development” and find and sketch the stages listed. Make each individual sketch at least a quarter of a page or big enough to include the details of what you see. You will be graded on effort. A good sketch includes the magnification. Label the following:
EggWhy does the starfish embryo not have lots of yolk while the amphibian embryo does have yolk?
4-cell stage
8-cell stage
Blastula (label blastocoel)
Early gastrula (label blastopore, archenteron)
Late gastrula
Bipinnaria larva - Examine the early stages in an amphibian by looking at the preserved samples with the
dissecting scope and cross sections of slides with the compound scope. Find, identify
and sketch these stages and structures:
Fertilized egg
8-cell stage
Blastula with blastocoel
Gastrula with blastopore and yolk plug
Neurula
Always start the process of examining something using the scanning lens.
Always focus by moving the lens away from the slide.
Always finish by clicking the scanning lens into place and covering the scope with a dust cover.
MATERIALS
Prepared microscope slides
- Starfish (Asterias) development
Label: fertilized egg, 8-cell stage, morula, blastula, blastomeres, blastocoel, early gastrula, bipinnaria larva, gut on larva - Frog blastula
Label: blastocoel, animal pole, vegetal pole, micromeres, macromeres, yolk - Frog yolk plug
Label: blastocoel, ectoderm, yolk, yolk plug, dorsal lip, ventral lip, archenteron
Optional: Frog neural groove
Preserved frog embryos
III. ANIMAL TISSUES
As indicated previously, once a gastrula has developed, there are three primordial germ layers, or layers of tissue that will become all of the different types of tissues in the adult animal.
We now fast forward to an adult animal. Even though there are over a million species of animals and 20–30 different phyla of animals, all animals show the same basic types of tissues in their bodies. We will use mammals as our primary model of tissues. Histology is the study of tissues. When sectioned as thin slices and enhanced with stains, tissues can be viewed with a light microscope. The Biology Department offers a histology class, taught by Dr. Carol Britson. It is a class that is of interest to many students interested in studying medicine.
According to your text, a tissue is a “group of closely associated, similar cells that work together to carry out specific functions.” There are four main categories of tissues, each of which can be easily recognized under the microscope. Generally, one or more tissues form an organ, such as the stomach or heart, and multiple organs form an organ system, such as the digestive system. After learning about tissues today, we will be studying organs and organ systems in detail via the dissection of the fetal pig. In these later labs, we will look at many more examples of tissues.
You should know each of the four categories and what makes each distinctive. In later labs we will identify subcategories of each of the tissues. In addition, you should know the germ layers that give rise to these tissues and you should know the organs where these tissues are found. The four categories of tissues are epithelial tissue, muscle tissue, connective tissue, and nervous tissue.
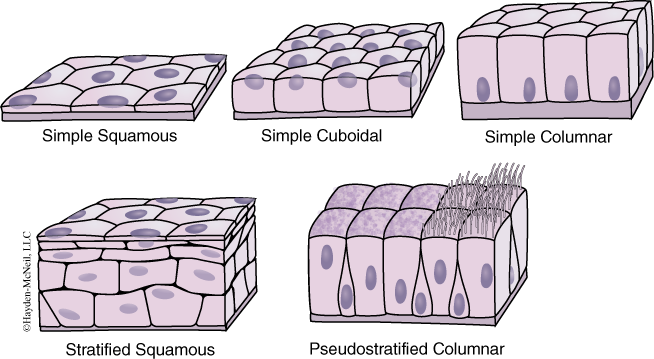
EPITHELIAL TISSUE
Epithelial tissue is comprised of cells that form a layer or sheet over external or internal surfaces. Typically the cells fit tightly together with one surface of the cells exposed to an opening (such as the lumen or cavity of the gut) and the other surface attached to underlying tissues (Fig. 1.4). Epithelial tissue forms the skin, and it also lines the digestive system and respiratory system as well as the excretory and reproductive systems. Epithelium is also found in the wall of tubular glands, such as sweat glands or salivary glands. As would be expected of a surface layer, epithelium functions in protection; it also often functions in secretion and absorption. The shape of the cells can vary from flattened cells (squamous epithelium) to cubes (cuboidal epithelium) to columns (columnar epithelium). Epithelial tissue is composed of either a sheet of a single layer of cells (simple epithelium) or multiple layers of cells (stratified epithelium). In this first lab, we will look at columnar epithelium, and we will see examples of the others in later labs.
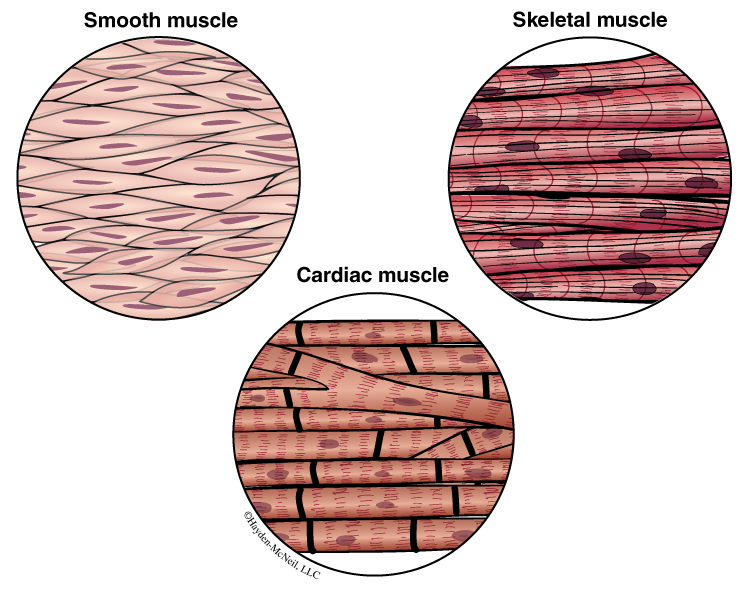
MUSCLE TISSUE
Muscle tissue is comprised of elongate, spindle-shaped cells that are contractile (Fig. 1.5). Each muscle cell is called a muscle fiber, and each fiber or cell is made of many contractile units called myofibrils. Typically, a muscle (such as your biceps) is made of many cells or fibers. There are three kinds of muscle tissue: skeletal muscle is muscle attached to the skeleton and is under conscious control (that is, you decide to take a step and in so doing you activate your skeletal muscles in your leg). Smooth muscle, or muscle that lacks striations and is found in the walls of the digestive tract or uterus and blood vessels. Smooth muscle is generally not under conscious control. The final kind of muscle is cardiac muscle, the main tissue of the heart. In this first lab, we will look only at skeletal muscle; next week, we will learn to recognize the other three kinds of muscle tissue. Muscle cells are elongate.
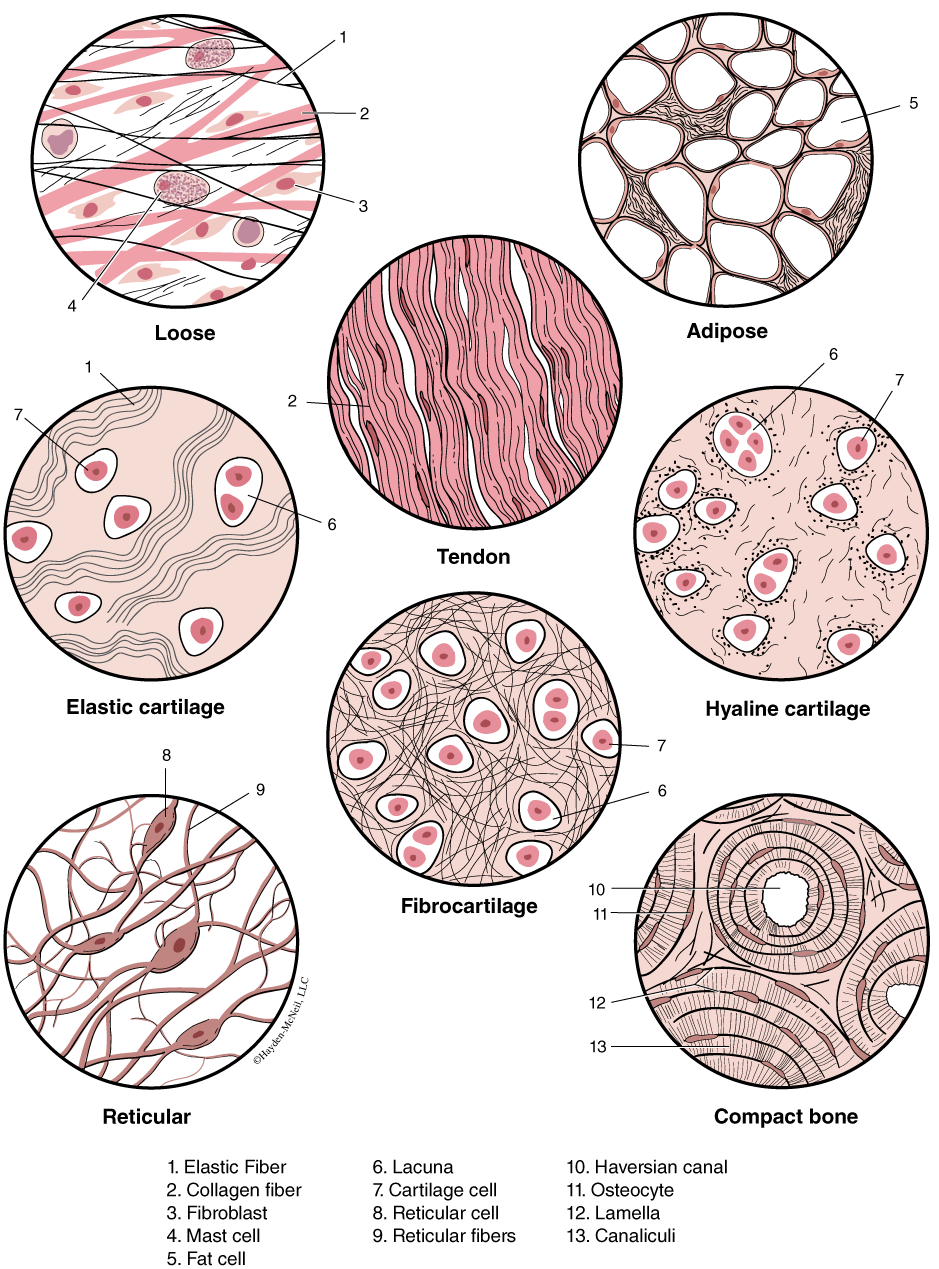
CONNECTIVE TISSUE
Connective tissue is very important tissue that helps to provide a framework for the body. Most types of connective tissue have few cells and large extracellular matrix (e.g., material not made of cells but secreted by cells). Examples of connective tissue include bones, blood, cartilage, and fat (Fig. 1.6). In this first lab, we will look at bone and cartilage. Later we will look in some detail at blood and the other kinds of connective tissue.
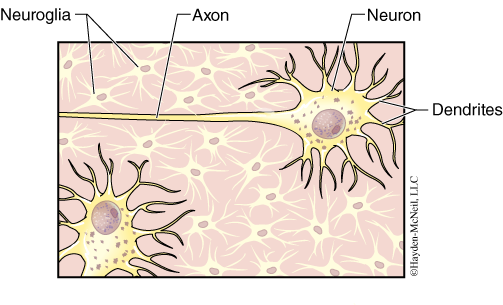
NERVOUS TISSUE
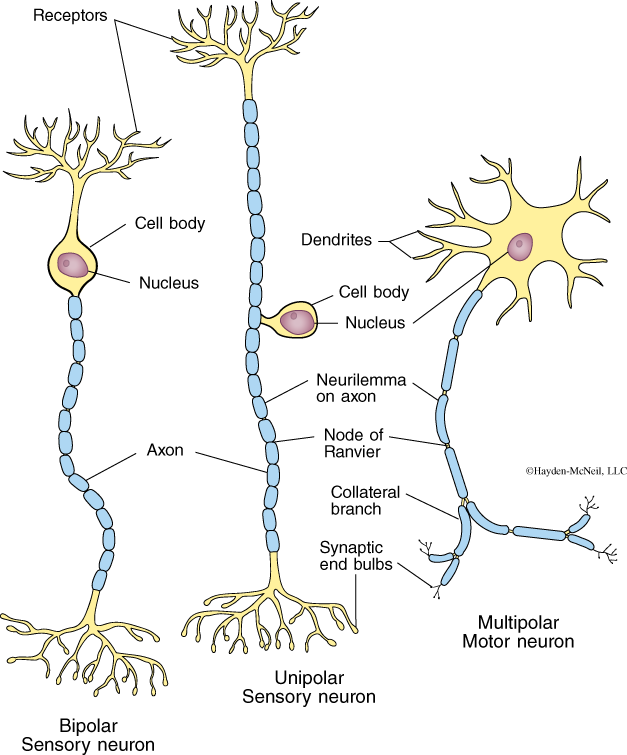
Nervous tissue is comprised of neurons (nerve cells) and glial cells (cells that provide support and nutrients for the neurons; also called “neuroglia”) (Fig. 1.7). In the human brain, there are probably billions of neurons, but there are more glial cells by a factor of 10. There are several types of neurons (several examples shown in Fig. 1.8); most have a cell body where the nucleus is and two kinds of cytoplasmic extensions: dendrites and axons. Dendrites receive signals from other cells and propagate them to the cell body and then to the axon, which is then connected to other neurons, muscles, or glands. Axons can be very long (many feet long) as they run along the spinal cord. A nerve is many neurons bound together. There are many different kinds of glial cells, and there is a growing appreciation of their importance in the functioning of nerves and the nervous system.
PROCEDURE
For this lab, you should work in teams of two, but each person must have their own microscope. Get two or more slides from the side table and sketch and label each of these slides. In doing your sketches, you need to ask yourself: What makes this tissue distinctive? How can I recognize it? Where are the cells and nuclei? Once you have sketched each of the slides, work with your partner to quiz each other and to look at each other’s slides. For example, one person can pick a slide, hide the label, and ask the other person to identify it. You should be able to identify the tissue type and the kinds of cells in it, and you should know where this tissue is found.
MATERIAL TO EXAMINE
Muscle tissue: skeletal muscle
Connective tissue: cartilage and bone
Nervous tissue
IV. NOTES TO INSTRUCTORS AND MATERIALS FOR LAB
As this is the first laboratory of the semester, it is important not only to take roll and be sure students are in the right lab, and also to take time to introduce this laboratory class. Let the students know how the class will be graded and what you expect in their work.
Students will keep a laboratory notebook of their sketches and notes. These pages can be added directly to the 3-ring lab manual. In this first lab, you need to be clear what they should be doing in their sketches and notes.
This lab has three parts: introduction and overview of the lab, early development in animals, and animal tissues. We suggest that after you do the general introduction, you take time to briefly introduce early development and give students about an hour to complete the development portion of the lab.
The last hour of class should be focused on animal tissues. Take a few minutes to introduce the tissues and allow at least 45 minutes for students to look at the tissues. In this lab we focus on the four main categories of tissues.
At the end of class, it is the TA’s responsibility to be sure that students return slides to the correct tray and the lab is clean and ready for the next group. Nobody should leave until the lab is clean, organized, and ready for the next group.