Chapter 2. Molecular Biology I
General Purpose
This lab will present the general concepts related to some of the techniques used in the fields of microbiology and molecular biology and how these techniques relate to understanding the relationship between DNA, genes, and traits expressed by an organism.
Learning Objectives
General Purpose
- Develop a basic understanding of some of the techniques used in the field of molecular biology.
Conceptual
- Gain an understanding of restriction enzymes and their uses.
- Gain an understanding of plasmids.
- Gain an understanding of electrophoresis.
Procedural
- Gain proficiency using gel electrophoresis.
- Gain proficiency interpreting fragment patterns in gels.
- Gain proficiency in sterile technique.
In this laboratory, you will do two exercises. In the first exercise, you will load and run an agarose gel with DNA fragments. After running the gel, you will view the DNA fragments in the gel using a Dark Reader, which will allow you to see discrete DNA bands on the gel. In the second exercise you will plate out different bacterial cultures and subject them to different treatments.
You will work in groups of four.
Exercise 1. Analysis of DNA Fragments by Agarose Gel Electrophoresis
Materials
Agarose
Gel pouring platform
Gel tray
Gel comb
1 × TAE Buffer (Tris-acetate-EDTA)
Beaker marked at 35 mL
Gel electrophoresis chamber
Power supply with electrodes
P100 tips
P100 micropipette
P100 pipette tips
Samples 1, 2, 3
Molecular ladder (lambda phage)
Practice dye
Procedure
Pouring an Agarose Gel
- Place a gel pouring tray in the pouring platform (Figure 11-4).

- Turn the handle to tightly clamp the pouring tray in the platform. This seal must be liquid tight.
- Place a gel comb into the slots closest to one end of the gel pouring tray.
- Fill the glass beakers marked at 35 mL with warm liquid agarose.
- Slowly pour the liquid agarose into the gel tray. Using a yellow pipette tip break any surface bubbles that might remain after pouring.
- Allow the gel to set (harden) for approximately 45–60 minutes. The gel should be slightly opaque when solidified. The surface of the gel will also have a wrinkled or swirled appearance.
- Pour a small volume of TAE buffer on the gel and then remove the gel combs by pulling straight up from the gel. Use a slow steady pressure rather than jerking the comb out.
- Release the clamp on the gel platform and slide the gel tray laterally out of the platform.
Practice Pipetting and Loading Samples onto an Agarose Gel
- Place the tray with the gel in the electrophoresis chamber with the wells toward the negative (black) electrode (Figure 11-5). Be careful when handling the gel—it may slide out of the tray.
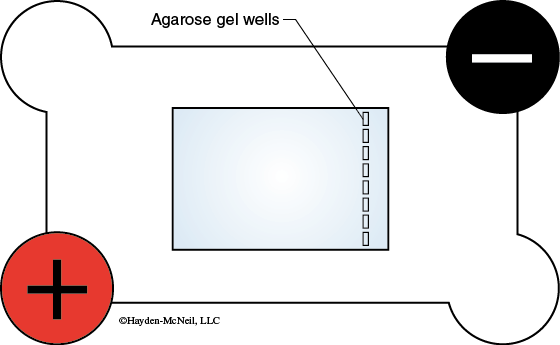
- The electrophoresis chamber contains 1 × TAE buffer. THIS SHOULD BE ENOUGH TO FULLY SUBMERGE THE GEL. If the gel is not fully covered by the TAE buffer, add additional buffer until it covers the gel. Do not fill the chamber above the maximum mark on the side of the chamber. Be careful to avoid getting the electrical connections wet.
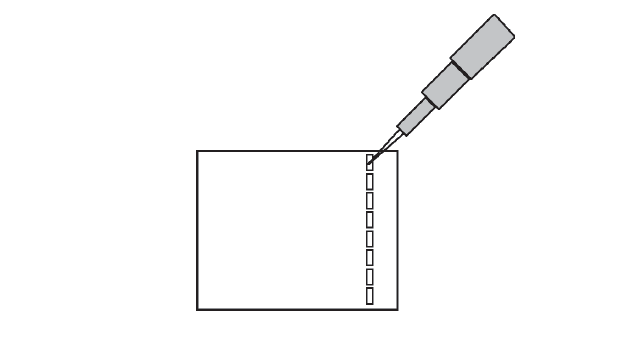
- If you have not used a micropipettor before to load an agarose gel, practice the technique. Your lab instructor will demonstrate how to load a gel. The micropipette is operated by depressing the plunger. On the downward stroke of the plunger there are two stops. The first stop offers firm resistance, and the second is a hard stop. To take up a volume in the micropipette, place a yellow tip on the end of the pipette. Depress the plunger to the first stop and insert the disposable pipette tip into the sample to be transferred. Draw the liquid into the pipette by slowly releasing the plunger. To dispense the liquid from the pipette, place the tip of the pipette into the opening of the well (Figure 11-6) and slowly depress the plunger all the way to the second stop. When the liquid has been dispensed, withdraw the pipette tip from the well before releasing the plunger.
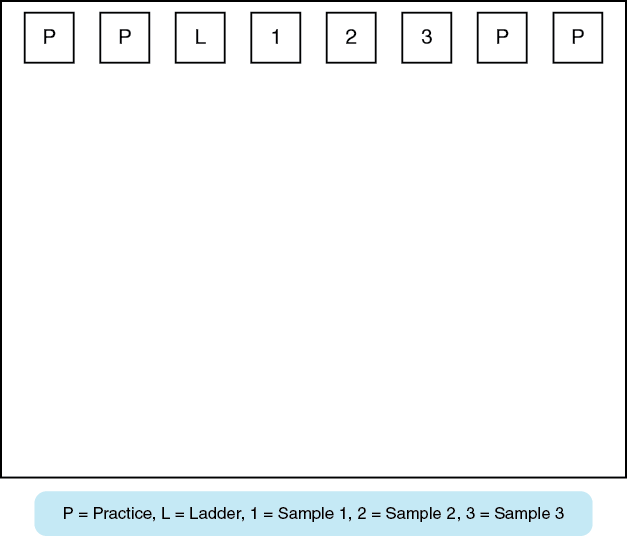
One person in your group should set the micropipettor to 12 μL and attach the P100 pipette tip. Use the dye in the clear tube labeled “D” to load one of the wells on the outer edge. Each person in your group should load 12 μL of the practice dye into one well. See Figure 11-7 below as a guide. Next load the DNA samples on the gel by pipetting 12 μL of the prepared samples into the designated wells.
Running the Gel
- Once the gel has been loaded, place the cover on the electrophoresis chamber by matching the black connector to the black electrode and the red connector to the red electrode. Be sure the lid is properly seated before continuing.
- Plug the leads from the electrophoresis chamber into the power supply. Push the color-coded leads into the receptacles on the front of the power supply.
- Once the electrophoresis chamber is connected to the power supply, turn on the power supply (toggle switch on the right side of the power supply). Set the run conditions to: 70 volts, 50 ma, and 60 minutes. Once the run conditions are set and both electrophoresis chambers are connected to the power supply, start the run by pushing the “running man” button.
- Shortly after starting the run you should observe bubbles rising from the negative (black) electrode. If you do not, ask your laboratory instructor for assistance.
Removing the Gel and Viewing the DNA
- When the power supply turns itself off, you should unplug the electrophoresis chamber from the power supply and then remove the cover from the chamber.
- Gently lift the gel and the tray out of the electrophoresis chamber. Be careful when handling the gel—it may slide out of the tray.
- Place the gel on top of the Dark Reader and cover with the blue filter. The DNA samples contained SYBR Green dye so the DNA fragments can now be viewed. The lights in the room need to be turned off for best results. View the information at the following link to see how SYBR Green dye works.
- After viewing the DNA bands in the gel, make a sketch of the band pattern in your laboratory notebook or take a picture of the gel using your cell phone camera app.
Clean-Up Procedure
- Dispose of gloves in the biohazard bag located at the front of the room.
- Dispose of used tips and microcentrifuge tubes in the beaker labeled “USED TIPS AND TUBES” that is located on the bench top.
- Discard the gel into the appropriate waste container labeled USED GELS.
- Rinse off gel tray and gel comb using distilled water and return them to the gel pouring platform.
- Leave the buffer in the electrophoresis chamber for the next class.
Exercise 2. Bacterial Plating
During this exercise each bench of students will plate out different bacteria and subject them to different treatments. The bacteria have been transformed with the DNA from different plasmids. These are the same plasmids that you analyzed by electrophoresis. The resulting patterns of fragments detected by the electrophoresis will allow you to determine which plasmid contains the genes conferring each of the different phenotypic effects.
Materials
P1000 micropipette
P1000 sterile tips
6 one-striped agar plates
3 two-striped agar plates
3 sterile cell spreaders
Microtubes labeled A, B, and C
Procedure
To avoid contaminating your bacterial samples, please read all of the procedures before beginning.
- Disinfect your workspace by wiping the lab bench with the disinfectant solution (10% bleach).
- Label the plate(s) that you are going to inoculate. Label the bottom of the dish (not the top) with your name, cell type, treatment type, and section number. Your lab instructor will demonstrate how to label the plate.
- Using the large (P1000) microliter pipettes, pipette 200 μL of one of the bacteria designated for your group onto the center of the appropriate Petri dish. Some groups at your lab bench will be using different bacterial samples from you. If you are not sure of which sample or plate to use, please ask your instructor before proceeding.
- Spread the bacteria around the Petri dish using a sterile cell spreader.
- Replace the cover of the Petri dish and wait 30 minutes.
- After 30 minutes, invert the dishes and label the bottom (now the top) of the Petri dish with the type of bacteria, your initials, and the lab section number. Seal them with Parafilm. The exceptions to this are the dishes that are to be treated with UV light. Your lab instructor will assist you with this treatment. After the UV treatment, seal the plates with Parafilm.
- Your lab instructor will place all of the plates in the incubator.
Clean-Up Procedure
- Place all cell spreaders in the beaker labeled “USED CELL SPREADERS” at the sink area.
- Throw away microcentrifuge tubes and pipette tips in the beaker labeled “USED TUBES AND TIPS” on the bench top.
- Throw away gloves exposed to bacteria in the biohazard bag at the front of the room.
Post-Lab Quiz
Proceed to the Post-Lab Quiz