Chapter 2. Analyzing Enzymes and Enzyme Kinetics II
Learning Objectives
General Purpose
Conceptual
- Be able to relate changes in different factors to changes in the rate of enzyme-catalyzed reactions.
- Be able to formulate testable hypotheses, including H0 and Ha.
- Be able to design and conduct experiments to test your hypotheses.
- Be able to clearly present the results and conclusions of an experiment to others.
Materials per Student
Disposable gloves
Safety glasses
Materials per Student Group (2 students)
Spectrometer
Deionized water (dH2O)
Test tube rack
Potato extract
Cuvettes
0.05 M Catechol
Small Parafilm squares
p 1000 micropipette
One 10-mL pipette and green pi-pump
Procedure
1. If necessary prepare the extracts from other sources and keep the prepared extracts on ice.
2. Turn on the spectrometer by holding the power button on the right side for about three seconds or until the LED lights start to flash (see Figure 3-3).
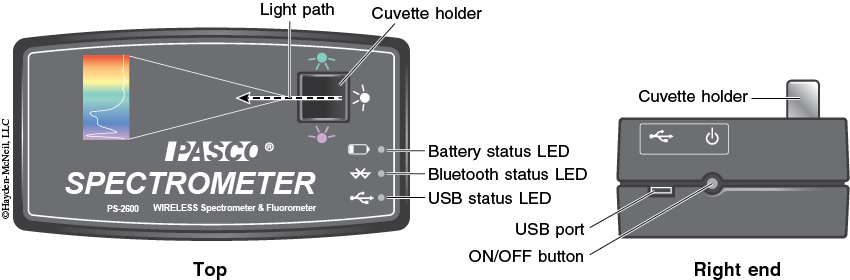
3. Plug the spectrometer into the computer via the USB cable (see Figure 3-3). To wirelessly connect to the spectrometer with a personal laptop or tablet, add a device in the Bluetooth settings and select the spectrometer that matches with the ID # on the bottom of the instrument.
4. Open the PASCO Spectrometry app by clicking the icon ![]() . This should now show the initial screen of the PASCO Spectrometry display (see Figure 3-4) on your computer or tablet.
. This should now show the initial screen of the PASCO Spectrometry display (see Figure 3-4) on your computer or tablet.
5. After a few seconds, the ‘Connection Status’ symbols on the top toolbar should turn from ![]() to
to ![]() . Click the circle to check that the ID # on the bottom of the spectrometer matches the display on your computer or tablet. If connecting wirelessly, a ‘Sensor Not Found’ error should pop up. Click
. Click the circle to check that the ID # on the bottom of the spectrometer matches the display on your computer or tablet. If connecting wirelessly, a ‘Sensor Not Found’ error should pop up. Click ![]() . Select the spectrometer with the corresponding ID # and click
. Select the spectrometer with the corresponding ID # and click ![]() . If a connection error does not pop up, click
. If a connection error does not pop up, click ![]() on the top toolbar.
on the top toolbar.
6. Make sure the “Absorbance/Transmittance” tab ![]() is open on the top toolbar and the “Analyze Solution”
is open on the top toolbar and the “Analyze Solution” ![]() setting is selected.
setting is selected.
7. Obtain a tube of potato extract from your instructor. Cap the tube to limit oxygen exposure and place it on ice.
8. Obtain a clean cuvette from the rack. Using the labelled pipettes, prepare the first blank based on the solutions and volumes appropriate for your experiment.
Be sure to recap the potato extract (or any other extracts) to limit oxygen exposure and keep them on ice.
9. With gloves on, use your thumb or forefinger to seal the blank cuvette and invert it once.
10. Wipe the blank cuvette with a Kimwipe and gently insert it into the cuvette holder. The cuvette should fit snugly.
11. On the bottom toolbar, click “Calibrate Dark” ![]() to calibrate the spectrometer with the light turned off. A progress bar should appear, and after the calibration is complete, a check mark
to calibrate the spectrometer with the light turned off. A progress bar should appear, and after the calibration is complete, a check mark ![]() should appear.
should appear.
12. Wait one to two minutes to allow the light source to warm up, then click “Calibrate Reference” ![]() to calibrate the spectrometer to the blank solution with the light on.
to calibrate the spectrometer to the blank solution with the light on.
13. On the bottom toolbar, click “Start Record” ![]() . The symbol will change to the “Stop Record”
. The symbol will change to the “Stop Record” ![]() icon and a horizontal line should appear at 0.0 ODU, indicating the spectrometer was properly calibrated. Tiny peaks in the line show noise, but if there are major peaks, repeat steps 11 and 12 to recalibrate the spectrometer.
icon and a horizontal line should appear at 0.0 ODU, indicating the spectrometer was properly calibrated. Tiny peaks in the line show noise, but if there are major peaks, repeat steps 11 and 12 to recalibrate the spectrometer.
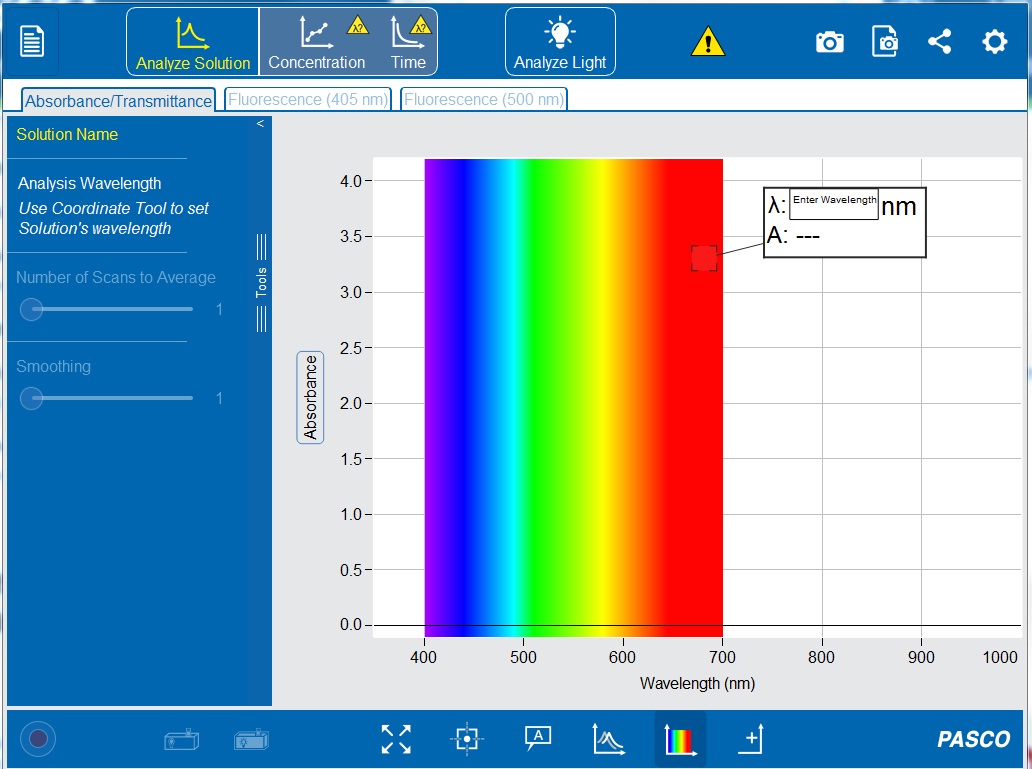
14. In the “Enter Wavelength” box on the display (see Figure 2-13) type 500 nm to set the wavelength to 500 nanometers. If the white Enter Wavelength box is not already displayed on the graph, click the “Add Coordinate Tool” ![]() on the bottom toolbar. The coordinate tool can also be manually moved to set a wavelength.
on the bottom toolbar. The coordinate tool can also be manually moved to set a wavelength.
15. Click ![]() to set the wavelength. A vertical line should appear on the graph at 500 nm, and the white box should now display the wavelength (λ) and the absorbance value (A).
to set the wavelength. A vertical line should appear on the graph at 500 nm, and the white box should now display the wavelength (λ) and the absorbance value (A).
16. Remove the blank cuvette from the spectrometer and return it to the rack.
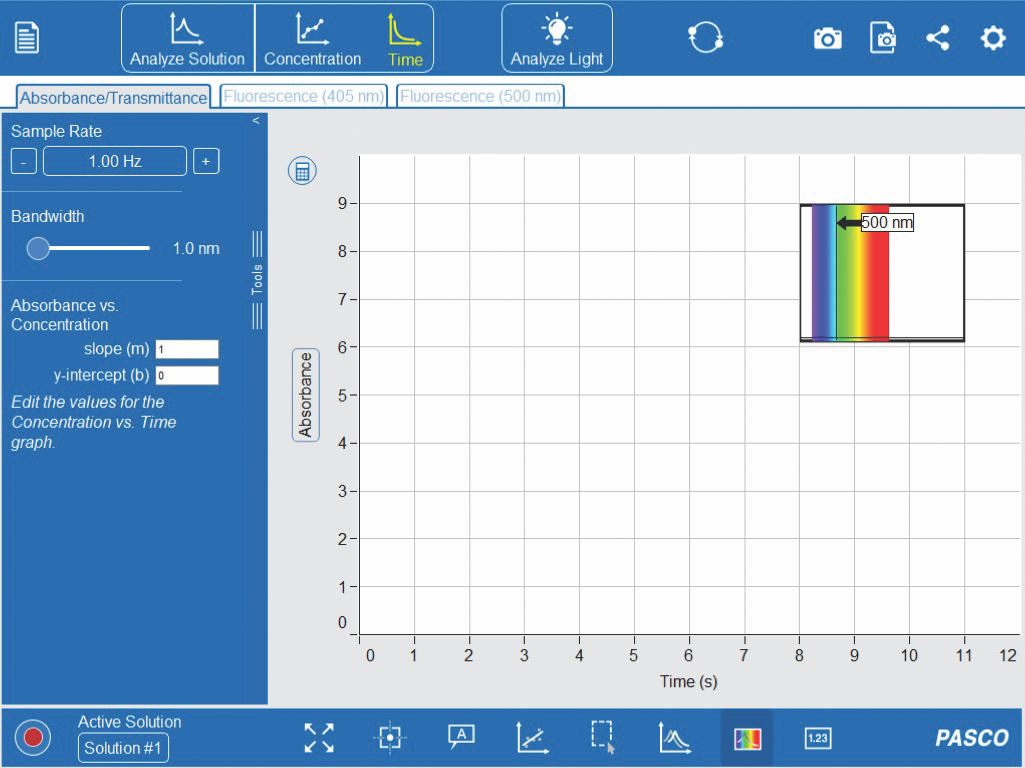
17. As seen in Figure 3-5, click the ‘Time’ graph on the top toolbar. Keep the default options on the left-hand toolbar. A small absorbance spectrum from the ‘Analyze Solution’ tab should be visible as well.
18. Obtain three clean cuvettes from the rack. Using the labelled pipettes, prepare the first set of treatment cuvettes based on the solutions and volumes you listed in the table prepare in your table notebook for this experiment, but WAIT TO ADD THE EXTRACT CONTAINING THE ENZYME.
Measuring the Reaction Rate
1. To start the reaction, add the appropriate volume of extract to the first replicate using the labelled pipette.
2. Quickly seal and invert the cuvette once to mix the contents. Record the color of the solution in the table you have prepared in your lab notebook.
3. Quickly wipe the cuvette with a Kimwipe, place it in the cuvette holder, and click “Record” ![]() to start measuring absorbance over time.
to start measuring absorbance over time.
4. After 180 seconds, click the “Stop Record” ![]() icon to stop recording data.
icon to stop recording data.
5. Remove the cuvette and record the final colors of the solution in the table you have prepared in your lab notebook.
6. Repeat steps 1-5 for the second and third replicates of treatment 1. You may need to calibrate with the blank between replicates.
7. To obtain the absorbance values for the time points list in the table you have prepared in your lab notebook, manually move the ‘Coordinate Tool’ along the graphs. Note: Anything saved to the computer will be deleted so anything you wait to keep must be saved or sent to another device.
Clean-Up Procedure
1. Turn off the spectrometer.
2. With gloves and safety glasses on, drain and rinse all the cuvettes in the sink.
3. Return the cuvettes to the rack on the bench paper upside down to drain.
4. Return the large tube to the rack near the sink upside down to drain.
5. Return the pi-pumps to the basket and labelled pipettes to the jar.
6. Discard (only) gloves in the biohazard bag.
7. Return the safety glasses, protocol sheet, and standard curve to the front table.
8. Push in your chair. See your instructor regarding any In-Class Assignment.