20.4 20.3 Using Only Translations
Following Escher’s artistic genius, we investigate monohedral tilings in which the tile used may be nonconvex and have any curve whatever as a boundary (rather than one consisting of only straight edges). You may wonder just how much liberty can be taken in shaping a tile and how you could design an Escher-like tiling yourself.
[Technical note: We restrict ourselves to isohedral tilings, those in which any tile can be made to coincide with any other tile by one of the wallpaper groups of symmetries of Spotlight 19.9, page 797. In practical terms, if you copy the tiling onto a sheet of clear plastic, choose any tile on the paper original and any tile on the plastic, and make them coincide (perhaps by turning the plastic over), then all the tiles on the plastic coincide exactly with tiles on the original.]
In the simplest type of tiling, the tile is just moved along in two directions; that is, copies are laid edge-to-edge in rows, as in Figure 20.10.
Each tile must fit exactly into the ones next to it, including its neighbors above and below. We say that each tile is a translation of each other one; we can move them to coincide without doing any rotation or reflection.
When is it possible for a tile to cover the plane in this manner? The boundary of the tile must be divisible into matching pairs of opposing parts that will fit together. Figures 20.10 and 20.11 illustrate two basic ways that this can happen.

839
Translation Criterion RULE
A tile can tile the plane by translations alone if either
- There are four consecutive points , , , and on the boundary such that
- the boundary part from to is congruent by translation to the boundary part from to , and
- the boundary part from to is congruent by translation to the boundary part from to (see Figure 20.12a)
or
- There are six consecutive points , , , , , and on the boundary such that the boundary parts , , and are congruent by translation, respectively, to the boundary parts , , and (see Figure 20.12b).
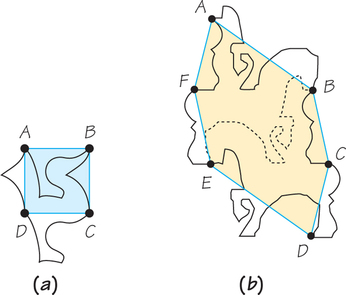
In the first, two opposite pairs of sides match; in the second, three opposite pairs of sides match.
The tiles for Figures 20.10 and 20.11 are shown in outline form in Figure 20.12, together with points marked to show how the tiles fulfill the criterion.
In fact, alternative 1 of the criterion is a special case of alternative 2 (see Exercises 21 and 22 on page 860). Moreover, alternative 2 completely “characterizes” tiles that can tile by translations. That is, not only if alternative 2 is true, then the tile can tile by translations, but also the criterion works “in reverse”: If a tile can tile by translations, then alternative 2 must be true (for some choice of six consecutive points).
A nice feature of the Translation Criterion is that if you can find points as required for alternative 2, then you can join them in order, as in Figures 20.12a and b, to see how to do the tiling.
To create tilings, though, you can proceed exactly as Escher did. His notebooks show that he designed his patterns in just the way that we now describe.
EXAMPLE 2 Tiling Starting from a Parallelogram
How can you make an Escher-like tiling by starting from a parallelogram?
Applying the first alternative of the criterion, start from a parallelogram, make a change to the boundary on one side, and then copy that change to the opposite side. Similarly, change one of the other two sides and copy that change on the side opposite it (see Figure 20.13). Revise as necessary, always making the same change to opposite sides. You might find it useful (as Escher did) to make your designs on graph paper, or you can work by cutting and taping together pieces of heavy paper.
840

Self Check 2
Start from a parallelogram and design your own Escher-like tiling.
- Answers will vary.
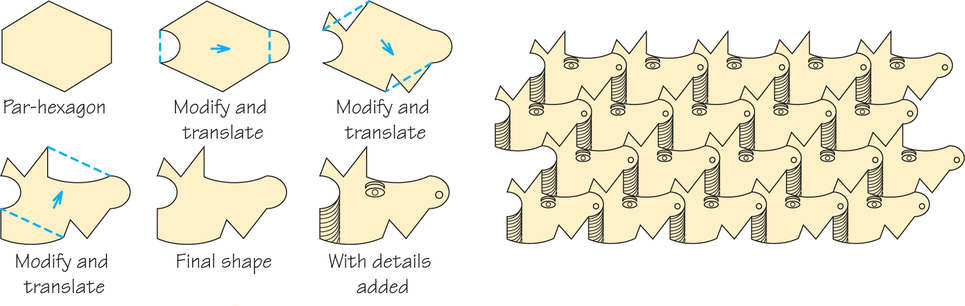
EXAMPLE 3 Tiling Starting from a Hexagon
How can you make an Escher-like tiling by starting instead from a hexagon?
Start from a par-hexagon, a hexagon whose opposite sides are equal and parallel. A par-hexagon is a special case of one of the kinds of hexagons that tile the plane, Type 1, shown in Figure 20.9 on page 835. Again, make a change on one boundary and copy the change to the opposite side, and do this for all three pairs of opposite sides (see Figure 20.14).
Self Check 3
Start from a par-hexagon and design your own Escher-like tiling.
- Answers will vary.