Planning and Visualizing the Shoot
Now that you have a solid understanding of the script and you’ve assembled your creative collaborators, it’s time to get ready to shoot your movie. You need two plans: how you will get your scenes shot, and what the scenes should look like. Following are guidelines for planning the shoot and visualizing it.
Planning the Shoot
Even a one-
- If you can, assemble your cast and do a table reading of the script. A table reading is just what it sounds like: everyone sits around a table and reads the script aloud. This practice is common in theater productions and should be used more frequently in moviemaking because it gets the actors comfortable with their roles and also gives the director important information about how scenes play for emotion, comedy, and character revelation. It is also one last chance to make sure the chemistry of the entire cast works.
- Based on your script work, you should already have a good understanding of which scenes are most important. Balance your shoot plan by making sure you lavish the most time and detail on the most important scenes. For example, a one-
page exposition scene does not need the same amount of time or detail, or the same number of camera setups, as a scene in which a character dies. - Based on the rehearsal and your knowledge of what locations you’ll be using, create a shot list for each scene. A shot list is the list of shots, or camera angles, you will need to be able to edit the scene later. You may want to discuss your shot list with your editor. Make sure you have more coverage, or extra camera angles, than you think you need because that will give you more options later, in the editing room. The assistant director will make sure scenes are properly scheduled, and during production, the script supervisor will keep track of everything that was shot and what still needs to be shot (see Supporting Positions, below). You will also discover during production planning that in some respects, your initial shot list is actually a wish list of all the shots and angles you hope to get; some of these may be eliminated before you even start principal photography because they are too complicated, would require too much equipment, or would take up too much time and therefore cost too much to achieve (see Chapter 5: Production Planning and Management).
- Create floor diagrams for each scene. A floor diagram is a map of where the actors will be and where the camera angles should be. This will tell you or your crew where the cameras will go and how they should move.
- Some directors swear by storyboards (see Chapter 4.), whereas other directors prefer a less-
formal approach to thinking through each scene. Storyboards are sketches of important moments in the scene, rendered in frames, as if you were reading a comic. You may find them useful for describing the action to your designer and photographer. - If your movie is going to involve any kind of visual effects, make sure your previsualization and visual effects partners are close collaborators in this process. For example, if you’re going to use green screen to drop in a background outside a window, your photographer must arrange the lighting so that the effect looks realistic. (You’ll learn more about this in Chapter 8.)
- Remember that when you are shooting, you won’t have an infinite amount of time, and some things are bound to take longer than you hope—
the unexpected will occur. Have a backup plan . . . plus a backup for the backup plan. Know in advance what you can cut if you need to; know what you can work around or accomplish in a shorter amount of time if you get stuck. Although every moment of a film is important, not every moment is a key moment— a moment when the audience should gasp, cry, or laugh.
Visualizing the Shoot
Whereas planning the shoot is a technical exercise, visualizing it is a creative one. You’ll want to run the movie in your mind, seeing it from different angles, trying and discarding mental versions of various ways to approach each scene. At every step, you must ensure that your visual style is consistent with the message of the script and that it advances the emotional truths of the characters.
 KEEP YOUR WRITER AND EDITOR CLOSE
It’s a good idea to have your editor and screenwriter on hand as you visualize your movie. The editor can help you make sure you’re planning with the final outcome in mind; the screenwriter can create alternative scenes in case your initial vision can’t be accomplished.
Once your vision has formed, discuss it with your collaborators. They need to know what you are trying to accomplish—besides needing to make plans for the shooting days, they might add something to your thoughts.
Following is a checklist of the seven most important things to consider as you visualize your film. Much more detail on each area awaits you in subsequent chapters.
- What format will you shoot your movie in? (See Chapter 6: Camera Skills.)
- How will the mise-en-scène, or visual elements of the movie, tell the story and properly set the stage for the characters’ journey? To put it another way, what will the movie look like? (See Chapter 4: Conceptualization and Design.)
- How will you use the camera? Will the camera move with the action, or will it stay in one place and observe it? Will the camera be steady, which feels solid and in control, or shaky and handheld, which feels tense and documentary-like? Will you use long lenses that emphasize the characters at the expense of their environment, or short lenses that keep the characters in the context of the scene? (See Chapter 7: Telling the Story with the Camera.)
- How will you frame your shots? What will go into the frame—and what will be kept hidden, out of frame? (See Chapter 7.)
- What’s the right coverage style? Will the story best be served in long takes, or short takes that are edited together? Does the story—and your budget and time constraints—allow for multiple cameras and many takes, or will you have to move quickly through the scenes? (See Chapter 7.)
- What kinds of transitions will you have between scenes? Most great films have great transitions. Will you cut, dissolve, or wipe? Do you want the shot at the end of one scene to match the composition of the first shot of the next scene? Some of these choices require substantial planning to create the seemingly effortless effect you may imagine. (See Chapter 12: Telling the Story through Editing.)
- Are there visual effects or stunts? How will they be used? Are they going to be created on-set, be added later, or be a hybrid of both techniques? (See Chapter 13: Visual Effects and Animation.)
 SET YOUR SHOT LIST AND PRIORITIES
Using a screenplay from a classmate or from www.dailyscript.com, create a shot list to get enough coverage of one scene. Then rank the shots in priority order, with the understanding that if you don’t have time for everything, you will shoot the most important coverage first.
To answer each of these questions, you’ll involve your producer and key members of your production team. All of these elements are interrelated and affect several departments’ workload and the budget overall (see Chapter 5: Production Planning and Management).
On the Set
The moment you step onto the set as a director is the moment when the film you intend to make intersects with the film you actually make. You will need to understand: each scene from the vantage of characters’ actions as well as camera angles, costumes, and hair; how each scene links to the scenes that came before and the scenes that will come after; how much time there is left to get all the coverage needed; and how the visual effects will be added effectively to the master shot. You must also be prepared, with a visual effect shot, to provide descriptions to your cast of what the final shot will look like. The actors literally may be performing on a completely vacant stage or with a character that will be added later—
Of course, directors don’t always do all of this alone. They are supported by key positions: the assistant director and the script supervisor. You may find, however, that you will be playing both of these roles while on your student movie set.
Regardless, the way you approach directing will have a huge impact on the environment on the set as well as on the film itself. With that in mind, let’s look at some different styles of directing.
Different Styles of Aesthetics and Leadership
Current models of production favor collaborative directors, because there are so many disciplines and skills involved in filmmaking, sometimes overlapping each other. These directors believe that good ideas can come from anyone on the production, and it doesn’t matter who the idea came from because ego isn’t important—the film and its story alone are important. Autocratic directors, like all autocratic people, are less enjoyable to work with, and often develop poor reputations among their colleagues.
SHOW, DON’T TELL
On-screen, show, don’t tell. Actions and visuals often convey more than dialogue. You are making a movie, not a radio show.
As we’ve mentioned earlier, in addition to establishing the atmosphere for the entire production, the director determines the visual storytelling style that’s right for the movie. Some directors care much more about a movie that looks good, even when the story doesn’t call for, or does not need, highly wrought visuals. Sometimes audiences care more about one than the other, and this is often genre dependent. An action movie without a great look won’t meet audience expectations, whereas a personal drama isn’t as dependent on visual style. As an example, we may contrast S.W.A.T. (2003) and Once (2007). S.W.A.T., directed by Clark Johnson, was a $70 million studio action movie, based on a television show. Although it performed well with audiences, grossing over $200 million worldwide, critics panned the movie as being thin on story and lacking dimensional characters. Once, in contrast, was an independent Irish movie directed by John Carney for $150,000. The film is sometimes out of focus, especially in the first reel, and the dialogue can be difficult to understand. Regardless, the reality of its love story and the charm of its music held audiences and critics enthralled, and the movie made $19 million worldwide. Dollar for dollar, Once is both more artistically and more commercially successful than S.W.A.T.
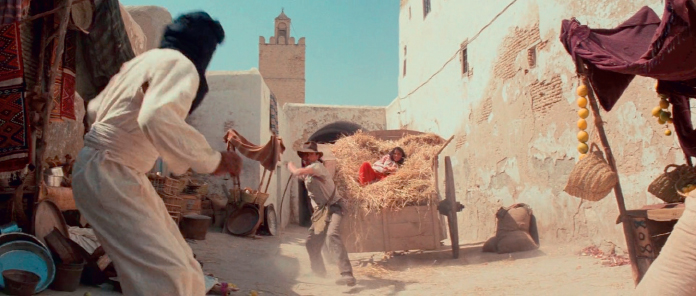
Raiders of the Lost Ark (1981)
One director, two styles: In Raiders of the Lost Ark, director Steven Spielberg created a movie experience that emphasized fun. He chose brightly lit settings and short scenes that propelled the action forward. Thirty-one years later, in Lincoln, Spielberg selected dark, somber scenes, lit as if by period candlelight. Lincoln focuses on backstage political deal making instead of action sequences; it is 35 minutes longer than Raiders of the Lost Ark.
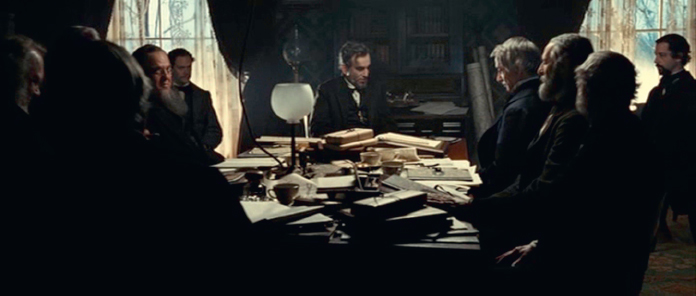
Lincoln (2012)
With so many different approaches to the art of directing, the best way to determine your personal style is to learn from the examples of others and watch a lot of movies, which will give you an opportunity to examine different directing approaches (see the list of must-see movies). Good directors allow their style to be guided by the story; for example, Steven Spielberg directed both Lincoln (2012) and Raiders of the Lost Ark (1981), and the styles of those two films could not be more different.
One way to discover your style—and the style that’s right for the film you’re about to direct—is to ask yourself a series of questions:
 How should the movie look—gritty or crisp? vibrant colors or faded colors? Will I shoot in color or black and white?
-
What will the characters look like—their costumes, hair, and makeup? How can I use the way they look to say something about them and the story?
-
How long should the movie be?
-
Who am I making the movie for? To whom am I telling this story?
-
Do I want the audience to understand everything as it happens, or should some parts of the story be mysterious at first, and only be explained later in the film? At the same time, how can I make sure the audience really understands everything I want them to understand?
-
Do I want to tell the story with many short takes or with a few long takes?
-
Should the actors be completely accurate with their lines, or should I allow them freedom to do some improvising?
-
Do I want the set to feel calm and controlled, or full of creative chaos?
-
Should the story be told in chronological order, or can some scenes play out of sequence?
-
Would you pay to see this movie?
By responding to these questions with answers that are authentic to yourself and to the story you will shoot, you will come to the set with the beginnings of a directorial approach. Then, as with all crafts, you will discover your true style as you do the work.
Working On-Set
Of course, no day on-set will be typical, and directing a movie means preparing for the unexpected to occur. But there is a time-tested process most directors go through during production. We’ll approach this process as if you are shooting an independent movie; the same course of action applies to your class project, except that you will have less time to shoot and you may be wearing a few more, or even all, the hats.
Even though you have planned the entire movie, you should spend concentrated time at the end of each day preparing what you will shoot the next day. Because you may be shooting your script out of sequence, make sure you place these specific scenes within the chronological context of the whole story. This is as important for your communication with the actors as it is for the look and feel of the sets and lighting. Develop an idea of how you will want to stage the scene—where the actors will be in relationship to one another and their surroundings.
On the morning of your shoot, meet on the set with your production designer and director of photography at least an hour before the actors arrive. You should make sure the set meets your approval; if it doesn’t, request changes that are possible within your limited time frame. Also, inspect any props the actors will use to ensure they are correct and functional.
COUNT YOUR SETUPS
The amount of time you spend shooting is determined not by page count but by the number of setups you’re trying to get. Make sure your ambition for setups is reasonable. Every change in the camera’s location costs time and money.
The director of photography will want to know how you envision shooting the scene, so that camera and lights may be put in place. At this point, you may only have a general idea. You should discuss the emotional and storytelling purpose of the scene with the director of photography, who will use this information to propose some approaches to coverage.
Next, call the actors in for a rehearsal. They will not yet be in their costumes or makeup. Ask the crew to step back—generally out of the stage area and out of the actors’ sight lines, so the actors can work with less distraction. The actors may have some questions, and you should answer them. You should know what each character wants at each moment of this scene and have a clear understanding of what happened to each character before and what will happen immediately after. This is important information for the actors to hold on to as they determine the best way to approach the scene. (To learn more, see Action Steps: How to Work with Actors.)
Run through the scene with the actors, making sure to adjust how they move about the set—when they cross from one place to another, pick up a prop, or sit down. This is called blocking. Your script supervisor will take notes on the blocking as you approve it.
Once the rehearsal is done and you feel good about the actors’ readiness, ask the director of photography and sound recordist to come over and watch the actors do a final run-through as a technical rehearsal, which is for blocking more than performance. This type of rehearsal allows the director of photography to finalize light and camera positions and to practice complicated physical camera moves, and the sound recordist to determine the best way to capture the actors’ dialogue, while the actors leave the set for costumes, hair, and makeup.
When the actors and the lights are ready, it is time to shoot the scene. Make sure everyone and everything is in place. You or your camera operator will call out “Camera!” and make sure the camera is recording. Your sound technician will call out “Speed!” which means sound is rolling. Then you, the director, will indicate that the actors should start the scene (you may call “Action!” or let them know in some other way) a few moments after all the recording devices are going, to allow for some “heads,” or extra footage that may be needed in editorial. This is now the actors’ cue to start the scene. When the scene is finished, keep shooting for a moment, to ensure you have a little extra footage at the end of the scene, or “tails,” for editorial purposes, and then let everyone know the take is over. (Many directors call “Cut!”)
Next, you’ll actually repeat the process all over again. You’ll go through the same steps and the same scene to get variety in the actors’ performances. An exact replay of the same scene is known as a take. While filming, you will add “print it” after you call “cut” to note that this is the version or take of the scene you think may be the best. It is often hard to judge on the set how the actors’ performance will play on-screen, especially in the context of the finished movie. For that reason, you should have the actors put some variations into their performances—larger as well as subtler, more dramatic as well as more comedic. Don’t ask them to make changes just for the sake of change, of course—you still want them to be true to their characters—but you want to give them the opportunity to explore some layers of their characters on camera, and you want to give yourself and your editor the chance to make changes in the editing room as you’re assembling the movie. Multiple takes are done not only because of technical errors or dissatisfaction with an aspect of the scene. Shooting a scene today is all about creating options in the editing room tomorrow.
In addition to looking for variety in your actors’ performances, you will repeat the scene to attain different camera angles. Generally, the first takes you shoot will be wide shots, called master shots, in which the whole scene is visible. These master shots establish the set and the characters’ actions. After you are satisfied with your master shot, you will redo the scene for additional angles, such as close-ups and over-the-shoulder shots (see Chapter 7).
At some point during the day—generally at lunch or at the end of the day—you will look at dailies and communicate with your editor. Dailies refer to footage previously shot, either from the day before or, given the speed of today’s digital workflows, sometimes even from earlier that same day. The editor will immediately start thinking about how to cut the scene. In fact, the editor may even begin roughly editing it on-set moments after the scene has been shot, the advantage being that you can end a day or even more importantly, leave a location, fairly satisfied that you have recorded everything you need. The editor will also alert you if there’s any coverage you missed, in which case you could shoot it immediately. If the editor doesn’t volunteer such comments, make sure to ask: you might be able to get some more shots the next day, but once you’re in the editing room, chances are you won’t be able to go back to shoot material you’re missing. You do not want to “fix it in post” or, worse, be forced into staging a costly reshoot weeks or even months after the entire cast and crew have moved on.
If your film involves visual effects, you will also need to collaborate closely with the previsualization team during shooting, perhaps even allowing them to take key measurements on the set or location for later use during the visual effects process. The visual effects supervisor will typically be on-set and may even be able to show you instant rough examples of how the day’s scene will look when finished. This is done by taking a feed off the video camera and marrying it to a virtual set—that is, a set that exists only in computer rendering, not in physical form. You’ll learn how such techniques work in Chapter 13: Visual Effects and Animation; for now, simply enjoy the magical awe of being able to look at what you just shot and imagine it in a visual virtual reality.
STAY SAFE
A film’s director must maintain a working atmosphere of respect and safety. In the rush to get scenes shot and “make the day,” people sometimes take shortcuts and compromise safety. Don’t let this happen. If an accident happens on the set, the director is ultimately responsible. Lives have been lost, and well-known producers and directors have faced criminal charges and seen their careers ruined when this principle was not respected.
ACTION STEPS
How to Work with Actors
Just as every actor has a different style, so does every director. You will find the style that best suits you and the actors in your movie. At the same time, most successful directors follow these steps to help actors give their best performances:
 Know the script. It’s your job to understand the script fully, especially the dialogue. You should have a clear understanding of who the characters are and what each line of dialogue means. If an actor asks, “Why would I say that?” you should be able to answer.
 Talk and listen. Talk with the actors, and listen carefully to what they have to say. Most actors will do preparation: they’ll come to the table with ideas about their characters. Take the time to listen to their feelings and observations, and pay special attention to things they feel uncertain about. This is when you can share your vision of the characters and clarify problems for the actors by discussing the characters and their relationships in more detail.
 Rehearse. Most directors begin by having the actors read the scene aloud, although some directors and actors prefer to “put the script on its feet” right away and use movement to work out the scene. There’s no right or wrong choice—do what works best for you and your cast. The important thing is that rehearsal makes performances better.
 Create a positive environment. It’s your job to create a safe, nonjudgmental space so that the actors can do their work, which is emotional and vulnerable. You set the tone and mood by the way you behave; for example, if you’re directing a comedy, keep everything light, fun, and cheerful.
 Help the actors define their intentions. Acting is largely about playing intention; an intention is what a character wants at each moment in a scene. Intentions may change during a scene, but an actor can only play one intention at a time. You should make sure the actors understand their intentions clearly.
 Give feedback and encouragement. If something isn’t working, it is often best to take the actor aside and discuss it privately; you don’t want to embarrass anyone. And when things are going well, give profound encouragement by word or deed—one well-known director laughs extra loud to let the actors know a scene is especially funny.
 Scale the performance to the way you’ll shoot the scene. Inexperienced actors often overact—that is, their performances are big and corny. Remember that subtle performances often play well on camera, especially in close-up.
 Keep the dialogue open. Don’t stop communicating once the cameras roll. Instead, check in with your cast as often as you check the shot. Sometimes actors make important character discoveries on the spot, and you will want to take full advantage of their process.
 When shooting, don’t cut off an actor’s performance, especially if it is an ad lib or something improvised. Often, some of the most memorable moments come from an actor’s inspiration while in character during a scene. Keep the camera rolling to capture these moments.
Supporting Positions
Although you will likely be doing many of the tasks described in this section yourself, on a film of some scale the director is supported by two key positions: the assistant director and the script supervisor. Assistant directors (ADs) hold the most stressful job on the set. They must coordinate all the necessary elements to shoot a scene. The lead AD is called the first AD, and there may be one or more second and third ADs reporting to the first AD, depending on the complexity of the production.
HOW WOULD YOU SHOOT THIS SCENE?
Select a scene from a class project or from www.dailyscript.com. Your assignment: design three different ways to block and shoot the scene. Which works best for the characters? for the overall arc of the film’s story? Why?
First ADs begin work in the preparation stage and are responsible for breaking the script down into scenes and figuring out the best way to organize the shooting schedule; this involves coordination with all other departments (see Chapter 5: Production Planning and Management). On a shooting day, the first AD is the first person to arrive and the last to leave and, in between, keeps the entire company in sync with what needs to be ready and when, solving numerous problems along the way. The first AD also keeps an eye on the clock, calling for meal breaks and making sure crews don’t go into overtime without the producer’s approval; plus, on large productions, it is often the first AD who calls “Action!” The first AD is simultaneously the director’s confidant, shield, and taskmaster.
If present on a production, second and third ADs have specific areas of responsibility. For example, they may be in charge of overseeing principal cast members or organizing crowds in crowd scenes. People who enjoy being ADs thrive at being in the center of swirling activity and forging order out of apparent chaos.
The script supervisor creates the collective written record of the production, ensuring a film’s continuity (see Chapter 7). The script supervisor will usually be seen right next to the director, taking detailed notes of everything each actor is doing during each take. If an actor forgets when she picked up a glass of water, for example, the script supervisor will give the answer; such detailed accuracy is essential for making sure that actions and dialogue match in multiple takes. The script supervisor also carefully follows the dialogue in the script, making notes to ensure that each line has been shot from all necessary camera angles, as well as noting any new lines of dialogue that have been added or changed, and lines that have been deleted.
To keep all this information organized, script supervisors have developed a unique form of notation. After the scene is shot, the script supervisor gives these notes to the editor, to be used as a reference in assembling the film.