Outdoor Lighting
Making a movie outdoors presents special opportunities and challenges. On the one hand, you have an abundant source of light from the sun and, on clear nights with a camera that operates well in low-
Adjusting for Weather and Time of Day
In daylight photography, the sun will always be your key light. When the sky is clear, the sun will be harsh and strong, which means your images will be high contrast: you’ll notice strong shadows around noses and eyes. How can you counteract the contrast if you don’t want it? You can use any of the following methods, or employ them together:
 Use stretch silks or scrim between the sun and the actors. The diffusion media will flatten the sunlight and reduce shadows.
-
Set up reflectors to bounce the sun’s rays back, throwing a fill light on the actors. Reflectors are lightweight, inexpensive, easy to set up, and—best of all—don’t need electricity.
-
Add strong fill lights to counterbalance the sun’s light.
On the other hand, when the sky is overcast or cloudy, or if fog rolls in, the light will be even but flat. In this case, you will probably want to increase the contrast by adding fill light, either with electric lights or reflectors.
 REMEMBER TO WHITE-BALANCE
Even when shooting in daylight, don’t forget to white-balance (see Chapter 8). The sun’s color temperature changes throughout the day. On a clear day, sunlight will be 5500 K at noon, but it can rise to 7000 K when clouds roll in. It will be 2500 K at sunset and sunrise.
You should also organize your shot list carefully, and make sure to white-balance as the daylight changes. Shadows alter direction as the sun arcs through the sky; light in the morning is different from light at midday, which is different from light at evening. Shoot your wide shots at the time of day that’s appropriate for the story; it will be easier to cheat the lighting when you move in for close-ups. Of course, if your schedule permits, overcast days, sunset, and dawn provide great mood and free production value! Magic hour, which is the time between sunset and dusk, or dawn and sunrise, is a short but remarkable time for filming. It is called magic or golden hour as shadows are gone, and the natural lighting ratio between the background and foreground is very small. Professionals always check the weather carefully when shooting outdoors, because a sudden rainstorm or windstorm can be extremely dangerous (water and electricity are a deadly combination) and can damage equipment.
If a scene takes place at night, or is a scene that will have extensive visual effects added, most cinematographers will prefer to shoot at night or in a studio setting, where lighting can be meticulously controlled. There is also a technique called day for night, which involves shooting during the daytime with a deep-blue filter on the lens and further darkening the image in postproduction. However, day for night has fallen out of favor; the sun’s strong shadows can give it away, and audiences don’t respond well to obvious fakery, so there is no point using the technique unless you have a great deal of expertise with it.
HOW TO USE THE SUN
Try positioning the actors so that the sunlight is not directly in their eyes, which will cause them to squint, but almost directly in front of them.
It is quite possible to shoot night for night, especially as many digital cameras capture excellent images even in low-light conditions, but it also requires great skill to make night lighting look convincing and not artificial. The following four techniques can create masterful night exterior shots:
-
Motivate the light whenever possible, using the moon, streetlights, car headlights, or light streaming out of windows.
-
Supplement the motivated key light with carefully controlled fill lights. You’ll probably want to gel them blue.
-
Backlight is essential to separate the actors from the nighttime environment. Backlights provide a fringe of light that defines the actors’ shapes.
-
Don’t forget to light the background; at night, if you don’t light it, you won’t see it. Background lighting also creates a sense of depth and identifies the actors as situated within a large, outdoor environment.
 OUTDOOR LIGHTING
Shoot test footage of an exterior daytime scene. Practice positioning the actors at different angles to the sun. If you have access to scrims or silks, shoot more test footage with the diffusion media to see how it flattens light on the actors’ faces.
As with all scenes you’ll be shooting, testing the look of night shots is essential. Until you see the result (on a playback monitor or on film), you cannot be certain that your night lighting will appear natural instead of contrived.
Practical Outdoor Setups
When you approach outdoor cinematography for the first time, it can seem daunting. Regardless of the amount of equipment you have, you can adapt these setups for your class projects.
FIGURE 9.6Exterior daytime shoot, two-person dialogue scene
Silks diffuse the bright sunlight, reducing contrast, and reflectors bounce fill light.
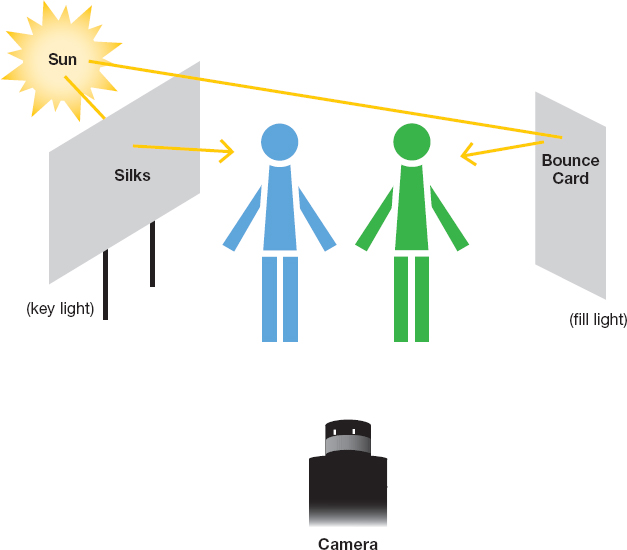
FIGURE 9.7Exterior daytime shoot, walk-and-talk with a Steadicam
A daytime walk-and-talk scene may use no artificial lights at all, as the subjects’ movements distract from the sharp contrast, and the director wants realistic lighting. The camera operator has the sun to her back, which means the sun is a strong front key light on the actors’ faces.
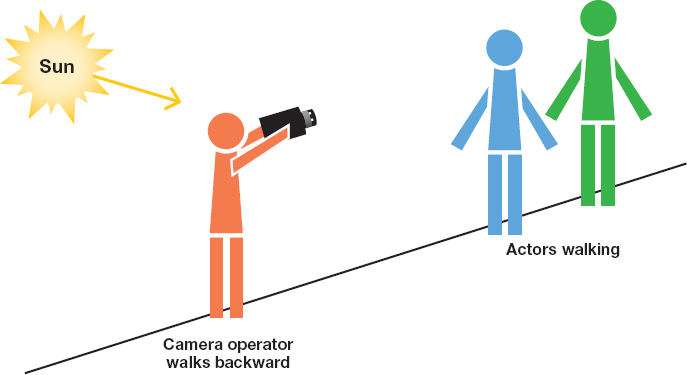
FIGURE 9.8Exterior night shoot, three-person scene
The key light is motivated by the car’s LED headlights. The crew has meticulously lit the background so you can see it—otherwise, they may just as well have shot this scene against a black drape!
