Chapter 2. Osmosis and Diffusion: Testing a Hypothesis With a Model System
Objectives
By the end of the period, students will be able to:
- understand the importance of osmosis and diffusion in living systems.
- complete an experiment using dialysis tubing to model diffusion.
- understand and explain the process of hypothesis testing.
Osmosis and Diffusion
In this lab we will build on everything that you have already learned in lab. We will use microscopes, make a wet mount, use the process of hypothesis testing, and model an important biological/chemical process!
Have you ever smelled a skunk without even seeing where it is? If so, you have experienced the process of diffusion. The potent chemicals that make the smell are produced in specialized glands and are released when the skunk is threatened. Or, have you ever had a sprained ankle and been told to soak your injury in Epsom salts? In so doing, you are drawing fluids out of the injured joint and often easing the pain. If so, you have experienced osmosis.
Diffusion is the movement of a substance from a region of high concentration to a region of lower concentration. Both gases and liquids diffuse in essentially the same way, although diffusion happens much more quickly for gases. Diffusion is critically important in the functioning of many biological systems. Oxygen diffuses into cells, where it is used in respiration. Carbon dioxide diffuses out of cells into the bloodstream and is then taken to the lungs, where it is exhaled. Your TA will provide other examples.
If there are materials dissolved in a solution, those materials are called the solutes. Let’s compare two solutions. If the first solution is deionized water, there are no solutes in it and it is 100% water. If a second solution has glucose dissolved in it, the solute is the glucose and the concentration of water is less than 100%. If there were a permeable membrane between these two solutions, the glucose would move by diffusion from solution 2 to solution 1. However, since the concentration of water is greater in solution 1, there will be diffusion of water from solution 1 to solution 2. Both the glucose and water will move if the membrane is permeable. In reality, most membranes are selectively permeable, allowing substances only of a certain size to move.
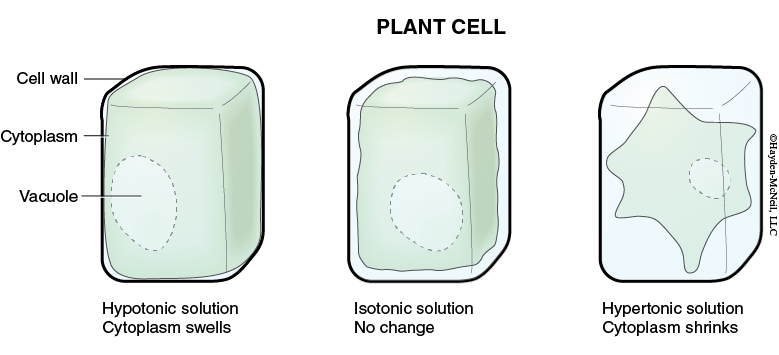
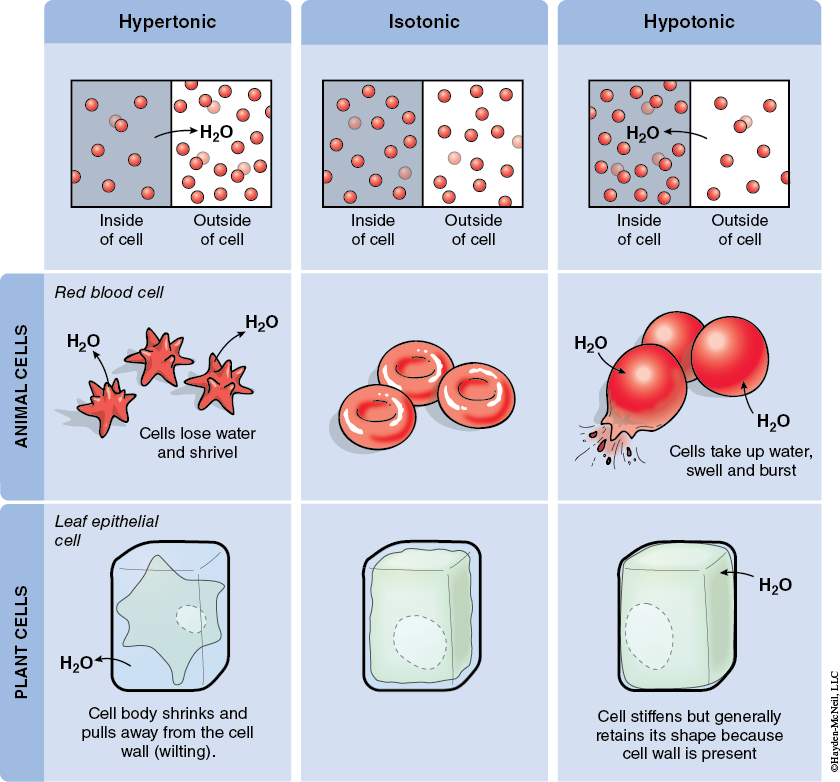
When we compare two solutions relative to each other, we often use the terms hypotonic, hypertonic, or isotonic. If two solutions have the same concentration of solutes, they are isotonic relative to each other and if the solutions are next to each other, they won’t change (Figures 5.1 and 5.2).
If one solution has more solutes (and thus a lower concentration of water), it is hypertonic relative to the other solution. And, if these two solutions are separated by a permeable membrane, there will be a net movement of water into the hypertonic solution.
If a solution has fewer solutes than another solution, it is said to be hypotonic relative to the other solution.
Remember when using the terms isotonic, hypertonic, and hypotonic, they are always comparative. Thus if you say one solution is hypertonic, it has to be in comparison to another solution.
Osmosis is the diffusion of water across a selectively permeable membrane. The plasma membrane of cells is an example of a selectively permeable membrane. Water will move into or out of cells depending on the concentration of water that surrounds the cell. The cytoplasm of a cell is mostly water, but there are lots of other molecules in the cytoplasm. If a cell is placed in fresh, pure water, the concentration of water inside the cell is less than outside and water will diffuse into the cell. (Note: The concentration of water in the cell is less than outside because of the materials dissolved in the cytoplasm of the cell.)
Laboratory Procedure
- CAREFULLY EXAMINE AND UNDERSTAND THESE EXAMPLES.
Examples. If you place a drop of saltwater next to the leaf of an Elodea (an aquatic plant), water will move out of the cells and into the saltwater. That is, water diffused out of the cells, causing them to shrink. This will be visible because even though the cells shrink, the cell walls do not.
- DEMONSTRATION OF MATERIALS
We will use dialysis tubing as a means of measuring diffusion. Your TA will show you how diffusion can be measured. Dialysis tubing is selectively permeable (water can pass through it, but larger molecules such as starch cannot pass through the membrane) and so it is a good model of the plasma membranes of cells. Why are models important in science?
Each lab group will have the following materials: Dialysis bags, string, pipette, 3 cups for water, scissors and dropper jars with water, 10% sucrose and 20% sucrose.
Basic Procedure
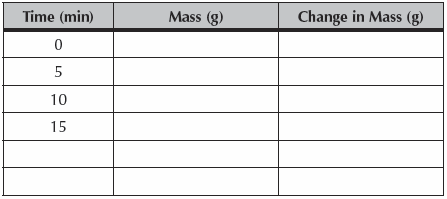
A 10 cm long dialysis bag must first be soaked in water. Then twist one end shut, fold it over, and tie a knot in that end with a short piece of string. It is critical that the knot be tight enough to not let any solution leak out. 10 ml of the 10% sucrose solution is pipetted into the bag. Air is gently squeezed from the top of the bag. Twist, fold, and tie the free end of the tubing with string as before. The bag should be leak proof. Gently blot the excess water and with the bag on the balance provided. Record the mass at time “0.” (The string must be wet to ensure accurate comparison to later measures.) The bag is placed in a beaker of water. The mass is recorded every 5 minutes, as indicated in Table 5.1.
Table 5.1. Demonstration: Record of mass and change of mass of dialysis bag with 10% sucrose as a function of time.
- WHAT AFFECTS THE RATE OF DIFFUSION?
Many different things could possibly affect the rate of diffusion. For example, what if you used a higher concentration of sucrose in the bag? Could temperature of the water be important? In this next part of the lab, we will do two experiments to see what will happen if we use a more concentrated solution in the bag and to see the effects of temperature.
Experimental Design
Question: What will happen to the rate of diffusion if the sucrose concentration is higher than 10%?
Hypothesis. State what you think will happen. Make a prediction and put it in the form of a statement.
Question
uYg+litsdaNVUVNbDeKblCLkUOPB64fPPlmbpSm8s/iyATS+3DcCWuTZ99aBfNAqpsIbLT4m09yE12+XHzQtugIKxum9I0QDQdb+YKSAy60=Question
k4aSx9KDyAr4lm/xPHiWoVvRr923PCPHl9O8wHa9y31TrJGnhXo2qQDVi72Z+GPRlZVfayyWXpv7ePlr+G3Kb2N5hqGqjKYstiNlKS2FO++x7IbkJ0QuYA==What should be your control in this experiment? Be sure to run a control and be able to explain its importance.
The Experiment
We will redo the above procedure but will use 10% sucrose and 20% sucrose, as well as with water as the control. In this example, the independent variable is the concentration of sucrose in the bag. The dependent variable, what we will measure, is the rate of diffusion. Since many lab groups will do the same experiment, we will have several replicates.
WHEN YOU HAVE COMPLETED THIS EXPERIMENT
Each lab must be clean and ready for the next group of students. Part of your grade will be based on how clean the lab is left for the next group!
CHECKLIST FOR THE END OF LAB
❑ Clean up your lab table. Make sure microscope slides and coverslips are clean.
❑ Wipe up your table and make sure there are materials ready for the next group. Follow the instruction of your TA in getting the materials ready for the next group.
❑ Clean up around the sinks.