3.1 Geospatial Lab Application: Georeferencing an Image
This chapter’s lab will introduce you to some of the basics of working with georeferencing concepts by matching an unreferenced map image against a referenced imagery source. You’ll be using the free Microsoft MapCruncher utility for this exercise.
Important note: MapCruncher will take a map (in an image or PDF format) and align it to its Virtual Earth (and transform it into a Mercator projection). The end result of the process will be a series of “tiles,” used by Virtual Earth to examine your map and match it up with their data. While you’ll be using georeferencing concepts from the chapter, the end result will be that your map will be turned into a “mashup” that could later be used on a Web page.
Objectives
The goals for you to take away from this lab are:
 to familiarize yourself with the MapCruncher operating environment.
- to analyze both the unreferenced image and the source for appropriate control point locations.
- to perform a transformation on the unreferenced data.
- to evaluate the results of the procedure.
Obtaining Software
The current version of MapCruncher (3.2) is available for free download at http://www.microsoft.com/en-us/download/details.aspx?id=22420.
Important note: Software and online resources sometimes change fast. This lab was designed with the most recently available version of the software at the time of writing. However, if the software or Websites have changed significantly between then and now, an updated version of this lab (using the newest versions) is available online at http://www.whfreeman.com/shellito2e.
Using Geospatial Technologies
The concepts you’ll be working with in this lab are used in a variety of real-world applications, including:
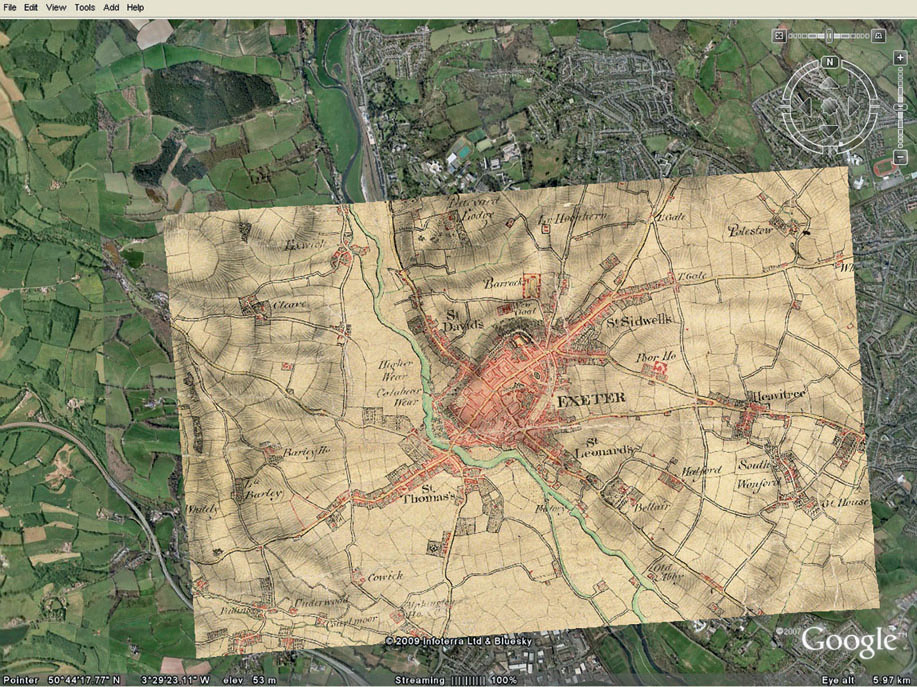
- the historical preservation of old maps, which utilizes georeferencing techniques with scanned versions of the maps, so that they may be matched up with current geography for comparison and analysis.
- engineering and real estate analysis, which utilizes scanned and georeferenced versions of old railroad property valuation maps (often hand-drawn), to compare land parcel plans and values from the past with current maps and imagery.
Lab Data
Copy the Chapter3 folder containing both a PDF version (parkmap2010.pdf) and a BMP version (parkmap2010.bmp) of the same file, which is a map—with no spatial reference attached to it as it’s only a graphic—of the Youngstown State University (YSU) campus. Maps of YSU can also be downloaded from the campus map Web page at http://web.ysu.edu/gen/ysu/Directions_and_Virtual_Tour_m162.html.
Important note: If you are working with MapCruncher on a 32-bit machine, use the PDF version of parkmap2010, and if you’re working with MapCruncher on a 64-bit machine, use the BMP version of parkmap2010 instead (MapCruncher will not work properly with PDF files on a 64-bit machine). Information on how to work with PDFs in MapCruncher on a 64-bit machine is available at the bottom of this Web page: http://research.microsoft.com/en-us/um/redmond/projects/mapcruncher/
Localizing This Lab
MapCruncher is capable of georeferencing a graphic or PDF map of an area. If you have a graphic (such as a BMP) or PDF of a map of your school, it may be substituted for the YSU campus map and you can match your own local data instead. The same steps will still apply; you’ll just be finding appropriate local control points for your school rather than the ones for Youngstown, Ohio.
Alternatively, you could use a graphic or PDF of a map of a local park, hike or bike trail, fairgrounds, or local shopping district, and georeference that instead.
74
3.1 Getting Started With MapCruncher
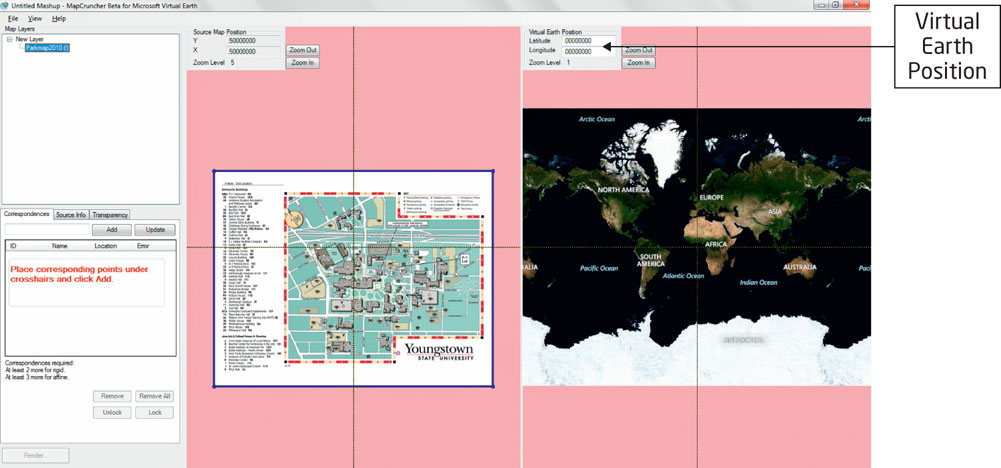
- Start MapCruncher. It will open with the default screen referred to as “Untitled Mashup.” Maximize the MapCruncher window to give yourself plenty of room to work with.
- The left side of the screen will contain the unreferenced image you want to match, while the right side of the screen will contain the referenced imagery from Microsoft’s Bing Maps “Virtual Earth” (this is what you’ll be matching your image to).
- As the text box notes, select the File pull-down menu, and choose Add Source Map.
- Navigate to the Chapter 3 folder and select the parkmap2010.pdf file (or the parkmap2010.bmp file if you’re working on a 64-bit machine).
- In the upper right corner of the MapCruncher screen you’ll see the Virtual Earth Position box.
 (Source: Microsoft)
 - Type in the following coordinates and then click on Zoom In to move the view to YSU:
- Latitude: 41.10687400
- Longitude: −80.64670900
- The crosshairs in the image will center on a point in northeast Ohio. Press the Virtual Earth Position’s Zoom In button several times to zoom in to YSU’s campus (Zoom Level 17 is probably a good starting point).
- Both of the views will now show the campus—the Source Map (left-hand view) will show the PDF map image (or graphic) while the Virtual Earth (right-hand view) will show the aerial imagery from Virtual Earth.
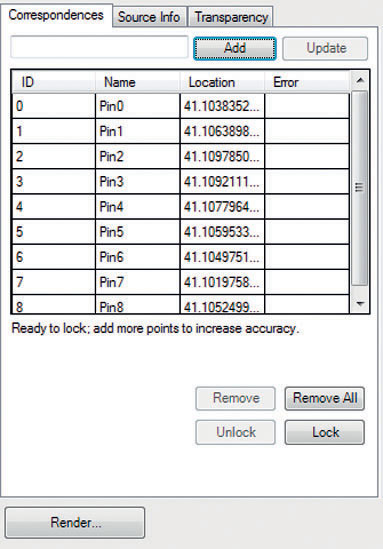
3.2 Selecting Correspondences
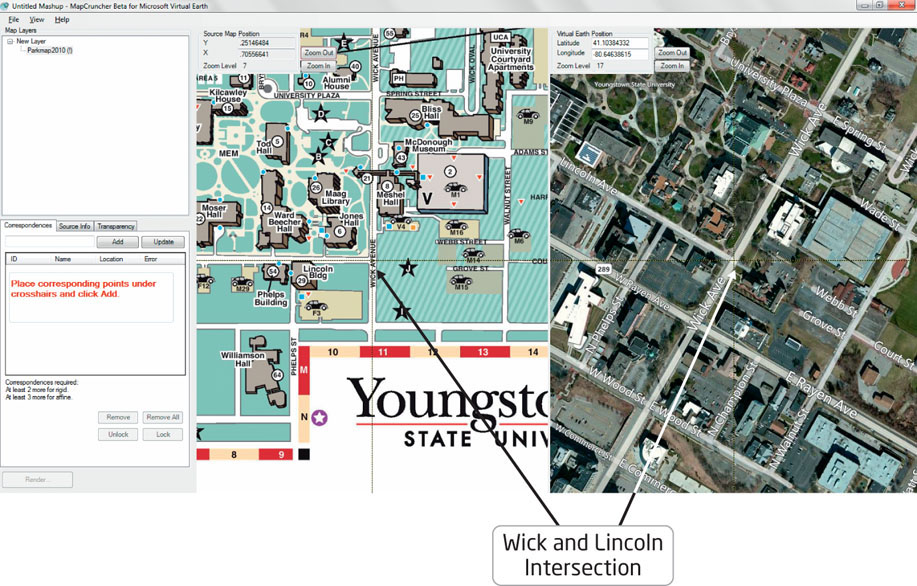
- The next step is to choose the same positions on both images to use as control points (MapCruncher refers to them as “correspondences”). A good starting point will be the intersection of Wick Avenue and Lincoln Avenue (a major road intersection that borders the southeastern portion of the campus).
- Click on Zoom In on the Source Map until you reach Zoom Level 7.
- The cursor will change to a hand—use this to pan around the map until the intersection of Wick and Lincoln Avenues is centered under the Source Map’s crosshairs.
- In the Virtual Earth view, pan around the map until that same intersection is in the Virtual Earth’s crosshairs.
 (Source: Microsoft)
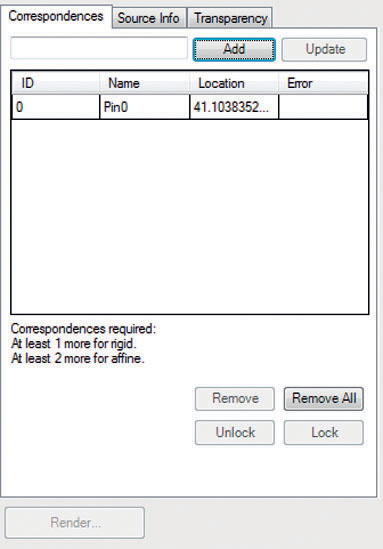
 - When you have both crosshairs accurately positioned, click Add in the Correspondences box.
 (Source: Microsoft)
 - The point will appear as ID 0. This will be the first correspondence (as MapCruncher refers to control points) to be selected.
Question 3.1
rD3bv9bmg5xf/V4ArDiaaCgRJgm6JkVJ3lENFzPBmiFW+RuWaB2ngyD7ePPkCLvEDm2RBjoXneU=Question 3.2
lkah+S3vosxxit48zWMe2D80rpKIFL+ZosUB3OeYYYeRMQt5qH1P3wRDMJ5IiJdr8dWAFx9i2QDQatxgoz6yGXIVfHWOOHkLpaHnBqhzpmg0+fylfOUY1R1JQfIBYCjQARyna+26muWYHx55BhjPWQRwyTxLmFqXJbriSHUDyf5HmySbaBL/yjMjB1sYNlQh/lHN0EGfm+6Hb0NqQejfYGx1tsM= - Use the combination of the Source Map and Virtual Earth to select another two correspondence points at clearly defined locations on both sources. Be sure to spread out the points geographically across the Source Map image, then click Lock. MapCruncher will perform an initial fit of the data, but if you pan around you’ll see that things don’t match up just yet. Press Unlock and select a total of ten correspondences (you can use the Lock option to see how things are fitting together as you go, then Unlock to adjust the points).
Question 3.3
UjiLd7jAlUZFI2pyJnCoYUZKq88QuKFJtiG8Qf73RwjL/2BNtPCPtiYl23LnNrAtVXNibzaeIWYuDEbSpYjI8+skUjQjG/72fCq0gmUJgTlEtIEFQuestion 3.4
FRgSrdp5sgX50rREKqsPVBSdv5FqDl31k3Kr8Y1NnXYQfKnwkJG09a1rRixwy0x5Lc3kC1OnHQEvM2aOZ8PC1QgZeDdERQfQGT+2a3DCoz+9egNyTpJoYjs+DB4Rr5z1AlVFrdeDM3H7hzWoNyTb/go2BCRUzl+m8pe0fpj176I= - Once you have about ten good locations chosen, click the Lock button in the Correspondences box.
 (Source: Microsoft)
 - A value for error will be computed for each of the points, and they will be sorted from highest error value to lowest error value (rather than by ID number).
Question 3.5
J3cpmTojRPNl8YWYOMM97Hze18DqfQE164PCmaj0rXrWIMEaLfjTiU45QRtej+17ANKHM6j0Bz76NvL/pgtn0uJB4sn3PDBH6MNt3g== - Pan around the source image to the ID number with the highest error value. With the maps locked you’ll see both the Source Map and Virtual Earth move together.
Important note: To zoom directly to one of the correspondence points, double-click on its ID in the box, and MapCruncher will zoom in and center on that control point.
If any of your error values are very high, you can change them by doing the following:- Zoom in to the selected point. You’ll see a green dot indicating where MapCruncher thinks the point should be and a line showing the distance from where you placed the correspondence point to where MapCruncher thinks it should be.
- Click Unlock.
- Move the crosshairs of the Source Map to the new spot.
- Click Update.
- Click Lock again to view the updated error terms.
- Pan around the Source Map, viewing how well points on the interior and on the fringes match up between the Source Map and the Virtual Earth representation. Add a few more correspondence points if you feel it’s necessary, to adjust for areas that don’t match up well.
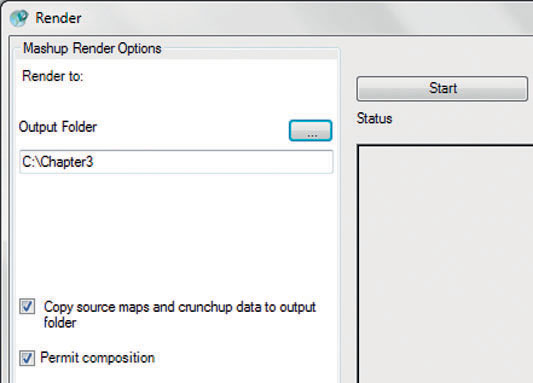
3.3 Matching the Source Map to Virtual Earth
When you have the Source Map set up the way you want it, it’s time to complete the process.
- You may first want to save your work, by selecting the File pull-down menu and choosing Save Mashup. Give your work a file name and save it on your machine (it will save with the file extension “.yum”).
- Back in MapCruncher, click the Render button in the lower left-hand corner. The Render dialog box will open.
 (Source: Microsoft)
 - Press the Pick button (the one with the “…” symbol on it) next to the Output Folder, and then navigate to a folder on your machine to save the aligned file to.
- Put checkmarks in the Copy source maps and crunchup data to output folder and the Permit composition boxes.
- Click the Start button to begin the process.
Important note: The Render process may take several minutes and could fill up about 200 MB of space on your machine. - You’ll see the new layer being “built” in the Status window of the Render dialog box.
- After a couple of minutes, the Render Complete box will appear. Click OK in this box.
- Click on the Preview rendered results text at the bottom of the Render dialog box. The Mashup Viewer will open to show the map lined up with Virtual Earth.
- From the Mashup Viewer’s VE Background pull-down menu, select the Hybrid option.
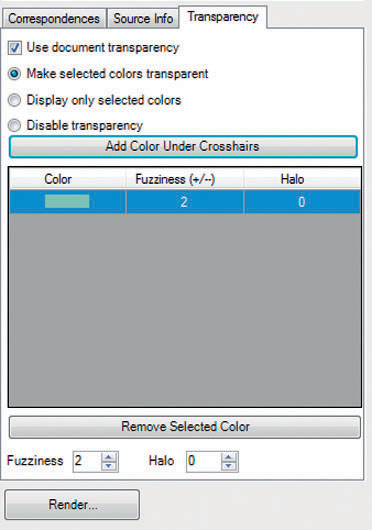
- Zoom in on the image. You’ll see that the parkmap has been transformed and aligned, but it’ll be tough to judge how good the match actually is, with the solid colors of the map overlaid on the roads and imagery. It can be made easier to judge if some of those solid colors (including the white border of the map) are made transparent. Other colors can also be made transparent, making it easier to match up the new map with the aerial imagery.
- Close the Mashup Viewer. Back in MapCruncher, select the Transparency tab.
- Put a checkmark in the Use document transparency box.
- Choose the Make selected colors transparent option.
- In the Source Map, pan across the map so that the green color (for instance, the circular greenery in the campus center) is under the crosshairs, and then click the Add Color Under Crosshairs button. The green color will appear in the box, while the green on the Source Map should change to pink. If necessary, change the Fuzziness option to 3 if the colors don’t change to pink.
 (Source: Microsoft)
 - Now pan across the Source Map so that the color white (you could choose one of the roads going through campus, such as Lincoln Avenue) is under the crosshairs, and then click the Add Color Under Crosshairs button. The white color will appear in the box, while the white on the Source Map should also change to pink.
- Click the Render button again.
- In the Render dialog box, save the results to a new folder. Click Start and the image will re-render, this time with the colors green and white made transparent. Preview the rendered results again.
- In the new Mashup Viewer, the map will be rendered, but it will be different this time.
- From the Mashup Viewer’s VE Background pull-down menu, select the Roads option.
Question 3.6
tH2r3QZIbPTa+tw0wsicYvfB8IHxJjyYBrySX4jpOpNqeDUz1E2ccAiCrrfVUWEc8iSt6/ayItuqBj/X05L6GBPlDNsxujc8OwHNF4FUXIZM2B/hELyj6FVo0EMbagZOMIEhoFmlpUCxvfTBZIbWXUIgdJA1aNktZMq3HWwiLCgQoHTR - From the VE Background pull-down menu, select the Aerial Photos option.
Question 3.7
GPGZY1F505Q14mHL+Fro5hxNhUC8Av11Az9shnmRHU7C6ZCEDPVigvSFGTbJmgPbnZMWBcGjfA8RfqkjalpY83tPhbRrAwy7HESoI+ynfnfnkAR5wxiN310SAqxVSbfkCYEcx6bWFQqn9Z5jQPwpwrL4+QpfwTi7nHrNsyi+fEASlUWIBvtQt8zSJNbUu1i/qX87cgPZpFT8V99vMFOkt9xLL1lndmdpoCoXL9bwz+MvtiDLC4xAiAaFuhvxcQkboUp9mA==
Closing Time
MapCruncher is a highly versatile tool that is used for making data (such as unreferenced images) match the map. Any type of map that is drawn to scale (such as a park trail map, a fairgrounds map, a theme park diagram, or an unreferenced image) can be aligned using MapCruncher. You can now exit MapCruncher by selecting Exit from the File pull-down menu.