9.2 What Are the Different Types of Aerial Photos?
vertical photo an aerial photo in which the camera is looking directly down at a landscape
nadir the location on the ground that lies directly below the camera in aerial photography
panchromatic black-and-white aerial imagery
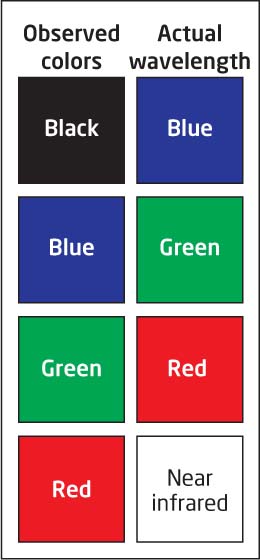
CIR photo color infrared photo—a photo where infrared reflection is shown in shades of red, red reflection is shown in shades of green, and green reflection is shown in shades of blue
When you’re flying in a plane and you look out the window, you’re looking down on the landscape below. If you had a camera strapped on the bottom of the plane and took a picture straight down from under the plane, you’d be capturing a vertical photo. Take a look back at Figure 9.4—the Cuban landscape as seen by the U-2 is photographed like you were looking down from the plane. Many aerial photos are vertical (although there may be some minor tilting from the camera). The spot on the ground directly beneath the camera is referred to as the nadir.
Aerial photos can be panchromatic or color. Panchromatic imagery only captures the visible portion of light in its entirety. As a result, panchromatic aerial photos will be grayscale (that is, composed from a range of gray color values that exist between black and white—like the Cuban aerial photo). Color imagery captures the three main bands of visible light—red, green, and blue—and the colors are composited together in the digital imagery (or film) as a true color composite (we’ll discuss much more about light and composites in Chapter 10).
306
A color infrared (CIR) photo is a distinctive type of aerial color photo. A CIR image is captured with a special type of film that’s sensitive to infrared light. Infrared energy is invisible to the naked eye, but special film processes can capture it. To enable us to see infrared energy reflection, a special filter is applied to the film—the end result is a CIR photo, wherein near-infrared (NIR) reflection is displayed in the color red, red reflection is displayed in the color green, and green reflection is displayed in the color blue. Blue reflection is not shown in the image, as it is blocked by the filter and displayed as black (Figure 9.7).
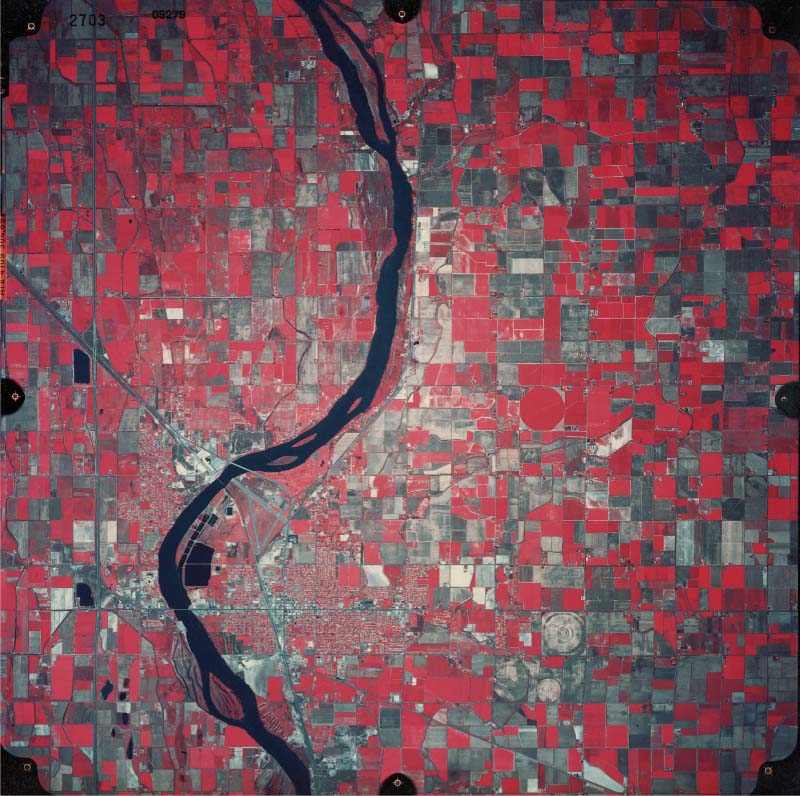
CIR imagery can be very useful in environmental studies. For instance, the relative health of areas of vegetation can be observed very clearly in CIR imagery. Examine the CIR aerial photo of Burley, Idaho, in Figure 9.8. The bright red sections of the image are indicative of areas with a high amount of NIR reflection (since NIR reflection is being shown with the color red on the image)—probably grass, trees, or healthy agricultural fields (all elements that would reflect large amounts of NIR light). The river appears black since water absorbs all types of light, except the color blue (which is then blocked in the CIR photo and shows up as black). Developed areas appear as a white or cyan color, as do fields of bare earth that have either been harvested and plowed over, or have been prepared for crops but not yet sown with seed. For more about examining different types of aerial photos see Hands-on Application 9.2: Examining CIR Photos and Hands-on Application 9.3: The National Aerial Photography Program.
307
!geo! HANDS-ON APPLICATION 9.2
Examining CIR Photos
To look at the differences between color and color infrared images, point your Web browser to the Map West Virginia viewer (also used back in Hands-on Application 1.3) at: http://www.mapwv.gov/viewer/index.html. Select the Layers tab and you’ll see there are several basemaps that use aerial photos, including recent NAIP color imagery (see page 10), and an option for color infrared (CIR) photos from 1996. Under the Search tab, type in the address of West Virginia University’s downtown campus: 1550 University Avenue, Morgantown, WV 26506, and then search for it. The Viewer will zoom you to the WVU campus area. Back under Layers, select the option for 1996 CIR Imagery and the basemap will change to color infrared imagery. Examine the campus and then select the option for 2009 NAIP imagery (this is color aerial imagery). Zoom around the campus and switch back and forth between the CIR and regular color aerial imagery to see the differences between the two types of aerial photos.
Expansion Questions:

Question
lp/8kTKoxQVIib07l+GEjDXacaVx3Aq+vKBlkRZv1IzYxdycIkWSD3Dq31mSI+y7A0HN1qjBAi3TinaOc+rUtVBNEaVvc6q1TC1T1fq8Bh+4/aLVCa4pxObo/9bRqa9eVU2cGV3y5EEXEgWk+HCvKm5ALjesByTOOssHwDRa+Rtv9sXHjC950iLF38LrTNjiwv9c1J0iTmidANHL/usC4b4tBJv5Zghgz0P9qgm/AZReLtjc4oFPEv5ff2EhHeqgZpxuFj+kw7tIS/QaGVg1vpEswmfHfyo+z3yeucdVe2CAgSMRIRoGysem/MRdjj8xR6o3qJGwM9Dmx+5lspK9JYLN2D8kkOz7n9RAb9gZGC7kRI7dqWdNHiGLpuSj9oLzVKK/r9gkVA1NptEhxiv1FMqBCDCeUFOqq1jfsG/mw55AYfqn+RwFa5km5vgc3hl8lTZ1fQwiTXZIE4F8-
Question
dnaqDTJYOMSESiVjdXKgoxBjnkwKknE12rGu2V3BFT7G5vt7NjCL2WOnuempjUe+RwmEU4niE5RUen2Ez2ZHyYxjbITeAibs7ngdQXF25qWaC4WZja/qfPmJuQ5WMnKHww8t+D+LZF6DuGvVyr+5D1JjrOGX4i6+7h9d7hsJtB7UTK2wacwE/AxZAKlJw10npFbI1LlmGAKtuf2bIG/8GgZRLuGqqoopSASp91/kWxnXpu3AOUFRpm6VPTr9iGoIonzoDVTyq+Vl9XLpLjUSu/GkPoPlF3ONNu919x9m5QunP/jGaYKHn31qoFDtsNzPRZ3lOY84z83rZm0iRv6U7RwsY+PW3sIedFQiC+hARIX+zFk5qNT3oGR2JfKKpndycMjb+9Wp2N2VhYfRr3TaBezUOZenCYP/+uoqw5i2BjMG+KkF0VD1PqMSAfsOmz5URY9df8jeZmnVjUn/oyc6GdAEdXr6m057KSbjUg==
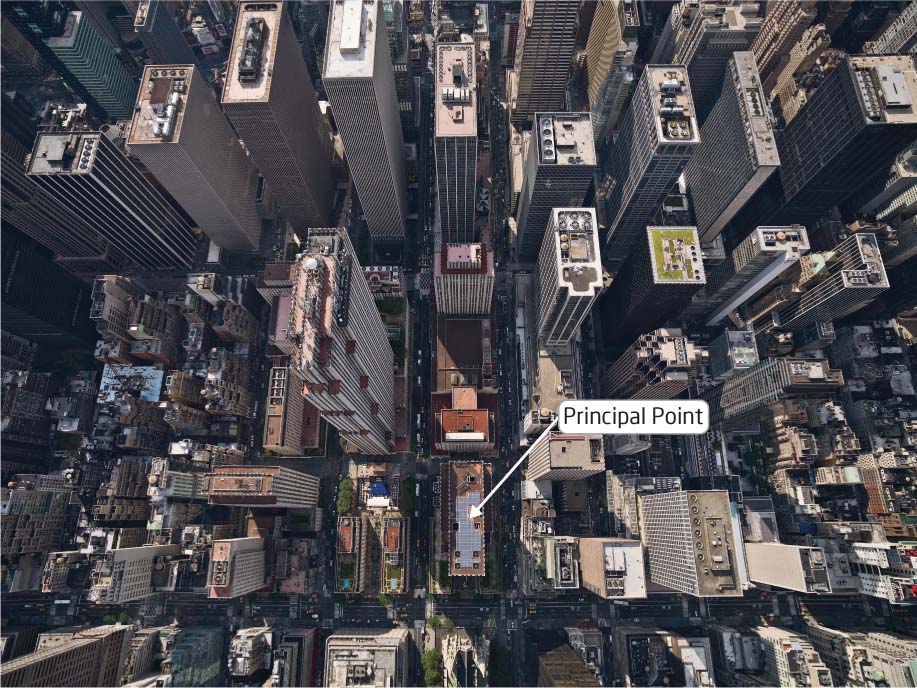
principal point the center point of an aerial photo
relief displacement the effect seen in aerial imagery where tall items appear to “bend” outward from the photo’s center toward the edges
No matter what type of aerial photo is being used, the big problem is that the photo cannot be used as a map. Even though it shows all the features you might need (like roads or footprints of buildings) you can’t rely on the photo to be a map for one reason—the photo doesn’t have the same scale at every spot on the image. As a plane flies over the surface, some terrain features will be closer to the camera and some will be further away—and thus, some areas will have a larger or smaller scale than others. The center of the photo is referred to as its principal point. In aerial photos, you’ll see tall objects (such as terrain relief, towers, or buildings) have a tendency to “lean” away from this center point toward the edges of the photo—this effect is called relief displacement. See Figure 9.9 for an example of this—if you look at the area labeled “Principal Point,” it’s like looking straight down at that area. However, if you look outward from the principal point, you’ll see that the tall buildings seem to be “leaning” away from the center of the photo (rather than looking straight down on all the buildings in the image).
308
!geo! HANDS-ON APPLICATION 9.3
The National Aerial Photography Program
The National Aerial Photography Program (NAPP) was a federal program that operated between 1987 and 2007. It was sponsored by several agencies, including the U.S. Department of Agriculture and the U.S. Department of the Interior. NAPP’s goal was to provide regular aerial photography of the United States. NAPP imagery consisted of 1-meter-resolution photography and the program produced over 1.3 million aerial photos in twenty years. NAPP photos are now available online via the USGS’s Earth Explorer utility (which we used back in Hands-on Application 5.3: USGS Digital Line Graphs). Open your Web browser and go to http://earthexplorer.usgs.gov/ to begin (make sure your computer can accept cookies for the Website to load properly).
Using Earth Explorer is a four-step process. First, enter your search criteria (such as a place name—for example, try Las Vegas, NV). Next, select the Data Sets tab and choose the datasets you want to search (in this case, expand the Aerial Photography option and select NAPP). In the third option, Additional Criteria, you can add other information to your search request to help narrow it down if you need to. Lastly, click on Results to see what NAPP imagery is available for the place you’ve searched for.
Click on the “footprint” symbol for each photo to see the highlighted outline of the section of Earth’s surface the photo represents. Also, click on the Show Browse Overlay option (the button next to the footprint) to see the NAPP image overlaid on the map, so that you can zoom in on the image. A thumbnail preview of the images will be available—click on an image to view it full size. It should be noted that the USGS requires users to create an account and log in before they can access download options for the photos.
Expansion Questions:
-
Question
Zszxf/krPOeBK7+P1lbsY978a671EFRKLBKB5iuxgGCQQLbyb91t6VuYhIifrIslq4NriaaoYBj2u5K2ZNm5Z0G64uajQU6aU6icNa3ibABnhDaN8+Jhq7O7NHwu3xyGV909dCp4VMVp6E7O7YbWkIO/h6g+iVft/5EXNoEDT1fdf3loi6asxDPNpJ0o3Ka1MfhhXCxbejAZW3Y0pYzOZlvpLPwNwGd9B62UNtB3Q882TNdX/wL/SE4L0z+UQnZR1CvuB/3AFmY6cM3pwOunFhWqbZi0HqSy3AexDHfjE3TX5JB+oaXxgurtiM9nl3NCQ6iY0hwVVync2d9zKYP5HV+ztfBMVkeVvzvzl2VD2gBUe7YzQsCotQcB9p7yCBI5lOJg1SfjVzUdMIBidWOjbjWFMZg= -
Question
lC4T6V0F0fclWk97PAKzTqsEKg31zE+hy0VKd8C2KJubPDG2ow0+EFfB7dU5+GL2Y3r0eYmsdMg+4IEGdr9djx6atdzOTE/gsVpTkE8JNmDv/dChLkZ8aUdLVrXK7vUaGRWjmArziqqAu/CAwoGudgPv+5dcJk7e4NIlJDMSUixXOTr4dINe6Cxg7HqTrS0mEqdks0d/f/wMVk4Pkg3qkUXP559b4S5R8ZkVv4tT2p8Y5B9S6pPtV0axW5w59wBAFK1+9g==
orthophoto an aerial photo with uniform scale
orthorectification a process used on aerial photos to remove the effects of relief displacement and give the image uniform scale
true orthophoto an orthophoto where all objects look as if they’re being seen from directly above
DOQ a Digital Orthophoto Quad. Orthophotos that cover an area of 3.75 minutes of latitude by 3.75 minutes of longitude, or one-fourth of a 7.5 minute USGS quad
NAIP The National Agriculture Imagery Program which produces orthophotos of the United States
Regular aerial photos do not have uniform scale. Orthophotos, however, do. To create an orthophoto, a process called orthorectification is performed on a regular aerial photo. This process removes the effects of terrain and relief displacement, and enforces the same scale across the whole photo. A regular aerial photo can’t be used as a map because it doesn’t have uniform scale everywhere, but an orthophoto can. Even with uniform scale, some of the side appearances of objects can still be seen because when the photo was taken, some of the sides of the building may have been hidden due to relief displacement and not visible in the photo. This effect is removed in a true orthophoto, which gives the appearance of looking directly straight down on all objects in the image. This is achieved by using several images of the area for filling in the missing information, while keeping constant scale in the final photo.
309
Orthophotos are used to create special products called Digital Orthophoto Quads, or DOQs. A DOQ is orthophotography that covers 3.75 minutes of latitude and 3.75 minutes of longitude of the ground, the same area as one-fourth of a 7.5 minute USGS topographic map (see Chapter 13 for more about topographic maps). DOQs (sometimes also referred to as DOQQs, or Digital Orthophoto Quarter Quads, as they cover one quarter of the size of a topographic map) have been georeferenced so that they can be matched up with other geospatial datasets (see Chapter 3 for more information on georeferencing). Also note that the USGS produces certain other DOQ products that cover the area of the entire quad.
A similar resource is produced by the National Agriculture Imagery Program (NAIP), which is administered through the United States Department of Agriculture’s Farm Service Agency. NAIP images are aerial photos of the United States taken on a regular basis which are processed into DOQs (and also as mosaicked images of whole counties), and made publicly available. NAIP began in 2003, and continues to produce orthophotographic images today (see Hands-on Application 9.4: NAIP Imagery Online for a USDA FSA utility for viewing NAIP imagery and their DOQ boundaries).
310
!geo! HANDS-ON APPLICATION 9.4
NAIP Imagery Online
The USDA maintains a GIS data viewer online for viewing NAIP imagery. Point your Web browser at: http://gis.apfo.usda.gov/gisviewer. Available layers are on the right side of the map: these include DOQQ boundaries (for available states, covering multiple years), the film centers of the DOQQs (for some states), boundaries, and other geographic data. By default, the NAIP imagery itself will be turned on. Under the Find a Place option, you can search for a state and city (such as San Francisco, CA). The results of the search will be shown in a separate pane. Note that you can also search by county or by DOQQ number. By right-clicking on the name of place found you can select an option to Zoom To that location. You can zoom in closer to view the NAIP imagery, and by turning on the NAIP QQ Coverage layers, you can see the boundaries of each DOQQ covered by NAIP imagery.
Expansion Questions:
- In San Francisco, which DOQQ numbers would you have to obtain to have full 2012 NAIP coverage of the entire city?
- Which DOQQ numbers would you have to obtain to have full 2012 NAIP coverage of the entire city of East Lansing, MI?
- DOQQ numbers 3609463NE and 3609463SE contain NAIP imagery of what city?
oblique photo an aerial photo taken at an angle
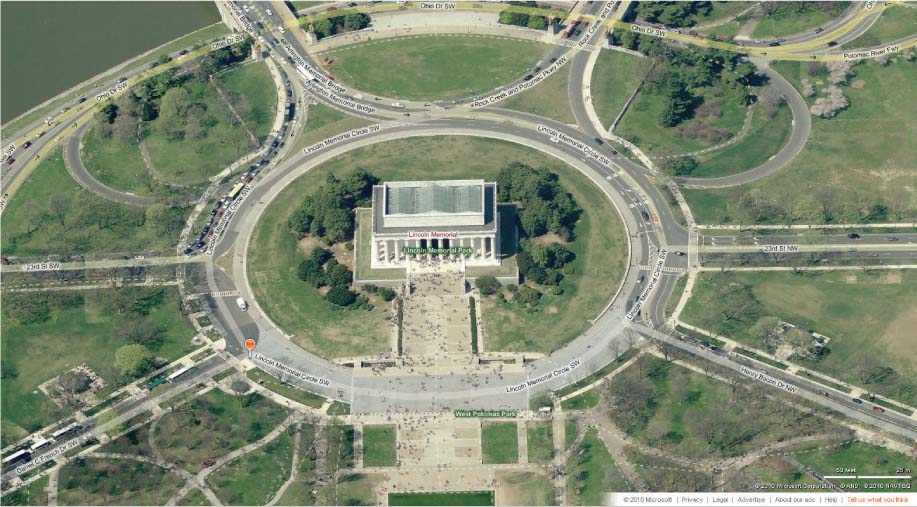
In an oblique photo, the camera is tilted so that it’s not positioned directly at nadir, but rather at an angle. Take another look at Figure 9.2—the image of San Francisco taken from the kites—for an example of an oblique photo. Unlike a vertical photo, you can see the sides of some of the buildings, and you’re really seeing the city from a perspective view instead of an overhead one. Oblique images allow for very different views of a target rather than those taken from straight overhead, and can capture other types of information (such as the sides of buildings or mountains). By examining different oblique photos of a single building, law enforcement agencies can obtain detailed information (the locations of entrances, exits, windows, and so on) which often prove vital information in deciding whether or not to send officers into a potentially dangerous situation. Companies such as Pictometry make extensive collections of high-resolution oblique aerial imagery to sell commercially. You can view oblique images of several locations online using Microsoft’s free Bing Maps utility, if its “Bird’s eye” imagery is available (see Figure 9.10 and Hands-on Application 9.5: Oblique Imagery on Bing Maps for examples of oblique images created on Bing Maps).
311
!geo! HANDS-ON APPLICATION 9.5
Oblique Imagery on Bing Maps
Bing Maps is a great source of viewing online oblique imagery supplied via Pictometry. Like Google Earth and Google Maps, Bing Maps allows you to view aerial or satellite images of areas, but it also gives you the option to view high-resolution oblique images of areas (where oblique imagery is available). To start, open your Web browser, go to http://www.bing.com/maps, and type the name of a location (try Atlantic City, NJ). In the Atlantic City map, zoom in until you can see the ocean and boardwalk. Select the option for “Bird’s eye.” The view will switch to oblique photography of Atlantic City. You can zoom in and out and pan the imagery (when you move past the edge of a photo, a new tile of oblique imagery should load).
Reposition the images so that you can see the boardwalk and oceanfront at an oblique angle, and then move down the boardwalk to see the casinos, piers, and developments. In addition, Bing Maps provides oblique imagery from multiple angles—click on one of the arrows pointing downward to the left and right of the compass rose (around the letter “N”) to rotate the direction and load oblique imagery of the same location but shot from a different angle. You can use this function to examine a spot from multiple viewpoints. Once you get used to navigating and examining oblique images of the New Jersey shore, search for your local area with Bing Maps to see if “Bird’s eye” imagery is available to view your home, school, or workplace.
Expansion Questions:
- What advantages are there for examining the Atlantic City boardwalk from oblique views rather than the usual overhead view? What specific features of the boardwalk can be seen in the oblique images that cannot be seen in from a vertical perspective?
- If Bird’s eye imagery of your local area is available, examine it using Bing Maps. What specific features of your local area can be seen in the oblique images that cannot be seen from an overhead view?
312