Chapter 2.
Microscopy
Microscopy
Care and Parts of the Microscope
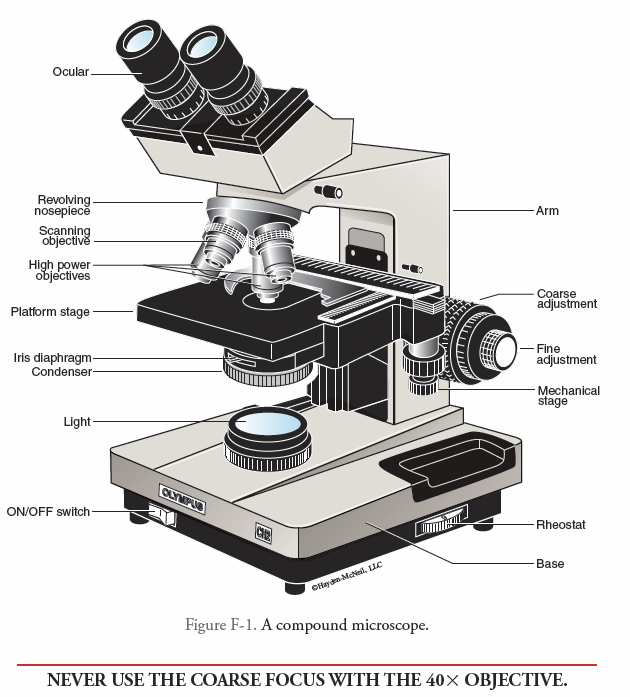
Always use two hands (one under the base and one grasping the arm or hand-grip) when carrying the microscope, and carry it in an upright position. The microscope is a precision instrument and should be handled with care. The structural framework of the microscope consists of a base, which provides a solid foundation for the upright arm, which is attached to the base, and a stage attached to the arm, which provides a solid, flat surface on which to place a slide holding your sample (Figure F-1).
We will examine the components of the microscope by following the path of light through the instrument. We begin with a lamp, which provides light to the microscope. The lamp is turned on/off by a switch located on the front of the base, and the intensity is controlled by a dimmer located on the side of the base (Figure F-1). Some microscopes are also equipped with a field diaphragm located on top of the lamp housing. As the light travels upward toward the stage it passes through an adjustable opening, the iris diaphragm. The amount of light passing through the iris diaphragm can be changed by moving the lever on the front of the diaphragm (Figure F-1). The light then passes through a condenser lens and is focused on the sample on the stage. Move the condenser up as high as it will go and use the diaphragm to adjust the light intensity to just less than full brightness. The rule of thumb in light microscopy is “less light is always better.” After passing through the sample the light enters one of four objective lenses mounted on a revolving nosepiece (Figure F-1). Each of these lenses produces a different magnification. ALWAYS BEGIN YOUR OBSERVATIONS WITH THE LOWEST POWER OBJECTIVE (magnifications are marked on the lenses, e.g., 4×, 10×, and 40×) and increase the magnification as necessary by rotating the nosepiece to the next highest power. These microscopes are parfocal, meaning that once the sample is in focus on low power, you should be able to switch to the next higher power and still have the sample in focus or close to it. Begin focusing using the coarse focus knob; later use the fine focus knob to make fine adjustments.
With the high power objective in place you should only use the fine focus knob and only focus upward, unless you are watching from the side, to be certain that the objective does not touch the sample or coverslip. The image of the sample now passes along to an additional lens, the ocular or eyepiece. This lens further magnifies the image. The total magnification of the microscope is equal to the magnification of the ocular multiplied by the magnification of the objective being used.
The microscope should be kept clean at all times. This is especially true for the lens systems. Remember, the quality and clarity of what you see is largely a function of the quality and clarity of the lens systems. Your laboratory instructor will demonstrate how to clean the lenses. It is a good idea to always clean the lenses before using the microscope.

Use of the Microscope
Our microscopes are binocular—they have two eyepieces. In order to use these microscopes you must adjust each eyepiece for your eyes. The first thing to do is adjust the interpupillary distance. Move the eyepieces together or apart as you are observing a sample. When the image of the sample is visible simultaneously through both lenses, the distance between eyepieces is matched to the distance between the pupils of your eyes. One eyepiece is fixed while the other has an adjustable focusing collar. Adjust the eyepieces by carefully focusing on a sample while looking through the fixed eyepiece. You may want to use a piece of paper to block the unused eyepiece so that you can keep eyes open during focusing. Now block the fixed eyepiece and carefully focus the adjustable eyepiece by rotating the focusing collar until that image is also in sharp focus. The eyepieces are now adjusted for your eyes. You should check this adjustment each time you use your microscope.
Adjusting Illumination
These microscopes will provide the maximum resolution when they are adjusted for Kohler illumination. Adjust your microscope for this type of illumination whenever very detailed observations are required, especially when using the high power objective (40×).
a. Focus on a sample. On microscopes with field diaphragms you will need to center the light source following the procedure listed below. On the microscopes without a field diaphragm, skip to letter c below.
b. Close down both the field diaphragm at the light source and the iris diaphragm under the condenser. Center the small spot of light in the field of view by adjusting the centering screws on the condenser. DO NOT OVERTIGHTEN THESE SCREWS. When the spot is centered, focus the condenser until the edges of the leaves of the diaphragm are sharply outlined (sharp focus is usually associated with a color shift from red to blue on the edge of the leaves). Now open that field diaphragm until the light just fills the field of view, adjusting the centering screws as needed.
c. Remove one ocular and observe the spot of light in the tube. Open the iris diaphragm until the light spot fills approximately 2/3 of the field in the tube. Reinsert your eyepiece and begin your observations.
Dark Field Microscopy
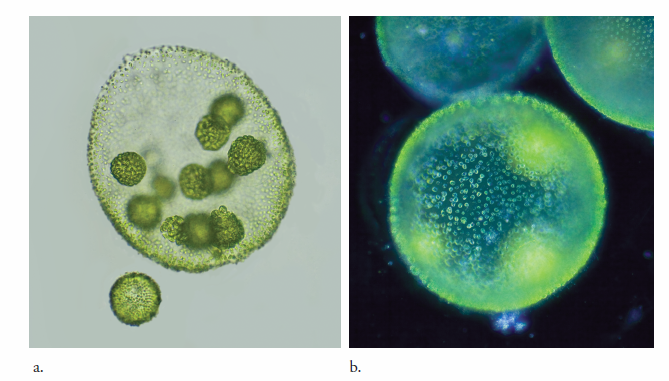
Dark field microscopy increases apparent resolution of small transparent samples by making them appear light against a dark background. Some of the light entering the condenser is blocked so that no light passes through the sample; rather, the sample is illuminated from the sides. Dark field microscopy is very useful in examining samples in which small objects are distributed throughout a liquid, such as bacterial cultures or pond water (Figure F-2). Follow the procedure below to set up your microscope for dark field microscopy.
a. Insert a field stop, a filter with a blackened circle in the center, into the filter holder below the iris diaphragm.
b. Adjust the iris diaphragm so that the field holder appears black. The objects in the field should now be brightly illuminated. Keep the diaphragm wide open and use as much light as possible. If the objects in the field are not brightly illuminated, check to be sure that your microscope was properly set up for Kohler illumination prior to inserting the field stop.
Note: Only use this technique to study organisms that can be observed easily with low power magnification.