Sound Recording
Now that you have learned how to design and plan sound, it’s time to head into the real world and live-
 Production sound, which has traditionally come to mean recording on-
set dialogue of actors speaking during principal photography, including pauses, silence, or room tone during dialogue sequences. -
Effects sound, which consists of any elements you think you might want to use—
alone or with other elements— to enhance your story beyond dialogue and music. -
Postproduction sound, which includes any elements you realize you need after filming is over, such as voice-
over narration, repair or addition of more dialogue, location and manipulation of library sounds (sounds that you have on hand in your own “sound library” or acquire from another library), and music.
In this section, we will focus on production recording and effects recording, including some of the tools involved in these processes. We will delve into postproduction recording techniques and requirements, along with other aspects of postproduction sound—
Recording Best Practices
Before you ponder specific recording tools, methods, and situations, keep in mind some general but important best-practice concepts for recording sound:
- Put your primary focus on what you are recording and where you are recording. Understanding these things will help clarify how you should record it.
- Study the acoustics—the properties of a room that determine how sound will travel within it—of your location and how they might impact your recording plan (see Tech Talk: Acoustics, below).
- Record dialogue on a separate track when possible, so you can separate it from sound effects and ambient noise. Isolating dialogue elements gives you a better chance to fix dialogue later on, should it become necessary.
- Capture presence by continuing to record after the scene is over, so you record the “sound” of silence. Silence sounds different in every room, and you may need such elements, often described as room tone, when you do sound editing.
- Make strategic use of available downtime to record ambient sound (background or atmospheric) or wild sounds (random elements recorded separately from picture elements) beyond what you are required to record.
Acoustics

Anyone interested in motion picture audio can benefit from a good foundational understanding of the acoustical properties of sound—that is, how it travels around a room. Here are a few basic, but crucial, concepts about room acoustics:
 Direct sound path versus reflected sound path: Put simply, direct sound is what comes, as the name implies, directly from the source of the sound—an actor’s mouth or a prop, for instance. Reflected sound results when direct sound bounces off walls, floors, ceilings, and so on.
-
How sound reflects depends on recording-environment surfaces. Generally speaking, hard surfaces like glass or metal produce better, more active sound—often called live sound—because those surfaces have reflective properties. Soft materials like carpet or furniture absorb sound and therefore “deaden” the acoustics of a room—hence the term dead sound.
-
Close perspective sound features a higher amount of direct sound.
-
Distant perspective sound features a higher amount of reflected sound.
-
Echo is the reflected sound one hears after a sound bounces off an object far away, giving listeners time to mentally distinguish it from the original sound. It is used frequently in music and motion pictures and can be recorded live or created/manipulated in the final mix under certain circumstances.
-
Reverberation, or reverb, is a sound effect sometimes confused with echo. In fact, reverb involves the bounce-back of a sound from a nearby reflective surface to its source so quickly that it is heard in combination with the original sound to create a prolonged, decaying effect. Reverb is used in music and motion picture mixing and can be created artificially in the final mix with special machines or can sometimes be created naturally in the field.
 MAKE YOUR OWN BOOM ARM
If you have no professional boom arm, improvise by making one out of a broomstick, metal pole, fishing pole, microphone stand, or light stand.
With all that in mind, remember the following, more specific technical requirements for good recordings:
- Depending on resources and creative preferences, decide early on whether you want to record sound to camera via physical media or to an external device, like a hard-disk recorder or even a laptop computer. If you are using a relatively modern device, audio captured in-camera is already synced with the picture and thus will be easier to coordinate later, during editing. However, that choice will likely limit how many channels you can record, whereas an off-board device offers the ability to record multiple channels in many cases. This decision can potentially impact what you record and where you go to record it.
- Consider using an external microphone over your camera’s on-board mic, even if you are recording directly to your camera’s media. Although there are exceptions, camera microphones tend to be inferior to stand-alone mic technologies (see here).
- Always test equipment before you arrive on-set or on location, and again before recording begins. Make sample recordings in the style and setup you plan to use when capturing the real thing, play back and analyze them, and make adjustments as needed.
- Bring equipment to assist in unanticipated situations, such as high-wind environments. Always carry a windsock—a foam cover to fit over your microphone to help reduce wind and other environmental noises from impacting your recording.
- Always carry a boom pole (or boom arm)—essentially a long pole that can lift a microphone above, below, or to the side of the action (see Action Steps: Using the Boom, below). Using a boom greatly increases recording options, as we will discuss later.
- Always wear headphones to monitor audio quality and sound levels, and to make adjustments to gain, or sound levels, as needed.
- Remember that you need to transfer sound from the capture medium to a backup medium or directly to an editing environment—or both—to get it moving for postproduction. For security’s sake, when feasible, the transfer process should happen in the field (see here).
- Keep a detailed log of sounds you have recorded: what order they are in, whether they have been backed up, where and when they appear, and other important details.
- If your recording was done on media and machines separate from the visual recording, you should also log slate information (see Chapter 6) for each take in order to keep track of timecode—a numeric code used as a tool to synchronize audio and video. One way or another, you need a sync point you can use to match dialogue with picture later on. Digital timecode, a traditional clapboard slate, or even having a crew member loudly clap his or her hands just before a shot commences are all methods of ensuring that a sync point exists on all your tracks.
GET A CONTACT MIC
Contact mics are designed to attach to surfaces, pick up vibrations through objects, and convert those vibrations to sound. They are excellent field tools for recording sound effects.
ACTION STEPS
Using the Boom
The use of a boom microphone is quite common in film production, and understandably so—you can follow the actor and acquire a pristine recording without getting microphones in the shot. But using one can be tricky, which is why it’s best to get someone to help by acting as the boom operator. To have a successful boom-operating experience, you must do the following:
 Attach a directional shotgun mic (see here) to the boom arm using a shock mount (a mechanical shock-absorbing fastening system that connects and stabilizes two instruments to prevent vibrations), wrapping the cable around the boom arm so that it doesn’t get in your way.
 Cover the mic with a large windsock or windscreen.
 Make sure you have cables of the correct length to allow you to move comfortably around the set and, typically, a grip to help make sure the cable is unencumbered.
 Discuss with the DP and director how the shot is meant to be framed and lit, so that you can choreograph yourself by deciding which side of the actor to stand on—and how far away—to ensure that you stay out of the shot and avoid casting shadows.
 Discuss with the production mixer the choreography you have decided on to ensure your planned mic placement is compatible with the recording strategy.
 Ask the camera team and actors to do a quick run-through to make sure you have established the correct positioning.
 Place the boom either above or under the outside frame of the shot, with the mic extended about two to three feet above or below the actor’s mouth. Give yourself enough leeway to be outside the frame in the event the camera operator alters his or her framing plan.
 Remain as still and quiet as possible beyond your choreographed moves as the shot is executed; most important, try to maintain your distance and posture while actors are speaking in order to avoid uneven sound levels.
 Be in shape and stretch, because you can easily fatigue doing this sort of physical work.
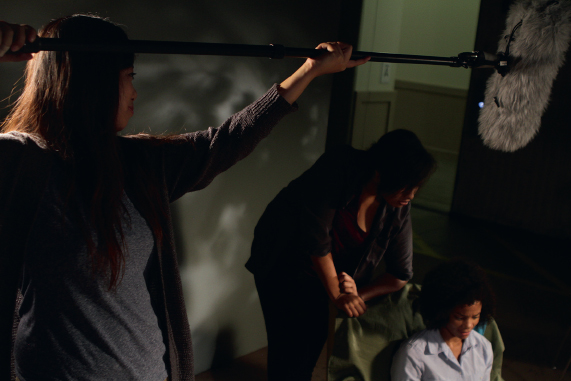
The boom operator keeps the boom out of the camera frame, and positions it to capture the actors’ dialogue. The “fur” on the mic reduces wind or air noise, so the dialogue track will be clear.
Production Recording: Dialogue
As noted, production sound involves the capture of dialogue during principal photography. That work is normally handled by a recordist, most frequently credited as a production mixer because, on-set, he or she may well be recording more than one mic or channel while using a portable field mixer and digital recorder (see here) to acquire the cleanest possible dialogue recording. The recordist will likely use a portable sound cart containing the field mixer, recorder, and lots of recording media: mics, cables, level meters, headphones, laptop, and possibly specialized equipment.
The goal of the recordist is to make sure there is a high signal-to-noise ratio, meaning no background or ambient noise or other distracting or distorting sounds bleed into the dialogue track. This goal can be challenging because sets are often crowded and noisy, with less than optimal acoustics. Indeed, for possible postproduction use, production mixers frequently ask for silence on-set and record room tone—a unique, barely audible hum, buzz, or low tone that exists in many locations due to natural phenomenon or mechanical infrastructure.
GET CONSISTENT LEVELS
Besides making sure the levels are consistent on your recording device, make sure there is a consistency to your levels throughout the entire field-recording setup.
The production mixer also chooses which microphones and sound recorder to use, and will monitor and report to the director any audio problems. Thus, he or she should have a good foundational understanding of the physics of sound and microphone technology: how sound travels, bounces, or can be muffled or obscured; what decibels are too low or too high for comfortable hearing; and so on.
Often, the production mixer relies on the aforementioned boom microphone—a mic suspended in front of or just above the actors as they speak—while trying to keep the microphone, boom, and their shadows out of the camera’s field of capture. Depending on logistics and creative needs, the most prominent alternative to recording via a boom mic is to clip a small lavalier mic on the actor in such a way as to make it invisible to the camera (see here).
Regardless of which microphone is used, mic placement is crucial. Placing the mic directly in front of the mouth can pick up natural clicks and pops and breaths from the actor. A rule of thumb is to maneuver the mic between one to three feet in front of the actor, just above or below mouth level, but that is not an exact science, and each situation requires different placement choices. Remember: the distance between the mic and the speaking actor impacts the volume of what is being said. The further the distance, the lower the recording will turn out. If the person speaks softly, or if there is significant background noise, the mic needs to be closer to the actor’s mouth.
Keep in mind that the production mixer is there to get the desired creative result as clearly and efficiently as possible. Thus, he or she must speak up when there are situations that might interfere with this goal. For instance, if a character is speaking over an explosion or gunshot, dialogue may not record clearly. Therefore, the production mixer might ask the director if there is time to record wild lines as soon as the scene has been shot. That essentially means asking the actor to repeat the line right after the scene finishes, so that a clean recording will be preserved.
You won’t immediately master all these skills. It will be a gradual process to fully learn how to use the properties of sound to full advantage when recording dialogue, with some mistakes along the way. That said, none of the problems you encounter should be caused by a failure to have the best equipment you can access, good backup strategies, a solid knowledge of basic mic placement, and the know-how to properly use whatever recording device you have available.
Recording Sound Effects
Sound effects, by their nature, represent a particularly wide category but also a highly creative one. Depending on your skill level, resources, time, and creativity, you can potentially go anywhere to record sounds you think your postproduction team will need. You might take recording trips to sets and locations separate from principal photography and even to other locales. In fact, most industry professionals proclaim strongly that, when possible, you need to record in the real world. As Gary Rydstrom says, “That’s the discovery part, the cool part—
Thus, Rydstrom’s mentor, Ben Burtt, famously recorded traffic on a Los Angeles freeway through long pipes, and later turned the resulting recordings into the humming sound of the “speeder” bikes in Star Wars. Your job when recording effects is to apply such initiative to your project. At the same time, though, you have a specific mission related to your particular story, limited time and resources, and a need to adhere to your story’s requirements.
As such, recording trips should be thoroughly and logically planned out. Your breakdown of the script and research into locations will cue you about where you need to go to record your sound effects—
As you head into the field, you will be carrying similar equipment to what you used for production recording: a wide selection of mics; booms; a field mixer with a VU or peak meter (see here); a preamp, a compressor, and other specialized equipment when feasible (see here); recording media; quality headphones; cables; and helpful supplies, such as a notepad and Sharpies, spare batteries, a laptop or external hard drive for backup, and supplies to clean and repair your recorder. Be as diligent as possible about testing your equipment, checking settings, and having backup strategies—
Beyond equipment, you might bring along props for experimental recording work—
Also, if possible, bring an assistant with you. Sound assistants are crucial on major projects, for loading, unloading, and setting up equipment; providing support and backup; pulling cables and placing mics; operating booms; and more. Even if you can’t hire someone, ask a fellow student or friend to help out.
Assistants are particularly helpful because simply recording sound is not enough. You are a data manager in the field. You must label tapes, cards, hard drives, or whatever media you bring; take care in your file-
Recording Levels
A big part of your responsibility when recording sound involves setting and controlling the recording volume. Virtually all modern sound recorders and cameras with audio capabilities will have similar audio controls, usually called the pot (short for potentiometer) or fader, with which you control the sound level, sometimes called gain.
Most modern digital recording devices also have peak meters—instruments that read the volume level—
Either way, you generally want to record at the loudest possible level without going as far as zero—
Also, some recording systems offer automatic level control. As the name suggests, these devices automatically control and maintain gain: boosting it when the signal is too low and lowering it when levels are too high. Be careful in using automated controls in any creative endeavor like filmmaking because you delete human judgment and creativity from the equation once you choose settings. Plus, some automatic systems do not handle sudden noise changes well, so if you are going to use automatic level control, test the system thoroughly. In any case, do not become overreliant on your meters for adjusting sound levels—
Other technologies audio professionals use to control recording levels include limiters, which are separate automated systems that activate if volume levels rise sharply, making them helpful in such scenarios as the action scene just described; compressors, which can, depending on the model, work with a recorder or microphone to compress the sound’s dynamic range if levels spike too high; and preamplifiers (preamps), which usually connect to a microphone to boost a low signal before that signal is sent to the recording device.
Microphones
Obviously, any sound recording requires some kind of microphone. Generally, you have two choices: using a built-in mic on your camera or, preferably, using an external mic that connects to your camera or audio recorder via a cable or wirelessly via a transmitter. The external mic option is often preferable because, in most situations, it provides better sound quality than most built-in mics.
Your mic will either capture a signal that is then directed to the camera’s onboard media—tape, solid-state card, or hard drive—or connect to an external recorder or mixer, a device that will give you the opportunity to adjust sound before recording it permanently to your storage media (see here for more on recording equipment). At a minimum, a good working knowledge of the basic concepts of transduction and polar patterns, and the different types of microphones that result from these concepts, will be useful, because that knowledge will help you make wise choices about which mics to use in different environments.
At the base level, microphones are transducers—devices that convert energy from one form to another. Mics capture sound waves—acoustical energy—and turn them into electrical energy as signals that can then be recorded. When sound waves hit a microphone’s diaphragm—the actual transducer—it vibrates. The device turns those vibrations into electrical energy. At the other end, the electrical energy is converted to an audio signal by the receiving device.
There are, however, methods of transduction besides using an actual diaphragm-style mic, and that is how we get different categories of microphones. Capacitor microphones, electrical condenser microphones, and others use different forms of transduction to send the signal. Dynamic condenser microphones are quite common in the movie world because they are generally rugged in the field. Condenser mics have an electrical capacitor built in to simulate a diaphragm; be aware, however, that because of this design, they do require their own power supply.
There are other important issues related to how microphones pick up, convert, and relay audio signals, including frequency (the rate at which a sound repeats), frequency response (how effective an audio device is in transmitting an audio signal after receiving it), amplitude (the maximum range of a signal when measured from a particular average), and decibel level. But for now, the key concept is the polar pattern, also called the pickup pattern. The mic’s polar pattern, based on its design, determines from which directions it can pick up sounds—in other words, how sensitive it is. This concept is commonly called, for obvious reasons, directionality.
Some mics are designed to capture sound from a broad-ranging area. Others are extremely sensitive and are designed to pick up only a narrowly defined range of sound, which is useful when you are trying to capture a specific sound in an area filled with background noise. Thus, like camera lenses, different mics have different uses. With that in mind, here’s a quick look at the most basic types of microphones—all nicknamed based on their polar pattern design.
-
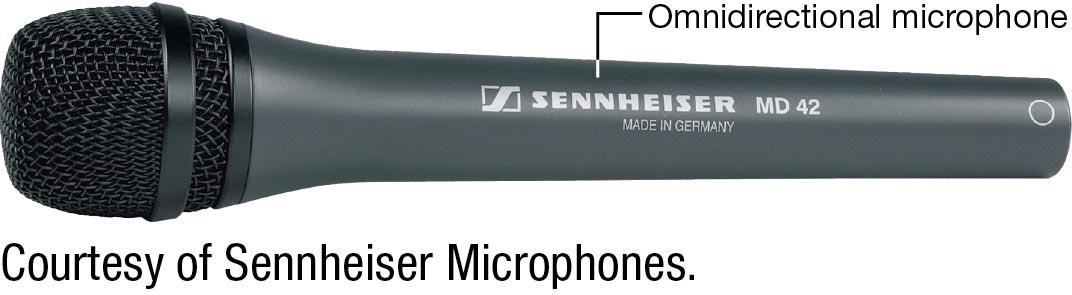
Omnidirectional. These mics pick up sound coming from any angle or direction with equal clarity and are therefore considered to be good general-purpose microphones. They work especially well when you are recording large groups of people and want to capture the overall sound.
-
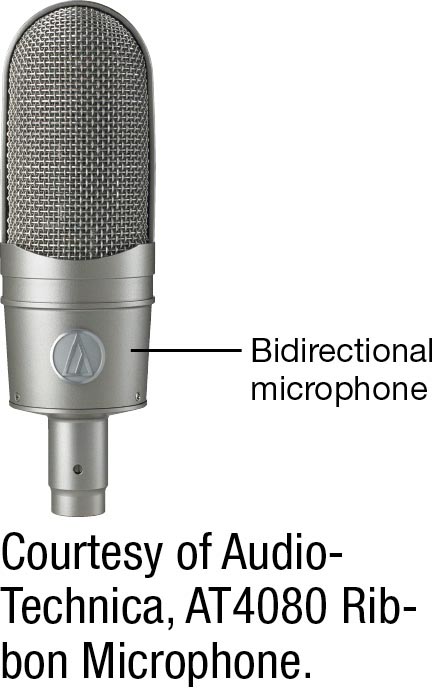
Bidirectional. This design allows sound capture from the front and back, not the sides.
-
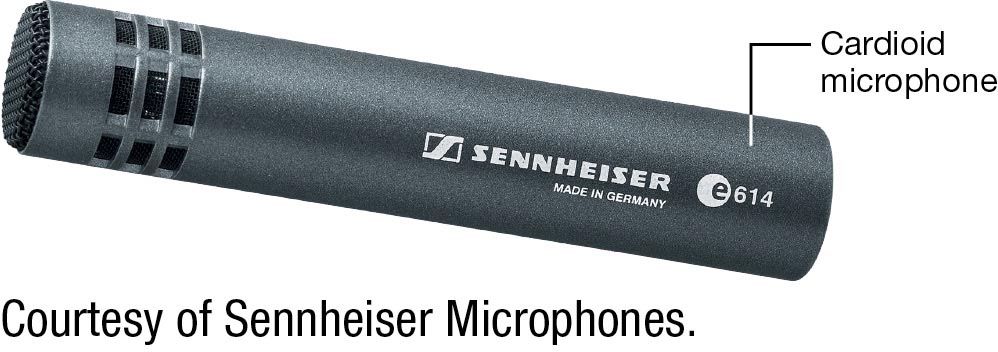
Cardioid. This microphone’s pickup pattern is designed to capture a wide area of sound directly in front and to the side of the mic, but very little behind it. Its name comes from the heart-shaped polar pattern demonstrating its pickup strength. Cardioids are useful for pulling in the sound of a particular source in front of you while avoiding unwanted sources behind you.
-
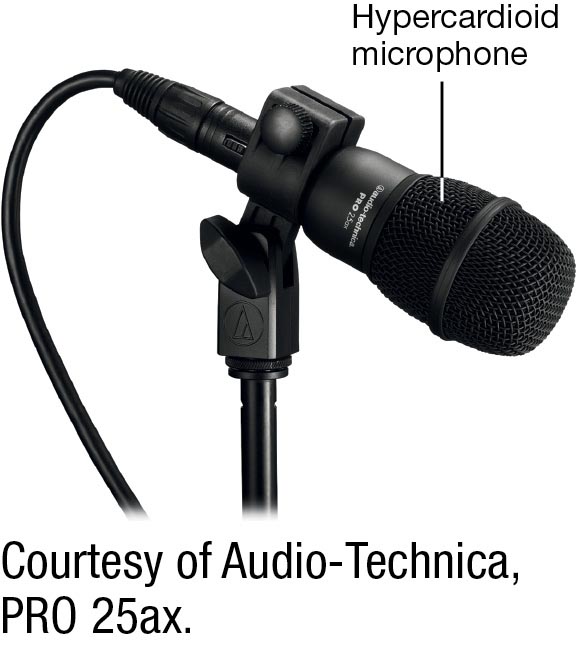
Hypercardioid. These mics are similar in pattern to the cardioid, but with a narrower, more targeted front range and the ability to pick up a narrow range of sound directly behind the mic.
-
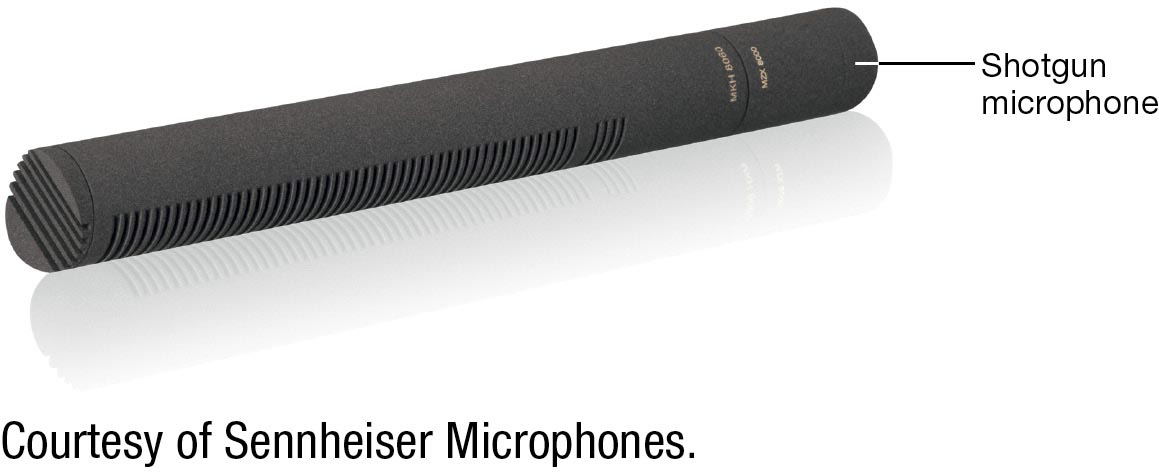
Shotgun. This design is tubular—designed to have a very strong sensitivity to anything directly in front of it. Shotgun mics are therefore used for recording only what you are directly aiming the microphone at—hence the name shotgun.
ATTACHING LAVALIER MICS
When attaching lavalier mics to clothing, run tests to make sure they are not picking up vibrations from friction with the clothing. There are a wide range of clips and mounting technologies available for attaching lavaliers.
Those are the basic categories of microphones based on pickup patterns, but the other key issue relating to mics involves their placement for recording purposes. We have discussed handheld and boom microphones, but as mentioned earlier, it’s frequently necessary to attach a microphone to a person or an object. The most common mic for placement on actors is the lavalier microphone, which gets its name from the fact that it can generally be attached to a person’s lapel, hidden from camera view. Lavaliers are small and are often used with wireless transmitters to make them easier to hide on a person. They are used to pick up the voice of single individuals and are therefore useful for television news, sports, documentaries, and reality shows. They can be designed with any polar pattern, but most lavaliers are omnidirectional or cardioid. Manufacturers offer a huge range of wireless microphones of all types and polar patterns.

Dylan McDermott gets ready to shoot a scene. The lav mic on his right lapel will pick up his voice. Because the sound recordist has positioned the lapel mic so we can see it, this shot will probably be a close-up, with the mic out of the frame.
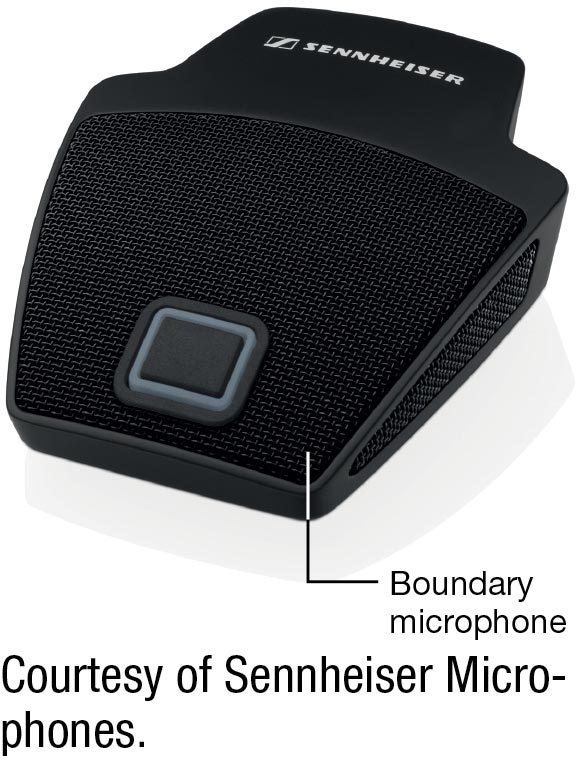
Another category is the boundary microphone, sometimes called a pressure zone microphone. This is a small, flat mic that can be attached to a flat surface. Its purpose is usually to record multiple people or musical instruments when conditions don’t permit mics to be situated near each actor.
Recording Equipment
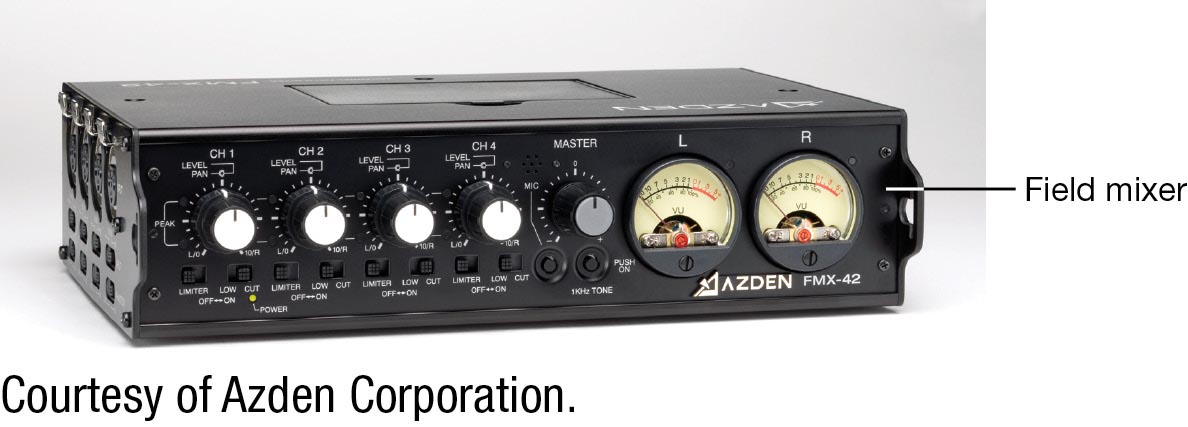
Along with a microphone, you need a safe and reliable way to record your sound. This typically involves the use of a digital recorder in combination with a field mixer—a portable battery-powered mixing device that allows the recordist to combine multiple mic signals and mix them into a single output signal in the field. The idea is to capture sound directly to your recorder if you are only recording a single audio source, or to take multiple-source audio signals and send them to the field mixer to combine before sending the signal on to the recorder.
KEEP LEVELS SIMPLE
Keep in mind that the more audio tools you connect during recording, the bigger the chance of level problems if you do not carefully set each device to the same levels. Keep it as simple as possible, and make sure levels are consistent on all machines.
You can simply record right to your camera’s source media or go from the field mixer to the camera if you do not have an external audio recorder. But either way, you need to have conceptual familiarity with capturing and mixing multiple channels of audio. Sound recorders can capture audio on all sorts of media these days, ranging from analog tape to digital hard drives, solid-state cards, or optical disks, such as CDs or DVDs. For decades, analog field recorders were used to capture sound on quarter-inch tape, and later digital audiotape (DAT), but the digital audio recorder has largely taken over today.
The current generation of digital recording technologies offers dozens of options, including small, handheld devices that provide rich sound at consumer-level costs. Such devices produce sound as digital files and save them to the recording media. You can also record to a laptop or desktop computer, iPad, or smartphone with a wide range of recording apps.
Keep in mind, however, that the world is awash in audio file formats, and many of them compress original data to make it more manageable. During your testing phase, you need to pick not only your recorder and recording media but also your file format and how much compression you can accept. The general rule of thumb is, if you have enough storage space, or enough media, you want to record with as little compression as possible. A good modern recorder will likely give you the option to record uncompressed or to choose which data compression scheme you prefer, such as the popular MP3 format used by consumers or BWF (Broadcast Wave Format), popular in film and television production. Compressed audio can sometimes work fine, but be careful when choosing a recorder to pick one that gives you options and is not limited to a low data rate.
SLATE APPS
You can use apps, such as MovieSlate, to make it easy to slate digitally with handheld devices.
You also need to thoroughly read your recorder’s manual and test it before you head into the field. Know what its limitations are and what its settings will permit you to do. Among the setting choices, you will need to make decisions about the sample rate and bit depth you prefer, the file structure and compression scheme you want, how to name your files, and so on. Sample rate refers to the rate at which the digital recorder “samples” the signal being recorded. Bit depth, as discussed in Chapter 6, is essentially the flip side of the sample rate, impacting a signal’s resolution rather than its recording level. With high-end equipment, you get many options in these areas. For now, you will likely be limited in what tools are accessible to you, but always choose the best sample rate and bit depth available. As a general rule, the higher the sample rate, the better quality your recording will be; keep in mind, however, that the sample rate options available to you may depend on the recording technology you are using, and that the higher the rate, the more data storage will be required. The same concept applies when you increase bit depth—you can improve quality and lower noise in the recording, but you increase the amount of data you need to process and store in the field by doing so.
 RECORDING SOUND EFFECTS
Sound effects can sometimes benefit from experimentation and fearless creativity. With that in mind, grab a recording system with a connectable microphone and experiment with ways you can have fun shaping sound. Point the mic in the wrong direction; insert it in a tube or a pipe; attach it to something that moves or vibrates or shakes; or try anything else out of the ordinary that you want to try, as long as you are careful not to ruin the equipment—especially if you don’t own it!
Write a short essay explaining the results—what worked and what didn’t to create a usable or interesting sound—and propose how you might use such sounds in your film.
As mentioned, take care to log everything—including timecode, if possible. Logging timecode means labeling data with the specific time that it was recorded, making it easier to synchronize sound to picture data later if sound and picture were recorded on separate devices. If you do not have timecode available, then slating the shot will be your method of manually creating a sync point to match up sound and picture.
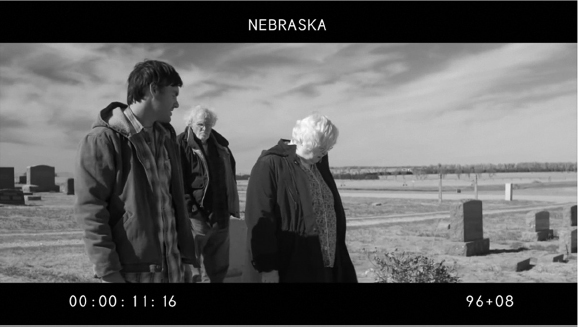
In this frame from Nebraska (2013) the timecode at the bottom allows the editor to log and identify the shot.