Lenses
We’ve just learned how images are recorded and about the cameras that make this possible, but how do the images arrive in the camera in the first place? Every camera, whether digital or film, relies on light coming through a lens. The lens is a piece of specially shaped optical glass at the front of the camera. It is the most important part of any camera (see Action Steps: Taking Care of Your Camera and Lenses, below). Everything else on the camera is called the camera body. The lens is the camera’s eye; without the lens, the camera cannot see. It is important to note that there are tools and techniques for altering the color, intensity, and quality of the light passing through the lens using various types of lens filters that are widely used around the industry. We will discuss those during our discussion on light in Chapter 9. For now, let’s focus on the basic kinds of lensing systems, and there are a great variety of them, although they are all controlled the same way. Four elements establish the “vision” of a lens: focal length, focus, aperture, and shutter angle; together they determine the qualities of your images, including how you manage the depth of field. We’ll look at each of these in turn.
 LOADING A FILM MAGAZINE
Using a roll of film that has already been exposed, practice threading the film in the magazine and closing the magazine properly. After you have mastered this technique, practice it inside the light-
ACTION STEPS
Taking Care of Your Camera and Lenses
 Keep the protective case for your camera and interchangeable lenses with you at all times. Always put the camera and lenses back in their cases when you are traveling. A small jolt in a car or truck can cause a lot of damage if the camera or a lens falls on the floor.
 Never clean your lens by blowing on it or using a handkerchief or shirt. Breath has moisture, which can damage your equipment. Use a can with compressed air to blow away dust, and if you use a cloth or cleaning fluid, use one that has been specially treated for use on lenses.
 Avoid moisture or water condensation. Especially if you’re in an environment with significant temperature changes, pack your camera and lenses with a cloth diaper in the case. It will soak up any nearby moisture—
plus, it’s cheap, reusable, and environmentally friendly!
Go Negative!

The film used in making motion pictures is called negative film because it creates a negative image—
Focal Length
When light enters the front of the lens, it is curved based on the lens’s shape and then focused onto the optical sensor or piece of film. The distance between the end of the lens and the point at which it focuses on the optical sensor or piece of film is called the focal length and is measured in millimeters. A lens with a shorter focal length bends light more strongly; it brings closer objects into focus and allows a wider view of the scene. A lens with a longer focal length bends light more weakly; it is able to focus on objects that are farther away and shows a smaller area of the scene.
For professional filmmaking, using 35mm cameras or their digital counterparts, a normal lens has a focal length between 35 and 50mm. This is because the human eye has a focal length of 43mm, so lenses in the 35–
All professional cameras (and many DSLR and prosumer cameras) allow you to change lenses. Interchangeable lenses are important for cinematographers because different lenses allow for greater creativity in capturing images. Let’s take a look at how each of these lenses affects what the camera sees (see also Figure 6.3, below).
Wide-
 8mm image, or fish-
eye lens -
21mm image
-
27mm image
FIGURE 6.3The same images as captured by 65mm, 35mm, 16mm, and 8mm (fish eye) lenses
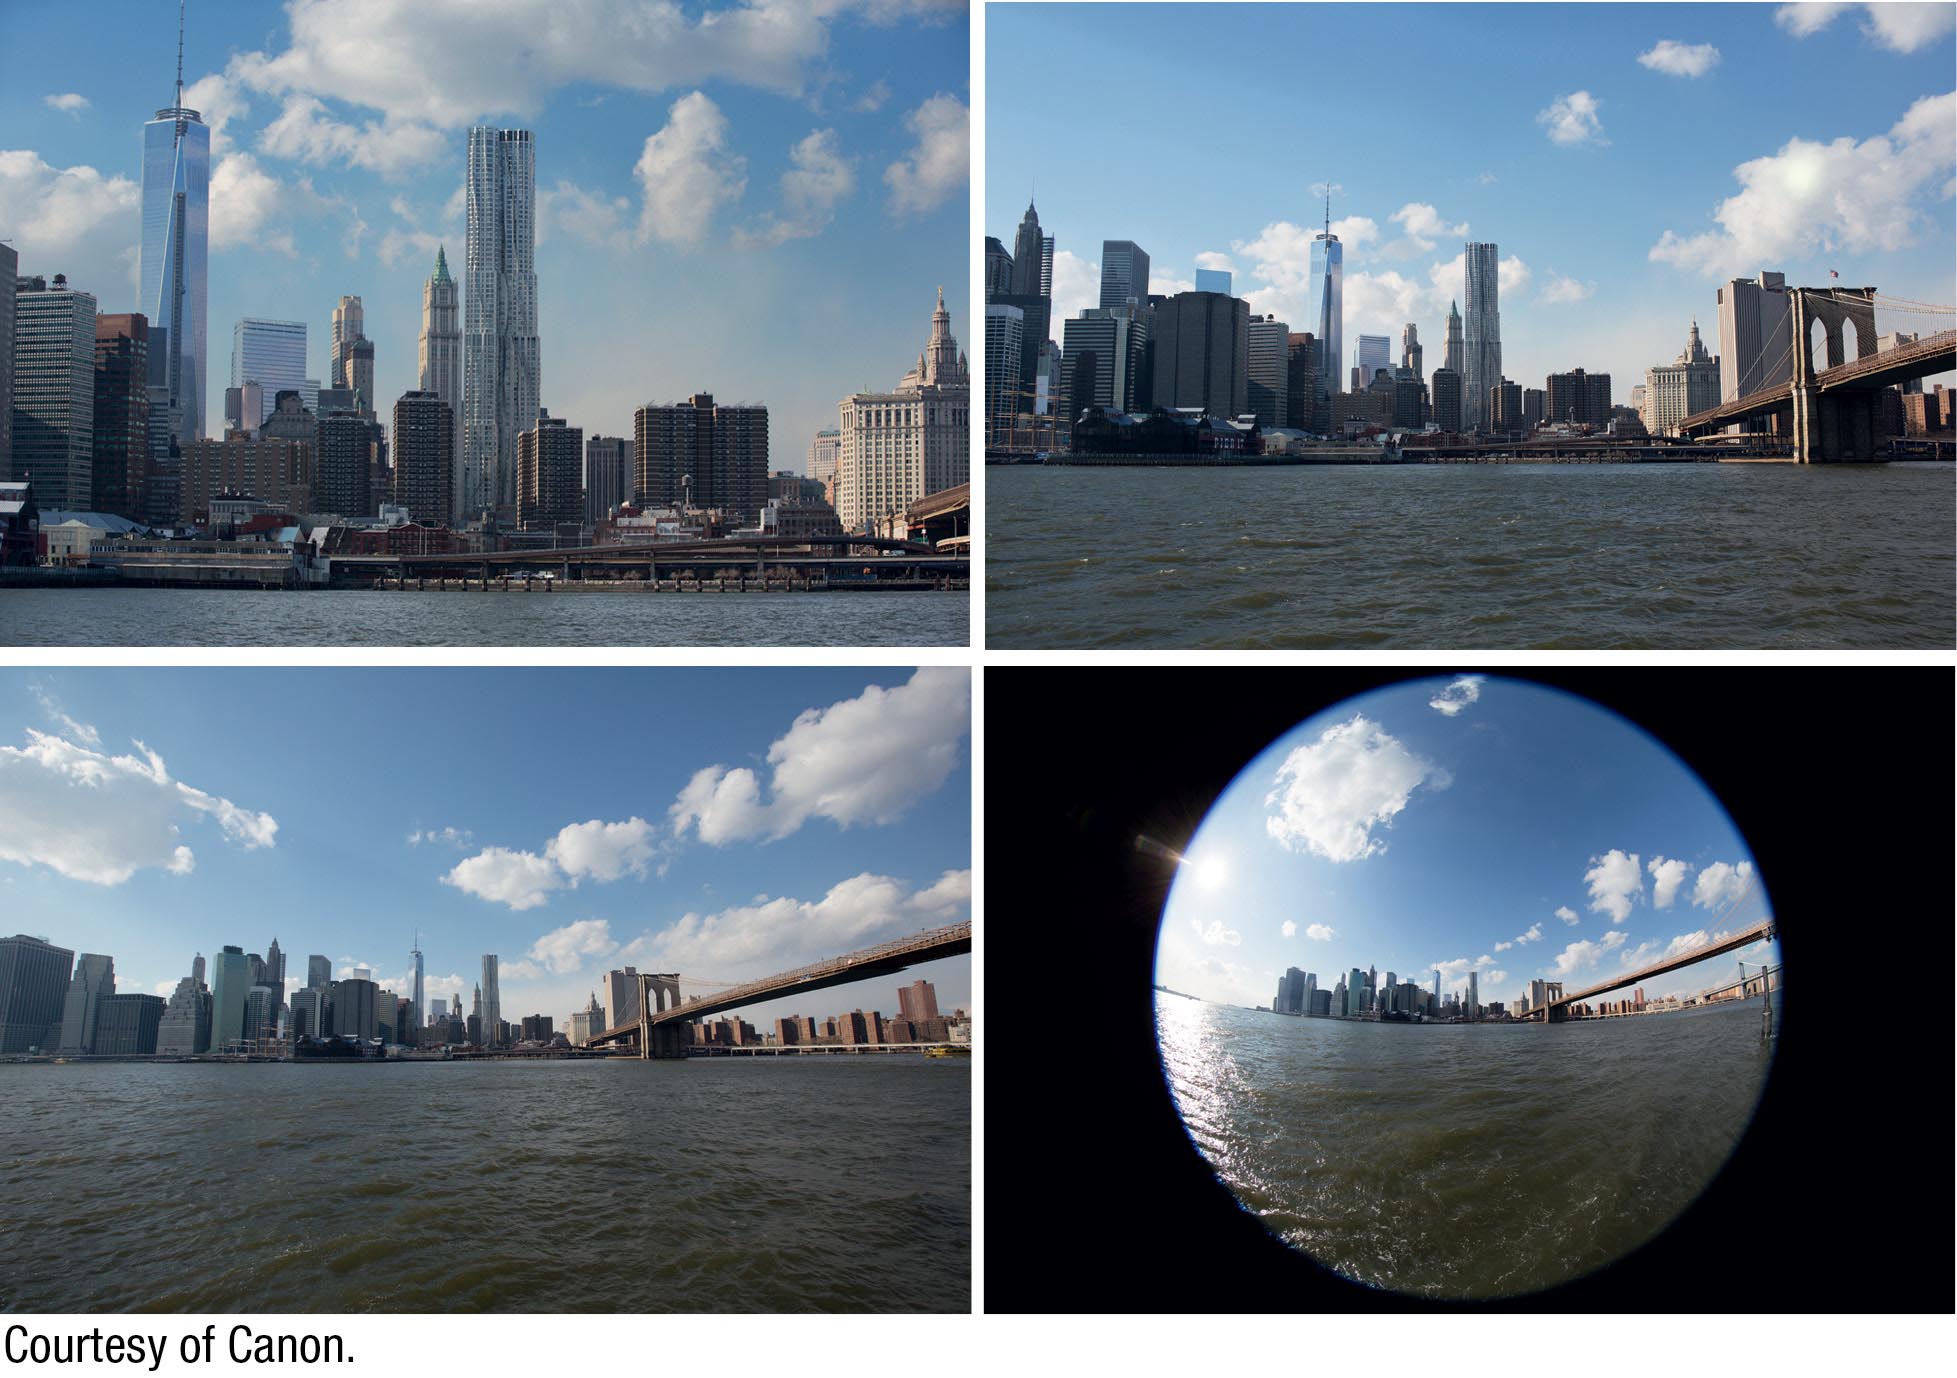
The longer the lens (“long” lenses have higher numbers), the closer the image appears. The shorter the lens, the more you see, and the sides of the image curve to encompass even more in the camera’s view.
Normal-
-
35mm image
-
50mm image
Telephoto or long-
-
100mm image
-
200mm image
-
400mm image
-
800mm image
-
1200mm image
The types of lenses described here fit into two categories: prime and zoom. A lens with only one focal length is said to have a fixed focal length and is called a primary lens, or prime lens. If you want a different focal length, you must replace one prime lens with a different prime lens. However, primes are useful because they are relatively lightweight, extremely sharp, and allow a great deal of light to come through even in low-
A lens with a variable focal length can zoom in and out and is therefore called a zoom lens. All consumer and most prosumer digital cameras have the ability to zoom, but they do so differently. Optical zooms actually use the optics of a movable lens to make the subject appear closer. Conversely, a digital zoom uses internal software to enlarge a portion of the image, making it appear larger. With a digital zoom, there is degradation of quality, and the picture may seem to break apart. Use an optical zoom for the highest quality image.
You can also take advantage of special lenses to produce unique imagery:
-
Anamorphic. An
anamorphic lens “squeezes” a wide-
screen image onto a 35mm piece of film. The image is then “un- squeezed” with a projector fitted with another anamorphic lens. -
Ultra-
wide angle . An ultra-wide- , or fish-angle lens eye lens , has a focal length of 15mm or smaller. It shows the whole scene but often visibly curves the edges. If the director wishes, the curves can be corrected digitally or by using a lens that has built-in correction. -
Macro. A macro lens gets crisp images of very small subjects and can focus from as little as one or two inches away. (A normal prime lens needs to be about 18 inches away to focus on a subject.)
Finally, if you’re using certain DSLR cameras, you can take advantage of the Four Thirds (4/3) standard, which consists of interchangeable lenses that work on several different DSLR camera bodies. These lenses are thinner and lighter than their traditional counterparts, and are specifically designed to produce the optimum image on the digital sensor of compliant cameras (the sensor on these cameras is a 4/3” sensor). Olympus, Leica, and Panasonic are the major manufacturers of cameras that work within this standard.
Focus
The term focus has two related meanings. The first is attention—what you want the audience to concentrate on. The second is technical and has to do with clarity—
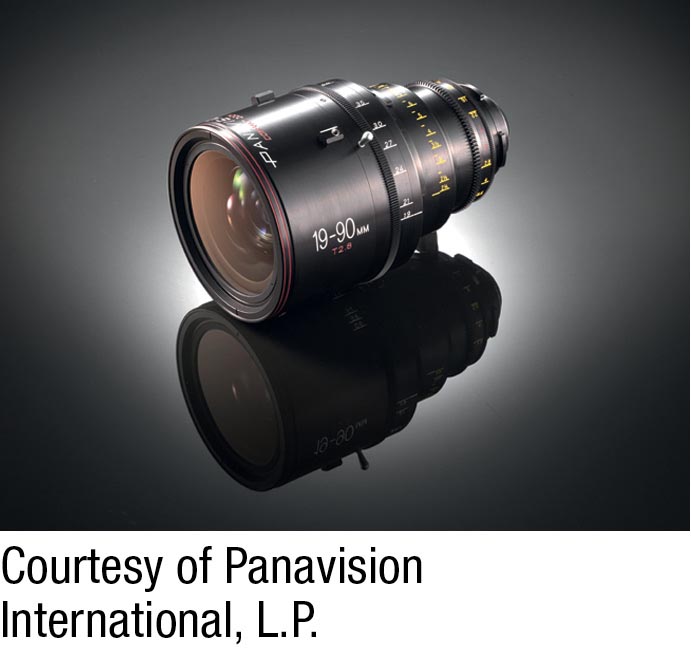
The PCZ (Panavision Compact Zoom) lens offers focal lengths from 19mm to 90mm, and weighs just over seven pounds.
If you’ve never used a manual focus control before, now is the time to turn off the automatic focus and learn how to do it yourself. Automatic focus is acceptable if you’re not very experienced or if you are in an in-
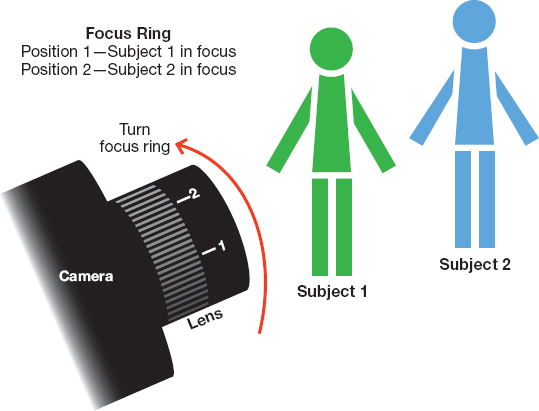
To focus your camera manually, adjust the focus control ring; a follow focus attachment will make it easier on your hand. Most digital cameras with pull-
Focus is a function of the distance between the lens and the subject. To get precise focus, camera operators often use a tape measure to get an exact number by measuring from the focal point on the lens to the object. Most focus rings have distance markings on them, which correlate to the distance at which a subject will be in sharp focus.
When photographing people, the sharpest focus should generally be on the center of the eye closest to the camera. If you shift the focus in a single shot, in order to draw the audience’s attention first to one thing and then to another, this is called a rack focus. Rack focus is often used to generate suspense; for example, you might focus on a person who’s hiding in the foreground, and then rack focus to reveal a predator lurking in the background. (See Action Steps: Rack Focus and Depth of Field.)
Key Factors: Aperture and Shutter Angle
Focus is also affected by two other factors: the aperture, or amount of light permitted through the lens, and the shutter angle, or the duration the lens is allowed to capture light. The interplay between aperture and shutter angle affects the way an image looks. Lighting also comes into play, especially the white balance on digital cameras, and you’ll learn about that in Chapter 9. Aperture, shutter angle, and other camera functions can seem confusing and counterintuitive—
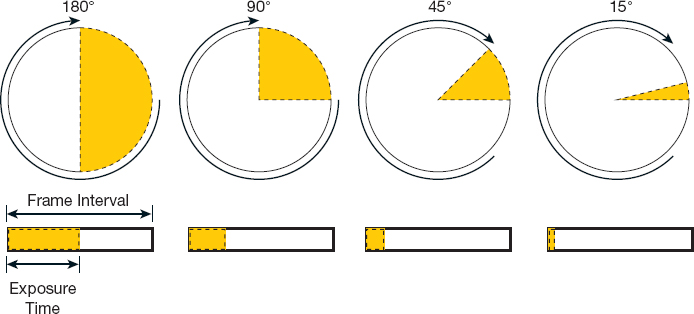
Shutter angles and exposure times
Aperture is controlled by adjusting a variable ring that sits behind the focus ring. This ring is also called the iris, and like the iris of your eye, it can get larger or smaller. On automatic settings, the iris adjusts its size automatically. In motion picture and television productions, the DP determines the desired iris setting, or shooting stop, and relays it to the first camera assistant, who sets the iris on the lens to the desired aperture. The size of the aperture is measured in f-
Shutter angle is the amount of time during each frame that light is present for image capture. It is the same as exposure time for each image frame, or the shutter speed on a still camera. It is called shutter angle because the shutter is a circular disc, and the open slice of that disc—
Depth of Field
Skinnier shutter angles allow quickly moving action to be shot without blurring. Big apertures allow a lot of light into the camera but also reduce the sharpness of the image. If you want every object in the frame to be in focus, use a great deal of light (much more than you could stand in daily life) and a very small aperture opening with a skinny shutter angle. The quality of this focus is called depth of field. When everything in a frame is in focus, it is called deep focus. When only one specific plane is in focus, it is called shallow or narrow focus. Adjusting the depth of field is an effective way to make a storytelling point in your film, because deep focus puts a character in the context of the scene as a whole, whereas shallow focus emphasizes a subject’s importance while everything else around it is blurry. (You’ll learn more about what this and other techniques mean for story and emotion in Chapter 9.) In stereoscopic 3D photography, the variables are multiplied because you are using two lenses and recording two images. (See Action Steps: Rack Focus and Depth of Field, below.)
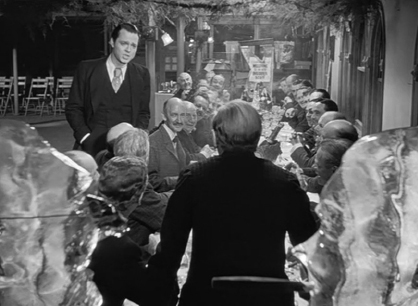
Orson Welles was known for his pioneering use of deep focus, as shown in this shot from Citizen Kane (1941).
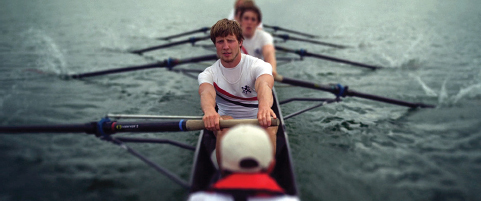
In the crew race scene from The Social Network (2010), DP Jeff Cronenweth used shallow focus to fix the eye on one set of characters in the 2.35:1 frame.
ACTION STEPS
Rack Focus and Depth of Field
Learning how to rack focus and control the depth of field takes some practice, but they’re important techniques to master. Fortunately, the steps are fairly straightforward.
Rack Focus
-
Position your camera on a tripod.
-
Using a measuring tape, measure the distance to each of the objects you will want to focus on. Most professional lenses have markings on them from which the measurement to the object should be taken. For example, if there is a one person in the background and another in the foreground, measure the distance to each of their eyes.
-
Note these distances on the focus ring. You may wish to mark them with a pencil on a small piece of blue, removable camera tape.
 By moving the focus from one person to the other, you draw the viewer’s eye to each person. This is called racking focus.
Depth of Field
You can achieve shallow depth of field using three separate techniques.
-
Using a telephoto lens, place the camera closer to your subject, and open the aperture wide.
-
When there’s an effective distance between your subject and the background, move the camera back, zoom in all the way, and focus on your subject.
-
Using a fixed-
focus lens, open the aperture wide, and increase your shutter angle.
Rack focus
By the Numbers
Which is more, bigger, or faster—
| F- |
|
| Film speed (ISO) |
|
| Lenses |
|
| Shutter angle |
|
| Speed of motion (frames per second, or fps) |
|