Basic Shots
Basic shots are the building blocks of visual grammar. If you think of a scene as a sentence, you can consider individual shots the words in the sentence. Each shot must have a reason for being there, and it needs to convey important information to the audience. As a cinematographer, you have a responsibility to get enough shots to make sure there are different ways to assemble the scene in the editing room (see Chapter 12). Indeed, the entire process of image capture can be thought of as executing your vision while preserving your future options for different editorial and visual effects as the entire story comes together.
As noted in Chapter 3, getting the shots you need is called covering a scene, or ensuring that you have coverage. The cinematographer needs to know the editing style the director will want to achieve before deciding how to cover a scene. What kind of pace should the scene have? Will the scene be intimate or more clinical? Will the actors be moving around or staying in the same position? Different editing styles require different shots; some directors prefer to do scenes in long, single-
How can you “see” a scene? First, ask yourself if the audience should experience the scene objectively or subjectively. In an objective scene, the camera is a neutral observer, similar to a journalist viewing the action. In a subjective scene, the camera experiences the action through the eyes of one of the characters and imparts that character’s emotional state to the action. Next, you’ll determine the distance from which the camera will see things: from far away, which places the characters and action in the context of their surroundings; from a middle distance, where you can see most of people’s bodies as they interact with others; and at close range, where you can see the fine details of faces and motion. These three distances correspond to the three basic shots—
Long Shots
Long shots are valuable for setting characters and places in relationship to the world they’re in. Images of a person walking down a deserted city street, where you see boarded-up buildings along the sidewalks, is an example of a long shot, as are images of a little house on a wide-open prairie. Following are names and explanations for the three most common long shots:
 SHOOT THE MASTER FIRST
Shoot the master shot first; that way, you’ll be sure you have captured the entire scene. Later, when you shoot closer shots, you’ll match the lighting, action, and blocking in the master shot.
 Establishing shot. The establishing shot sets up the location where the ensuing scene will take place. It should be wide enough to capture all the important architectural, or landscape, details. For instance, in a wedding scene, the establishing shot would show the outside (exterior) of the church; for a campfire scene, you’d want to shoot the surrounding countryside, with the campfire visible in the distance. Establishing shots are particularly useful as transitions between scenes or sequences.
 Wide shot/master shot. A wide shot is a shot that shows all or most of the actors. Typically, the master shot is a wide shot of the entire scene, which you can always cut back to or use as reference when you cut in for closer shots. The master is often shown at the start of the scene to establish the geography of the environment and the relative positions of the actors to one another (the blocking, which you explored in Chapter 3: Directing). Many situation comedies such as Talladega Nights (2006), use a wide shot to put characters in the context of everything that’s going on around them.
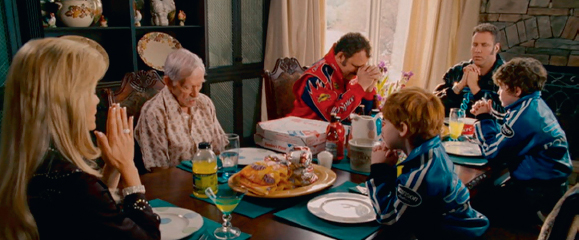
A wide shot establishes the dinner-table scene in Talladega Nights (2006).
 Extreme wide shot. An extreme wide shot differs from a wide shot in that the actors will appear much smaller, perhaps taking up as little as 20 percent of the frame. Although it serves much the same function as a wide shot, the extreme wide shot can also be useful in creating a sense that the environment is more of a character in the story, or perhaps to show the powerlessness of the actors against their environment. A science fiction story, in which the actors must grapple with a strange alien world, might make good use of extreme wide shots; they are also staples in epic adventures, as you can see in films like Lawrence of Arabia (1962), and traditional Westerns, such as The Searchers (1956).
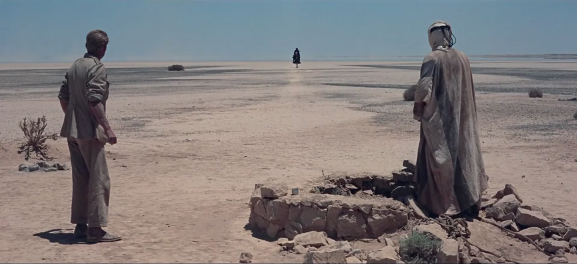
An extreme wide shot captures the epic scope of Lawrence of Arabia (1962).
Medium Shots
Medium shots bring you closer to the action, but not too close—and for that reason, they’re the most common shot in films. They let you see the entire action of the scene and some of the background where the action is taking place. A character pulling a cell phone from her pocket, or two characters sitting and talking on a park bench, would both be well-covered in medium shots. There is no hard-and-fast rule for what differentiates a medium shot from a long shot—it’s a fuzzy dividing line. In this book, we take the view that long shots emphasize the place more than the characters, and medium shots move in to focus specific attention on the characters and the action. Following are names and explanations for the five most common medium shots:
 Medium shot. While everything in this category is a medium shot, a classic medium shot is composed to start at the actor’s chest and move up to the head. This medium shot feels familiar and objective, because it is how we usually interact with other people—standing or sitting near enough to see their chest and head without getting in their face. You’ll use a medium shot to explore an actor’s emotional state without the subjective, manipulative quality of a close-up.
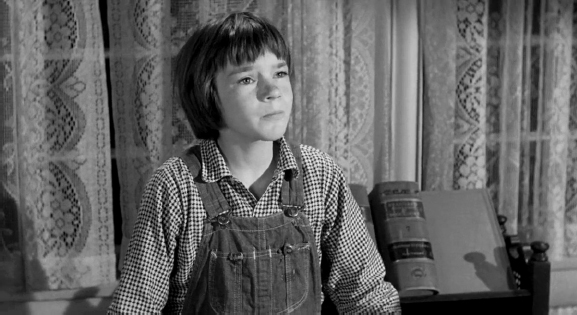
A medium shot in To Kill a Mockingbird (1962)
 MCU, or medium close-up. Slightly tighter than a medium shot, the MCU starts at the middle of the chest and goes up to the top of the head, sometimes cropping the actor’s face at the hairline. An MCU doesn’t have the forcefulness of a close-up, but it still brings focus to the actor’s eyes and facial expression.
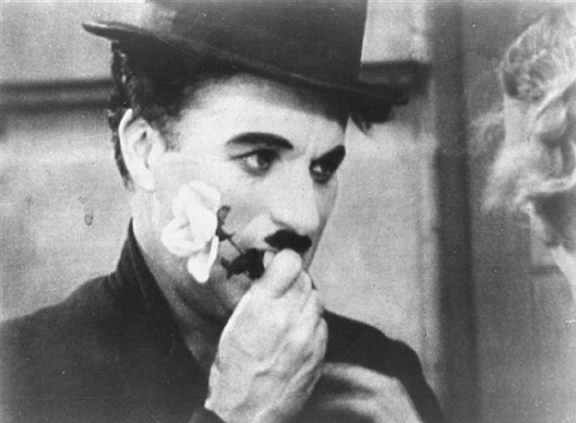
MCU in City Light (1931)
 Full shot. A full shot frames a single actor from head to foot. This shot is useful for showing the clothing that the actor is wearing. You might employ a full shot to emphasize a costume change—for example, when a bride-to-be tries on her wedding dress for the first time—but otherwise, full shots should be used sparingly, as they can be difficult to cut to and away from.
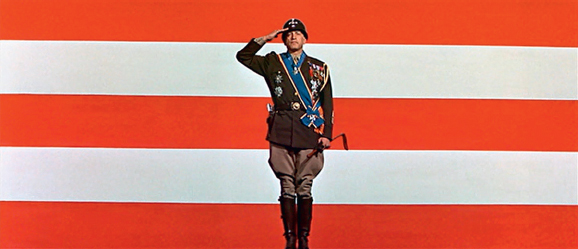
A full shot in Patton (1970)
 Cowboy. The cowboy is tighter, or closer, than a full shot and will generally cut an actor off just above the knees. It is called a “cowboy” because it is frequently used in Westerns to show someone who is wearing holsters. Because a person’s hands hang just above the knees when the arms are at rest, a cowboy shot is useful if you want to emphasize how the actor is using (or not using) hand gestures.
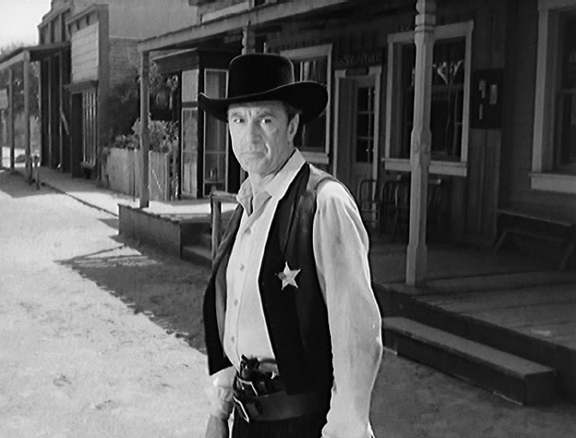
A cowboy shot in High Noon (1952)
 DON’T CUT UP YOUR ACTORS
Don’t frame a shot in which an actor is cut off at the joints (knees, ankles, wrists)—it will look as if part of the body has been cut off.
 Two shot/three shot, and so on. These shots refer to the number of objects—usually actors—in them. Typically, the framing of any of these shots is close to the edges of the actors’ backs and will not show as much of the environment as a wide shot or master. It’s a good idea to keep the camera at eye level with your actors. A two shot or a three shot is useful for capturing an intimate discussion in a single shot.
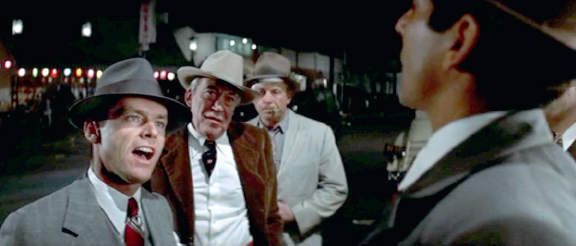
A uniquely composed three shot in Chinatown (1974)
Close Shots
A close shot brings you right into the action and emotion of a scene; here, the actor’s face fills the screen, and you feel deeply, personally connected to the character. In this way, the close shot is the opposite of the long shot: the long shot is objective, and the close shot is subjective. Directors often choose close shots for the most powerful, impactful moments of storytelling, and they are standard shots in movies that center on relationships. Close shots of actions or objects are narrative devices that tell the story in visual terms, and they often don’t need any dialogue to make their point.
 WATCH THE BACKGROUND
When shooting inserts, make sure the background behind the featured object is consistent with the scene. In the example of someone reading a letter, the insert on the letter should be shot from the actor’s perspective, with the actor’s fingers visible holding the letter, and perhaps, beyond the letter’s edge, a part of the room where the letter is being read. Nothing says “fake” more than an insert that’s inconsistent with the rest of the scene.
Following are names and explanations for the three most common close shots:
 Close-up (tight vs. loose). A close-up (CU) starts at the top of the shoulders and includes the actor’s head. As the shot moves in closer on an actor, it is said to be getting tighter. As the shot moves back, it becomes looser. Close-ups are especially useful for movies that will play on any screen other than a cinema screen—televisions, tablets, laptops, and mobile devices. When you’re shooting for a small screen, close-ups create a sense of intimacy with the actors and convey emotion well. They are also an important tool for emphasizing details and plot points—for example, the close-up of the doorknob turning, the email opening, the money being stuffed into a suitcase, all give the audience essential information so they can follow the story.
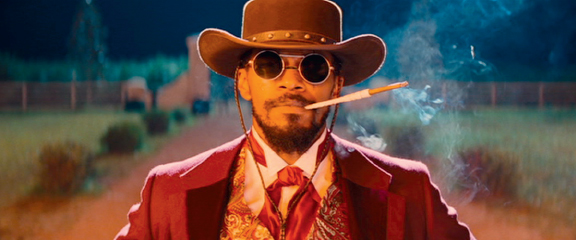
A loose close-up in Django Unchained (2012)
 COUNTING THE SHOTS
As you’ve just learned, every shot takes careful planning to set up. Using a 30-second commercial as an example, count the number of shots (setups). Then, list the kind of shot each one is (master shot, close-up, insert, and so on).
 Extreme close-up (“choker” and “haircut”). An extreme close-up (ECU), or big close-up (BCU) will frame out the shoulders and will often not even show the top of an actor’s head. It is often called a “choker” when the shot cuts into the actor’s neck. When the shot is so tight that it also chops off a bit of the top of the actor’s head, it is called giving the actor a “haircut.” Some directors use ECUs to convey moments when an actor experiences extreme emotion or must make a big decision. An ECU in a mystery or suspense story may signify that the actor has just figured out an important clue. The shot often focuses on the actor’s eyes, which are primary acting tools for conveying emotion.
 Insert shot. An insert shot (usually a close or a tight shot) captures some important detail in the scene. For instance, if an actor pulls a gun from his or her pocket, the director may want an insert shot of the gun as it is revealed. You should shoot inserts of any physical detail that’s significant for the characters—for example, a letter (you’d cut to it as the actor is reading the letter) or a gun (you’d cut to it as the actor pulls out the gun to threaten someone). Inserts can also be used as cutaways—shots the editor can use to break up or shorten the main action of a scene.
If you think creating all of these shots is time-consuming, you are right! Accomplishing a series of setups for each scene might take anywhere from half a day to two or three days for a particularly long scene. (See How to Shoot a Scene.)
Another way to cover a scene would be to do it in a single shot. The battlefield scene in Atonement (2007) is a good example of a complicated scene shot in a single take. The single shot is thrilling because it conveys a sense of scale and movement, but it also requires a lot of time to rehearse and choreograph and has potential storytelling risks. When you shoot a scene in pieces, you have the ability to shorten or lengthen the scene, and moments within the scene, and to orchestrate its movement in editorial to reflect character and storytelling dynamics. When you shoot a scene in a single shot, you have to live with it as it is.