Creating Images for Continuity
When the audience watches a scene, it feels as though everything is happening chronologically—
To make sure your film has continuity, you will want to verify that the lighting matches the master shot—
 Do I need this shot to tell the story?
-
Do I have all the coverage I’ll need—
all the bits and pieces, such as close- ups, reaction shots, and inserts? -
Have I shot enough coverage that the editor will have options in the editing room?
-
Or do I want to purposely limit the editor’s choices by limiting the coverage?
Deciding how to shoot each scene is the most important day-
How to Shoot a Scene
There are many ways to shoot a scene. What follows are basic steps for what we might call “classic coverage”—a shooting style that developed in Hollywood decades ago and is still used today because it is practical and efficient, and keeps continuity in mind. Of course, different directors have different approaches, and some choose to break from the classic coverage paradigm; this is fine, as long as the approach you take works for your story (see How Do I... Motivate the Camera?).
 KEEP YOUR EDITOR CLOSE
If possible, have the editor on-set with you when you’re shooting key scenes, or at least consult with her or him (if you are not the editor). That way, there will be another perspective to help make sure you get enough coverage to cut the scene together. If you are shooting digitally, the editor can also sometimes do a quick assembly of the scene to make sure there is sufficient coverage.
- Start with the master shot, which should be a wide shot covering the entire scene, with all of the actors in the scene, and covering all the dialogue and blocking. By definition, a master shot has built-in continuity—because there are no cuts, the action is continuous. Once you have shot your master, your job is to match all action to it. As you learned in Chapter 3, on a professional production, the script supervisor takes careful note of everything that has previously been established to avoid matching or continuity errors. In addition, having your master “in the can” means that you may be able to be cost efficient with your other shots (see Business Smarts: How Many Shots Do You Need?, below).
- Now shoot group shots (two shots and three shots), followed by close-ups, over-the-shoulders, POVs, and reaction shots. Vary the size and angle of each set of shots; this makes your film look more interesting and makes it easier to cut together.
- As you shoot the closer shots, make sure the action overlaps so that you’ll have flexibility in cutting. It is better to leave the camera running on an actor’s close-up for the entire scene, even if he or she has only one line; by doing so, you are getting reaction shots and the dialogue shot at the same time, and it will all be in continuity.
- Avoid brief shots. They take a long time to set up and are difficult to integrate editorially.
- Always shoot pieces for inserts and cutaways, as well as additional shots of the set from different angles without the cast, to give the visual effects department additional flexibility, when feasible. As you’ll recall, inserts are close-ups of important story elements, often taken from the POV of a character—for example, a close-up on a cell-phone screen as someone is reading a text message. Cutaways are shots the editor can literally cut away to in order to modulate the pace of a scene. For example, good cutaways might be close-ups of food being prepared for dinner, such as the stew simmering on the stove. Hand gestures also make excellent cutaways.
- When shooting pans, tilts, and zooms of objects, begin with a static shot, do the camera move, and end with a static shot. Without cutting, reverse directions (for example, if you started panning left-to-right, now pan right-to-left), and still without cutting, do the move both slower and faster. This will give the editor maximum flexibility.
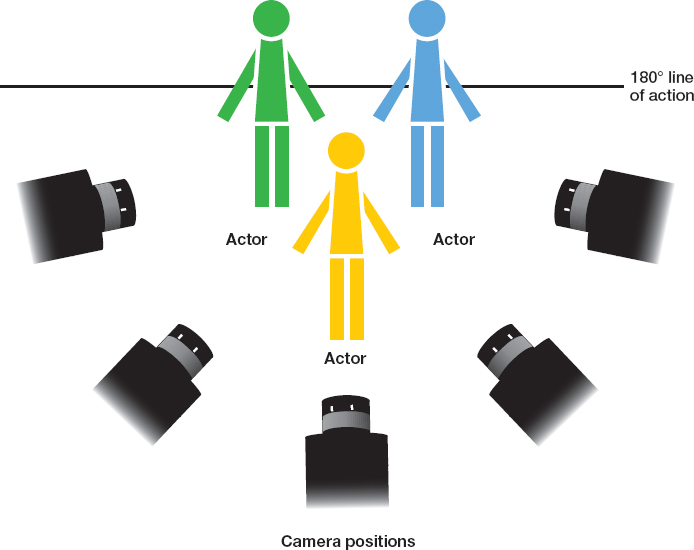
Don’t Cross the Line!
Whenever you shoot a scene, there is an imaginary line that separates the camera and the action. As long as you know where that line is and you stay on your side of it, all the shots will be in continuity because they will have the same screen direction: the actors will maintain the same right-
The 180-
FIGURE 7.2The 180-
Eyelines, Visual Effects, and Animation
You’ll learn how to create visual effects and animation in Chapter 13; for now, you just need to know that sometimes you’ll make a movie with these elements. The visual effect may be a view out a window—a window that’s painted green on the set; the animation may be a digital character interacting with the actors. In either case, when you’re shooting real actors who appear to be relating to elements that are not really there, you must be scrupulous about keeping your eyelines correct. If you don’t, the scene won’t work when you get to the editing room because the shots won’t match, and the continuity of the scene will be broken.
This process requires careful planning and is one of the reasons we emphasize that postproduction actually begins before preproduction in well-produced movies. By the time you start shooting your actors peforming on set, you need to know, for instance, where the horizon line will be in the window example, or how tall the mouse will be in the case of Stuart Little (1999), a technically pioneering film that was among the first to seamlessly introduce an animated character to the live-action world, where he interacted throughout the story with real actors.
VIRTUAL CINEMATOGRAPHY IS LIKE REAL CINEMATOGRAPHY
Everything in this chapter applies to virtual cinematography as well. Virtual cinematography is generally employed in animated films or in visual effects sequences for which most, if not all, of the elements are created in the computer. Camera moves and recomposition are done after completion of shooting, as a result of the editing process.
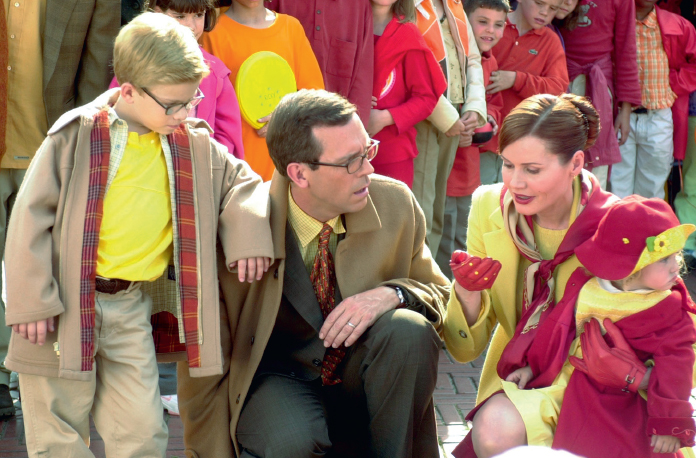
Where’s Stuart? In this scene from Stuart Little (1999), Geena Davis appears to share the frame with Stuart, even though the mouse was a visual effect and was obviously not there when the scene was shot. The visual effects crew, working in collaboration with the camera department, had to make sure the actor’s eyeline would be correct, and so they developed two solutions: one high tech, one low tech. In the high-tech solution, the director used a laser pointer synchronized to the camera’s shutter to indicate where Stuart would be. The cast learned to “love the dot” since that was their primary frame of reference on set for imagining where Stuart would be. A low-tech solution was to take a stuffed mouse toy about Stuart’s size and place him on the end of a stick. A crew member moved the stick and the actors focused on the puppet mouse. The device was affectionately known as “Rod Stuart”!
 REVERSE-ENGINEERING HOW TO COVER A SCENE
Pick a movie scene that’s at least two minutes long. Pretend you are the cinematographer. Make note of each shot (these are the setups you will need to cover the scene). See if you can design how you would set up each shot to replicate what’s in the scene.
How Many Shots Do You Need?

Every time you set up a shot it takes time—and time is always short on a movie set. There is constant tension between getting every possible shot and getting just enough to finish the scene and move on to the next one. Therefore, every shot is both a creative decision and a business decision.
The number and kinds of shots must be planned for, long before you get to the set—shot planning needs to be part of the budgeting process, as you learned in Chapter 5. The director of photography should have a thorough discussion with the director about what kind of coverage the film needs. Then, the director of photography can make a list of the necessary equipment (cameras and lenses, plus the ways to support and move the camera—see Chapter 6). If possible, it is generally a good idea to include a bit more equipment than is absolutely necessary, in the event something breaks or someone has a brilliant idea and needs additional tools. In fact, if you have a particularly complicated shot or one that will be nearly impossible to do twice, the director and director of photography will plan for that shot to be done with multiple cameras, if feasible. Each camera will be assigned to cover a different shot type.
During the shooting period, you will work with the director and the first AD to determine the best shooting order of scenes in a given day. It is often good business to get the most important shot first—so you’ll know that you have it—and then move down the shot list in priority order (see Chapter 5: Production Planning and Management). You also have to pick which scenes need the most shots and which ones can be less complicated, to keep your budget and time spent reasonable. For example, a fight scene may require a lot of shots and will therefore take more time to shoot and require more equipment—the close-ups on punches, inserts on bloody noses, and POV shots (see here) are all important for the pacing of the scene. A simple “walk and talk” scene that could be covered in one tracking shot (see here), may be fast or slow to accomplish, depending on the amount of rehearsal required and the intricacy of camera moves.
Cinematographer’s Emergency Kit

 A reference book of imagery that can inspire the look of the film. Images can be from other movies, photographs, graphics, or paintings. When you’re not sure how to capture a scene, go back to your image collection for inspiration.
-
The editor’s cell-phone number, so you can make sure you’re getting the coverage you need.
-
Your own list of the specific lenses, apertures, light meter readings, and angles you have used to cover a scene, in case you need to go back and do reshoots.