Color
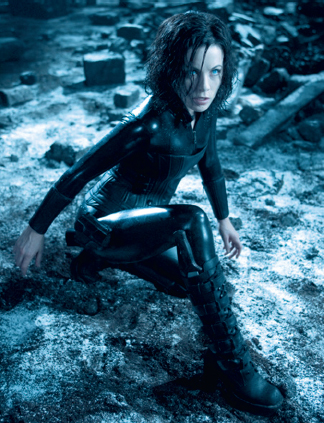
The Underworld series (2003–15)
Just as tempo conveys meaning in a song, color conveys meaning in cinematic storytelling, and it can be used a number of ways to provide different moods and feelings. But what is color, and how can you achieve the color you want?
Let’s start with the natural color of light. If you go outside on a sunny day, you generally aren’t aware of the color of light—it seems transparent, like the air we breathe. In fact, the light from the sun, what we might call white light, is made up of all the colors of the visible spectrum.
You can demonstrate white light in the studio by using the three primary light colors: red, green, and blue. When focused separately, as different spots on the wall, you’ll see three distinct colors, but when you bring them together, you’ll see white light in the center, where the colors combine. Where different colors intersect, you’ll find additional colors: red and green light combine to make yellow, red and blue combine to make magenta, and green and blue combine to make cyan. This gives us a good and simple definition: color is the way we see the visible spectrum of light.
One of the ways you can distinguish your student film is to make creative color choices and control the color. This will give your movie a more professional look. As two extreme examples of specific color choices, the Underworld movies (2003–12), in which the main characters are werewolves and vampires, appear overwhelmingly blue to give a feeling of cool otherworldliness, whereas red tones predominate in Midnight in Paris (2011) to convey warmth and romantic fantasy.
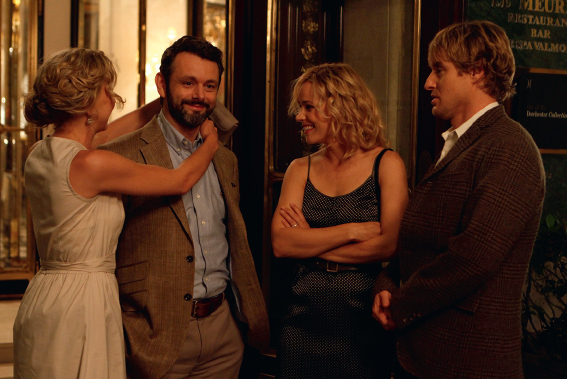
Midnight in Paris (2011)
In addition to making choices about color, you may also want to control the amount or intensity of color. Although you will be able to adjust color during postproduction color grading, which you’ll learn about in Chapter 11, you should make the fundamental coloring decisions during previsualization, then adhere to them during photography. Here are three ways to describe amounts of color:
 GELS CHANGE TEMPERATURE
You can change the color temperature of any light source by putting a colored gel in front of it (see here).
 Saturated color means that the colors are very intense. If you were a painter, you would be adding a lot of pigment to your base medium to make the reds intensely red, the blues intensely blue, and so on.
-
Desaturated color means the amount of color is minimal—you might describe desaturated colors as looking “washed out.” Using saturated and desaturated colors are choices of style; they do not convey a realistic look but emphasize psychology and mood.
-
Naturalistic color falls between saturated and desaturated colors; a DP using naturalistic color is trying to represent colors the way they normally are perceived in everyday life.
In order to achieve the color look you want, you’ll need to learn about the science of light: that light has a “temperature” and how to make sure the white light you see with your eyes is what the camera sees, too.
Color Temperature
ALWAYS WHITE-BALANCE
Always white-balance on something that is truly white—even a T-shirt, if necessary. White-balancing on something that is not pure white, such as a cream-colored wall, will throw off the color of the entire scene. You also need to white-balance every time you change lighting setups or locations—something that’s easy to forget. Try adding it to your camera checklist, along with checking your batteries and SD cards or film stock, to help you remember.
Have you ever taken a picture under fluorescent lights, only to discover that the people turned green in the photo? or noticed that the sun’s light in the late afternoon casts a glow that looks more red than the sun at high noon? That’s because all “white” light is not created equal, and what appears white is really a range of different colors of light—it’s just that our eyes normalize to make white lights in different settings appear the same.
The difference between seemingly white lights is measured in color temperature. White light that has more blue in it has a higher temperature; white light with more red has a lower temperature. Light temperature is measured in the Kelvin (K) scale. On a clear day, the sun at noon has a temperature of 5500 K. A tungsten lamp—one of the workhorse lighting tools you’ll be using, which approximates indoor lighting—has a temperature of 3200 K.
Based on what color temperatures mean, you can tell that sunlight is bluer (higher kelvin temperature) and tungsten light is redder (lower kelvin temperature). Therefore, if you want to supplement natural light, you’ll have to choose between lighting instruments that are more suited to outdoor or indoor lighting when you’re shooting your film. Within a scene, light temperatures don’t have to match precisely—you can have lights that are 3200 K, 3100 K, and 2800 K, and the lighting will work. But if you try to mix lights with color temperatures that are not close, like sunlight and indoor light in the same scene, the lighting won’t work well.
Once you have made sure your lights are close to each other in color temperature, you’ll still be faced with a vexing problem: how can you be sure that the light you see as white will read as white on-screen? Fortunately, there’s a solution.
White Balance
 MEASURING F-STOPS
Using an incident-light meter, measure the foot-candles or f-stops at different places around your classroom, using only the lights in the room and any window light. How would you set the f-stop if you wanted to shoot a wide shot of the entire room? Would you need a different f-stop if you were shooting a close-up?
If you’re using a video camera, it will have a switch that allows you to choose “daylight” or “indoor” light. That’s the camera’s approximation of what natural white should look like in average daylight or indoor lighting. However, in filmmaking, nothing is average, and you’re better off using the switch’s third position: manual.
With manual white balance, you’ll aim your camera at a standard white card, or even a normal sheet of white paper. Using the manual switch and the instructions on your camera, you’ll set this white card as the white of white light in your scene. That way, when you look at your footage, everything will be the correct color. You need to white-balance every time you change locations or change lighting setups, to make sure you are recording white correctly.
If you are using a film camera, you will need to choose a film stock that is white-balanced for your scene. When you use daylight-balanced film, the sunlight will appear white. When you use tungsten-balanced film, the indoor electric lighting will appear white. When using a digital camera, white balancing happens through the camera settings; when using a film camera, white balancing depends on your choice of film stock—it has nothing to do with the camera at all.