Indoor Lighting
Most cinematographers love indoor lighting because it gives them absolute control, whether the scene is actually supposed to take place indoors or whether it is on a sound stage dressed to look like an exterior. However, with great control comes great responsibility: indoor lighting uses far more equipment, and is trickier than exterior lighting.
As is true whenever things get tricky, it’s best to have a plan; a DP’s plan is called a lighting diagram (or light plot), which is a drawing of how the lights will be positioned, analogous to an architect’s drawing of how a house will be built. Let’s look at how lighting diagrams work, and then learn some practical applications of interior lighting.
Lighting Diagrams
Although lighting diagrams are occasionally used for outdoor shoots, they are nearly always used, and meticulously followed, for interior work. That’s because indoor scenes require special time-consuming rigging, meaning that the lighting crew needs to plan well in advance to have the equipment and person power on-hand. On student productions, it is customary for the DP to hang lights alongside the crew—or for the DP to be the crew—whereas on professional productions the DP may arrive on-set after the crew has already finished the pre-rigging.
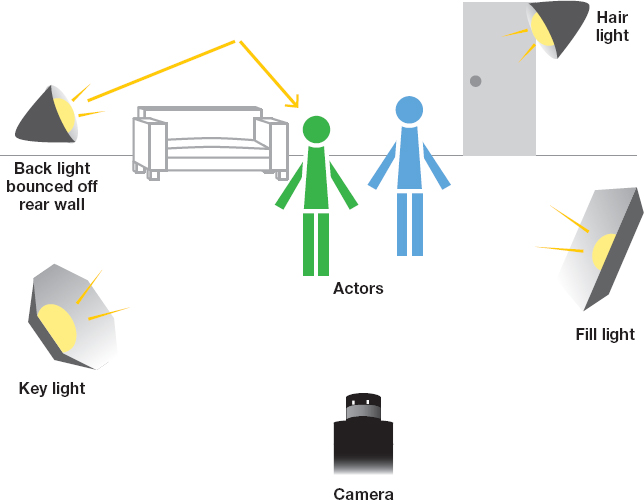
FIGURE 9.9Using only four lights, this setup provides proper lighting for two actors in this scene. The back light is reflected off the back wall to give the actors added dimensionality.

Lighting diagrams also offer an opportunity to study how lighting instruments work together to compose well-intentioned images. Figure 9.9 shows a lighting diagram for an interior scene. In more complex setups, the DP will include eye lights—light positions to reflect off the actors’ eyes. The eyes are the most expressive part of the human face, and you will want to make sure they “read” well.
 CONTROL YOUR LIGHT
When you’re working in a practical location, take control of light: turn off the existing lights and use your own. Only add existing lights if they will work for your movie.
As you can see from the annotations, both diagrams accomplish the same idea of a lighting triangle: key light, fill, and backlight. The studio film is able to use more lights to achieve specific spots and accents in the scene; the resulting lighting will be deeper and more modulated. Your lighting diagram will probably be closer to the student film version, although you may be able to pick up some extra instruments; in that case, the studio approach will give you ideas on how to make your student film look much more professional.
Practical Indoor Setups
Although lighting diagrams offer a bird’s-eye view of light design and are indispensable for communicating with your crew, they are difficult to visualize—you can’t know exactly what lighting will look like just by seeing the diagram, just as it is hard to know what music will sound like just by reading the musical score. Like music, lights must be “played” to be understood.
 LIGHT BY EYE
The most important thing is to know how to light by eye. Use the light meter, but develop the sensitivity and experience to know what the shot will look like on the recording medium (film or digital).
Your first step is to set up your camera and select the frame. Until you know what will be in the shot (and what won’t be), you can’t know where to light. By setting your frame boundaries first, you also save time and money, because you won’t waste resources illuminating elements that will not be in the finished film.
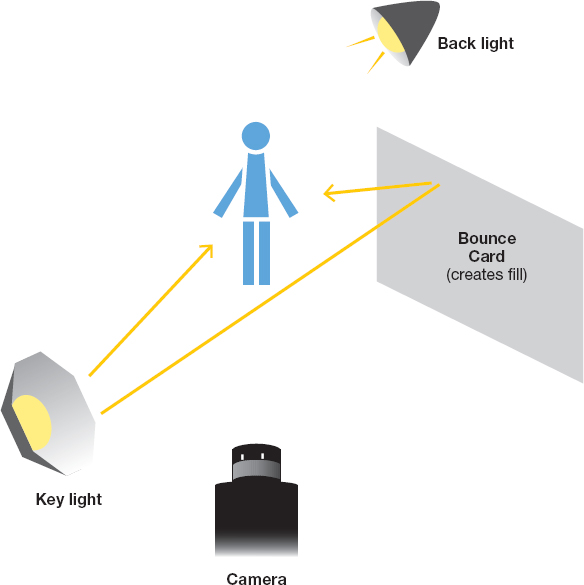
The indoor setups in Figures 9.9–9.12 are among the most common ones you’ll experience, and by studying how they look, you can start making plans for your class project. Figure 9.10 uses the concept of bouncing light; using walls, ceilings, or white cards as bounces is an easy and inexpensive way to create fill and an even baselight level.
FIGURE 9.10Interior day, one actor
Much can be done with only two lights in this simple setup. The key light is placed at a 30-degree angle to the actor’s eyeline; a reflector bounces light from the other side to provide fill. The backlight visually separates the actor from the background.

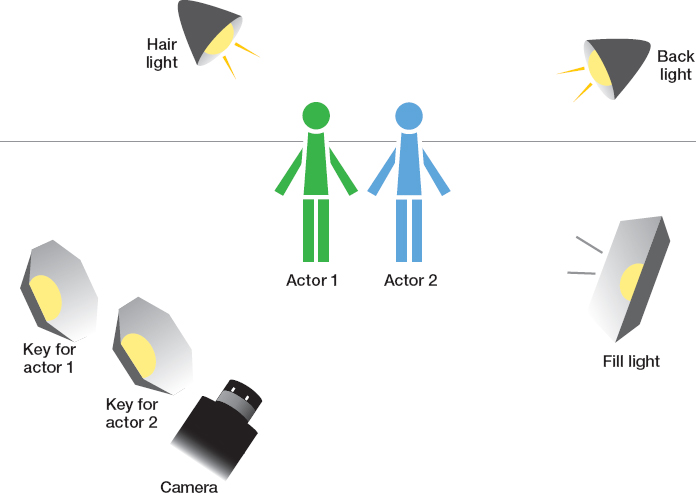
FIGURE 9.11Interior day, two actors
There are two key lights, side by side—one for each of the actors’ faces. The fill, back, and hair lights combine to give the actors definition and contrast (5-light setup).

 INDOOR LIGHTING
Try reverse-engineering the lights in a scene from a favorite film. How would you accomplish the same look?
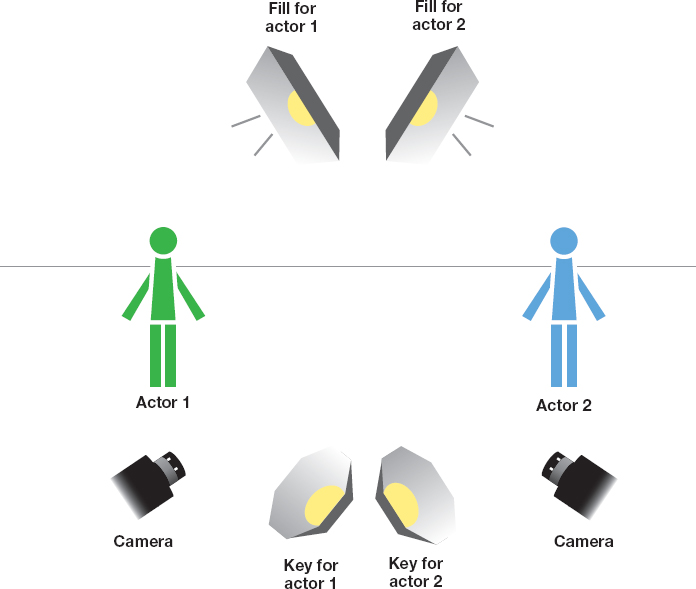
FIGURE 9.12Interior day, two-person scene
The lights are set up so that it will be easy for the DP to shoot in two directions—first the angle on one actor, then the angle on the other. There are two key lights and two fill lights, one set for each actor. The DP has adjusted the lighting levels so that there will be visual continuity no matter where the camera is positioned; setting the lights in this way also saves time, because the director can move quickly from one angle to another.
