Organize the Assembly
Typically with most NLE systems, you first initiate a new project in the software, which sets up the job so that you can create and organize a timeline; access your material from a central location; create settings and shortcuts for keystrokes; designate where all edited material shall reside, and in what formats; and so on. The entire project then lives on your hard drive as a single project file, which is a fairly small file because it is essentially just a playlist that maps out the project and points to the actual, higher-
The other large files your NLE generates to live on your hard drive are render files, which are copies of source files after they have been modified or tweaked and then processed by your computer to reflect all changes to the original file. Remember that you may also be importing associated media files—separate media beyond your original camera footage, such as graphics, still photos, and music. As you start a project, most systems will guide you through a process of deciding where you want to keep all that media material on your hard drive. This spot is frequently called a scratch disk, although different platforms may use slightly different terminology. Often, you will be able to specify the format, frame rate, codec, and other characteristics of files either manually or using automated presets for commonplace digital camera formats.
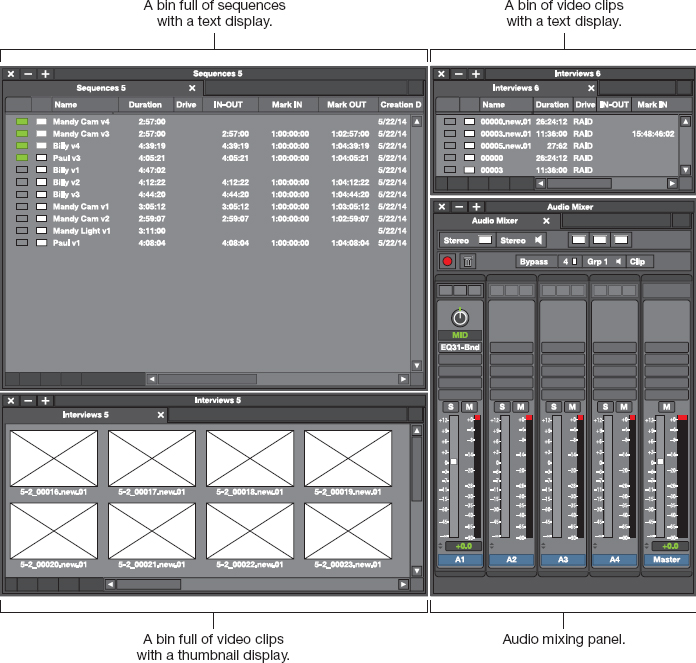
In most systems, your organizational structure for tracking everything is designed and visible through your NLE system’s browser, which is essentially a window or panel where you can store, track, move, and organize files, folders, bins, and other elements for your project. But most important, you want to properly name your files and set up bins—also called windows or simply folders—
There are dozens of ways to organize files and bins depending on your preferences, your resources, and which NLE software you are using. Many leading editors have particularly arcane ways of doing this, whereas others keep it exceedingly simple. Do some experimentation with sample clips to figure out what methodology works best for you. (To see a video about how this works in practical film conditions, see Video Activity: How Do I… Keep Track of Footage?)
Files and Bins
As you ingest image files and set about deciding where to put them so that you can use them efficiently, it’s important to be particularly strategic about file-
 The names should be easy to spot when scrolling through a directory.
-
You may want to use your script as the foundation of file names, following it scene by scene. You may even want to include scene and take numbers, or the order of shooting, in the file name. If you shoot scene one, take one, think about including those identifiers in the name.
-
Never include the word final in a file name—
changes are often inevitable until the last minute. Therefore, use version numbers or that day’s date, knowing that the largest number or most recent date is always your most recent version of a file. -
Add certain key words or short descriptors for specificity when it makes sense to do so.
-
Update the date in the file name to indicate how recently it was changed.
-
If multiple people are working on the material, add your initials at the end of the file name to indicate who worked on it last.
Finally, if your file format and software include the ability to input metadata—information about the file itself—
Meanwhile, you also need to move files to bins within your NLE’s browser environment to serve the goal of maximum efficiency. Generally, there are two leading schools of thought about organizing bins: you can organize material based on either the order in which it was shot or the order in which you intend to cut it. Many leading Hollywood editors organize content in cutting order—
The downside of this approach is that it can be extremely time-
There are, of course, more detailed breakdowns you can do with your bins—
 MATCH FRAME COMMAND
Many NLEs have menus that allow you to view available handles, but others require you to figure this out using what is sometimes called the match frame command. To execute, place your cursor on the first frame of a clip, hit the Match Frame button, and then the original master clip appears so you can compare it to the piece you are using.
Timelines
Most NLE systems use a window-based methodology for graphically displaying material you are working on in various ways, such as the aforementioned browser window. Another typical window, often called the viewer or source monitor, is used for marking clips while the editor is culling through material, and another, called the record monitor or program monitor, is used for basic viewing of edited sequences.
In virtually all NLE systems, the most important display is the timeline. This serves as the primary interface the editor will use to lay out chronological thumbnail representations of all tracks for all sequences from the movie in a linear, horizontal fashion across the monitor or monitors. You can zoom in on individual shots or scenes, and you can also zoom out to view how each sequence fits into the larger movie. The timeline essentially represents your movie exactly as you’ve cut it thus far, even though clips on the timeline are really just surrogates for the actual media files, which live within your storage system. These clips link directly to the portions of your original files that you will need when you finish the movie later on, as we discuss shortly.
Keep in mind that most NLEs permit multiple video and audio tracks or layers, depending on your creative and technical needs. You can layer sound above picture, sound above titles, titles above picture, or picture on top of picture. If, for example, you are using back-and-forth cutaways from another event happening in the narrative, you might want to place the cutaways on a different video track on the timeline so that you can experiment with them before you need to bother with an overwrite edit (see the next page) in that particular spot.4 You can make the cutaways longer or shorter to decide what you prefer without taking original shots off the timeline, and when you are happy, you can move the shot to the primary video track.
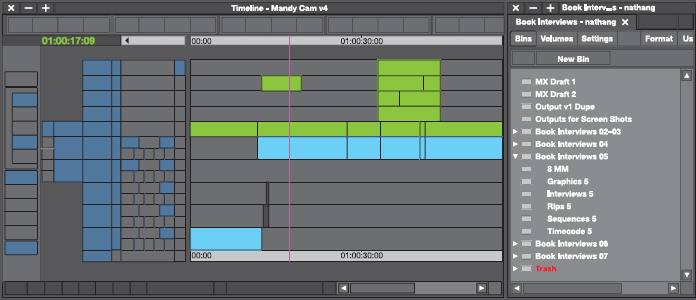
Also, not all NLE systems use a two-window layout, or all of the aforementioned nomenclature for the various tasks we have described. Some systems use just a single window, from which you can toggle back-and-forth between source elements and edited clips. In fact, there are numerous differences in terminology, layout, and other aspects among various systems. However, virtually all of them take the basic approach of offering some kind of visual representation via the timeline so that you can drag-and-drop clips, cut-and-paste them, or insert cut points; see what you like or don’t like; and then save or delete what you just did. In other words, the timeline is the place where you will be able to keep visual control of your creative work in an organized fashion.
Once you have familiarized yourself with your NLE and set up your project, you will start marking clips and adding them to your timeline. Here are some basic pointers for interacting with your timeline:
MATCH PICTURE AND AUDIO CUTS
As you manually trim or add clips, remember to cut every track on your timeline by the same amount—both picture and audio. If you add or delete a video clip on a video track but not on the corresponding audio track, you will fall out of sync. Many NLE systems automate this process, but you need to make sure you “unlock” tracks to enable that capability on most NLEs; carefully read the manual so you know how to unlock clips and automate this process.
-
Search bins to find clips you want to start editing with, and bring those clips to the source monitor. You can drag the clips, use menus or keyboard commands, and so on—there are literally dozens of options for how to move material around depending on your system and preferences.
-
The original raw clip is generally called the master clip. If you do not want to use the entire master clip, mark an inpoint and outpoint on the source monitor where you want the clip to start and finish. All NLE systems have different shortcuts you can use to program your keyboard for marking clips and performing other common editorial tasks easily. In fact, some NLEs, such as professional Avid systems, come with their own keyboards, which include special shortcut templates color-coded directly onto the keyboard.
-
Next, similarly mark an inpoint on your timeline—the place where you want the edited clip to go in your evolving cut. In many NLE systems, the clip within your timeline that you are currently dealing with is called the destination track or target track. NLEs often use tiny graphic shapes as markers, indicating places on the destination track where clips are to be inserted. As described earlier, you can drag clips from the source monitor to the program monitor in those spots, or otherwise command the NLE to copy the clips in question and paste them where you have indicated they belong on the timeline.
-
Typically, you will also be adding audio tracks you have previously organized (see Chapter 10). With many NLE systems, if you tell it that a particular audio clip belongs with a particular video clip, the system will automatically sync them together. Since your timeline typically has one or more video and audio tracks, which are visibly stacked on top of one another, you can efficiently apply particular audio to particular video clips. The system will likely give you options on how to visually display the audio track—often, as waveform images of the sound signal.
-
Depending on your NLE and workflow, you may need to instruct the system on what format to convert one clip or sequence to in order for the now-edited sequence to be the same frame size and frame rate throughout. Many NLE systems will do this automatically if you don’t indicate otherwise by adjusting the sequence to the same format as the first clip you added to the timeline.
Technical Assembly Techniques
As you march forward, adding and subtracting elements to and from your timeline, you must keep in mind that the movement of clips will typically impact the clips around them. If you already have a series of shots linked together and want to insert a new clip in the middle of them, most NLE systems offer a couple of ways you can do it so that you impact the overall sequence only as you intend. You can add a shot with an insert, or a splice edit—a procedure by which all preexisting clips automatically move to the right of the new shot. Some NLEs also call this a ripple edit because it “ripples” all clips after the edit further down the timeline. In this scenario, the overall length of the sequence grows by the length of the newly added clip.
A different approach involves an overwrite, or overlay edit, which adds no additional time to the sequence. With this method, the NLE allows you to insert a new clip and simply overwrites all material already on the timeline from where the new clip starts to where it ends. With an overwrite, the length stays the same and there is no rippling—earlier clips remain where they were. Overwrites are useful not only because length is not impacted but also because the synchronized relationship between picture and audio of the existing portion of the sequence is not changed. However, you need to be skilled at doing it, or you can overwrite material you do not wish to remove from the sequence.
USE SNAPPING
Leave your NLE’s snapping function on when cutting to avoid leaving tiny blank gaps between two clips you want to join together. The main reason for turning the snapping function off would be if you wanted such a gap for some reason.
You can also remove shots from the timeline, thus linking two shots that were previously connected to the deleted shot. This is simply called a delete or an extract edit. Modern NLEs have functions that make it easy to delete clips and then restore them with little difficulty. Other key technical editing maneuvers are described in this section. Keep in mind that the most crucial of editing techniques—executing transitions (techniques for moving from one shot to the next)—lies at the creative heart of editing, and we will leave that subject for examination in Chapter 12. But for now, here are the important technical processes you need to learn about:
-
Lift Edit: A lift edit happens when you remove a shot but maintain the space it took up on your timeline with black frames, often called filler or slugs or gaps. This serves the purpose of holding space for a future shot while allowing other clips to remain in their original positions.
-
Trimming Clips: Trimming is the name for the process used to change the length of clips on the timeline. It is essentially used for making modest final tweaks as necessary. Various NLEs offer many ways to trim shots, including a special trim function that automates much of this process once you make certain decisions about the nature of the trim. (See Action Steps: Art of the Trim, below.)
-
Three-Point Editing: This is the term for a process used to efficiently insert clips into your destination track. The name three-point editing derives from the fact that although there are four edit points involved, you only need to manually set three of them. The first two set the inpoint and outpoint on the source clip itself, and the third is the location on the timeline where you want to insert the clip. There is also an end point on the timeline where the clip will conclude—a fourth point—but that point is automatically calculated by the NLE.
-
Snapping: This term refers to one of the popular ways for moving existing clips on your timeline to different locations. Snapping is an NLE software tool whereby clips completely “snap” onto whatever other clip you place them next to in such a way that there is no minimal gap or space between the two clips you are linking together. The snapping function is also useful for marking clips or portions of clips for removal. You can snap your cursor to where the clip begins to easily place an inpoint, and then snap it to the end of the clip to place an outpoint.
-
Stacking: When you want to layer video images, you “stack” two or more clips on different video tracks within the timeline, a process called stacking. A simple example would be the placement of titles (see here) over images. The titles would be placed in the top video track, and the picture on the bottom track. Many NLEs include a basic visual effects capability of allowing you to adjust clarity of the video image, so that the titles or other video track are visible when stacked.
-
Sync Point Editing: A method for overwriting a clip, sync point editing lines up particular elements within multiple video clips or between video and audio clips automatically. You might have a cheering fan at a ball game clapping in the sequence and want to better synchronize that shot with the sound of the crack of a bat. Some systems come with a tool to mark such spots and automatically bring those elements together.
-
Replacement Edit: In other cases, you might like the length and positioning of your clip but not the image itself. In those situations, you would mark spots where you want to replace the image, click on a replacement clip, and have it seamlessly take the place of the original image. This is called a replacement edit.
-
Fit-to-Fill Editing: Fit-to-fill editing is a technique you use if a clip is too short for the space you have available. In that scenario, you can mark inpoints and outpoints for the space, then instruct the NLE to minutely speed up or slow down the clip to fill the differential.
 SETTING UP BINS
Design and type out a sample bin hierarchy for a single scene from a feature film you are well acquainted with. By “hierarchy,” we mean list the bins from most important to least in the sense of your preferred order for editing a chosen sequence if you were the editor, and under each one, list any subfolders you would include that break elements of the scene down further. Make sure the bin names are clear and easy to follow. Remember to include bins for audio, effects, voice-over, or any other elements that would have their own track on a timeline. Add a paragraph explaining your breakdown and why you think it would be efficient in helping you find material from that particular sequence.
ACTION STEPS
Art of the Trim
A major part of editing video involves the need to cut or trim clips, or to extend their length for various reasons. Typically, with most NLE systems, a basic trim function will show you the last frame of one shot (the tail) and the first frame of another shot (the head) in two windows and allow you to shorten one or both. But there are many different methods for trimming clips, which is one reason why some NLEs offer functionality for storing for later access extra frames from either the head or the tail of a clip that you have already removed from the timeline. This is useful in case you need to restore the frame later for the purpose of executing a dissolve (see Chapter 12), which might require extra frames to execute. Those stored extra frames are called handles, and although they are no longer visible on the timeline, the NLE can make them easily available to you. For instance, if you are executing a dissolve, you will need handles of half the number of frames of the entire dissolve, so if the dissolve is 20 frames, you will need a 10-frame handle. Many NLEs offer ways to make handles readily available for restoration as needed.
In addition, there are other handy methods for achieving your creative trimming goals in your NLE’s toolbox. Here are some of the basic kinds of trims you need to familiarize yourself with:
 Roll Trims: In this case, you add frames to the end of one shot and delete the same number of frames from the start of the next shot, which keeps the sequence length unchanged overall.
 Ripple Trims: As discussed earlier, ripple edits can be used to push following clips down the timeline, lengthening the overall sequence. However, if you need to also shorten the sequence, you could shorten the end of the first clip to prevent the overall length from increasing. In that case, you could insert a clip between two clips, pushing the clip on the right down the timeline as before, but then you might also shorten the tail end of the clip you inserted, thus pulling the last shot to the left, tightening the clip up again.
 Slide Trims: This is a technique for taking a clip and sliding it over adjoining clips to change its position on the timeline—the clip is not altered, but its location is changed.
 Slip Trims: These involve using a different piece of a clip without changing length or position on the timeline. Slip trims are often used for subtle adjustments within a shot.