Supporting and Moving the Camera
When you’re working with different lenses, especially telephoto lenses that make subjects appear closer, you’ll find an unfortunate side effect: every little move or shake of the handheld camera seems amplified. Sometimes this is a good effect because it makes the shot seem real or like a documentary; however, it can also be distracting and pull the audience out of your movie’s story. Fortunately, there are a variety of accessories that allow you to support the camera easily, so that the image remains stable, and that help you to move the camera smoothly in order to capture the shots you’re after. The crew members responsible for operating or assisting with the tools to move cameras are the grips. Following are some of the more common ways to support and move the camera:
 CHANGING EMPHASIS WITH DEPTH OF FIELD
Following the Action Steps, set up a series of three objects, three feet apart. Position your camera at one end. Practice depth of field changes by opening your aperture to the lowest number (most open position) and focusing on the middle object. Now, close your aperture to the smaller opening (highest number) and try it again. Finally, move your camera back farther, and zoom in as close as possible to the middle object. Can you adjust focus so only it is in focus, and the front and rear objects are out of focus?
 Tripod. Also called “sticks,” this is the most basic way to control camera movement. On a tripod, you can swivel the camera up-and-down or right-and-left, and the tripod structure will hold it steady.
-
Steadicam. A Steadicam is a special harness that fits on the cameraperson’s body and holds a digital or film camera. It has counterweights and a balancing mechanism, so the camera person can run or walk and the camera motion will appear smooth and fluid.
-
Dolly. The dolly is a fixed track—it looks like a small railroad track—which can be straight or curved. The camera and the camera operator ride on the dolly track; a dolly shot can be used to track smoothly alongside an actor who is walking or running, or it can be used to push in or pull back from an actor who is standing in one place.
-
Vehicle mounts. Cameras can be mounted on anything that moves. There are specialized mounts, or fixtures, that can attach a camera to a moving car or motorcycle.
-
Crane. Cranes come in a variety of lengths—from as little as 25 feet up to 85 feet. The 85-foot crane weighs four tons and has counterweights to keep it from toppling over. In all cases, the camera is mounted on the top of the crane; the camera may be remote-controlled. A crane shot allows the camera to get up high to survey the whole scene, swoop down onto the action, or pull back and away to give a dramatic feeling or emotional perspective.
-
Technocrane. A Technocrane is a combination of a crane and a dolly. A remote-controlled camera is mounted on the top of the crane, and the crane has a cart with wheels that can be pushed along a dolly track.
-
Helicopter mounts. Helicopter mounts include equipment that will attach a camera either to a full-size helicopter or to a miniature, remote-controlled drone that can fly in, around, and over the action—one of the coolest toys in a cinematographer’s bag of tricks.
-
Motion control. Motion control connects the camera and the lens adjustments to a computer, so that camera motion can be precise and repeated exactly; for multiple takes of a shot, the computer moves the camera. Motion control is always used for heavy visual effects shots, in which multiple images need to be created for separate layers or versions of the same shot. Motion control can be a particularly expensive technique and, with digital alternatives now available, is not used as frequently as it once was.
-
Wire mounts. Wire mounts permit the camera to be suspended on cables. Pioneered in sports television coverage, this tool allows the audience to get intimate with the action by placing the viewer right in the middle of it. As opposed to a crane, this rig is used when the shot requires the camera to be moved over a long distance. This could not be done with a cameraperson on the ground; a wire-mounted camera can zip around at up to 35 miles per hour!
 USE A WHEELCHAIR TO DOLLY
Low-budget dolly trick: Have the camera operator sit in a wheelchair and aim the camera. A second person can push the wheelchair from behind to track the action.
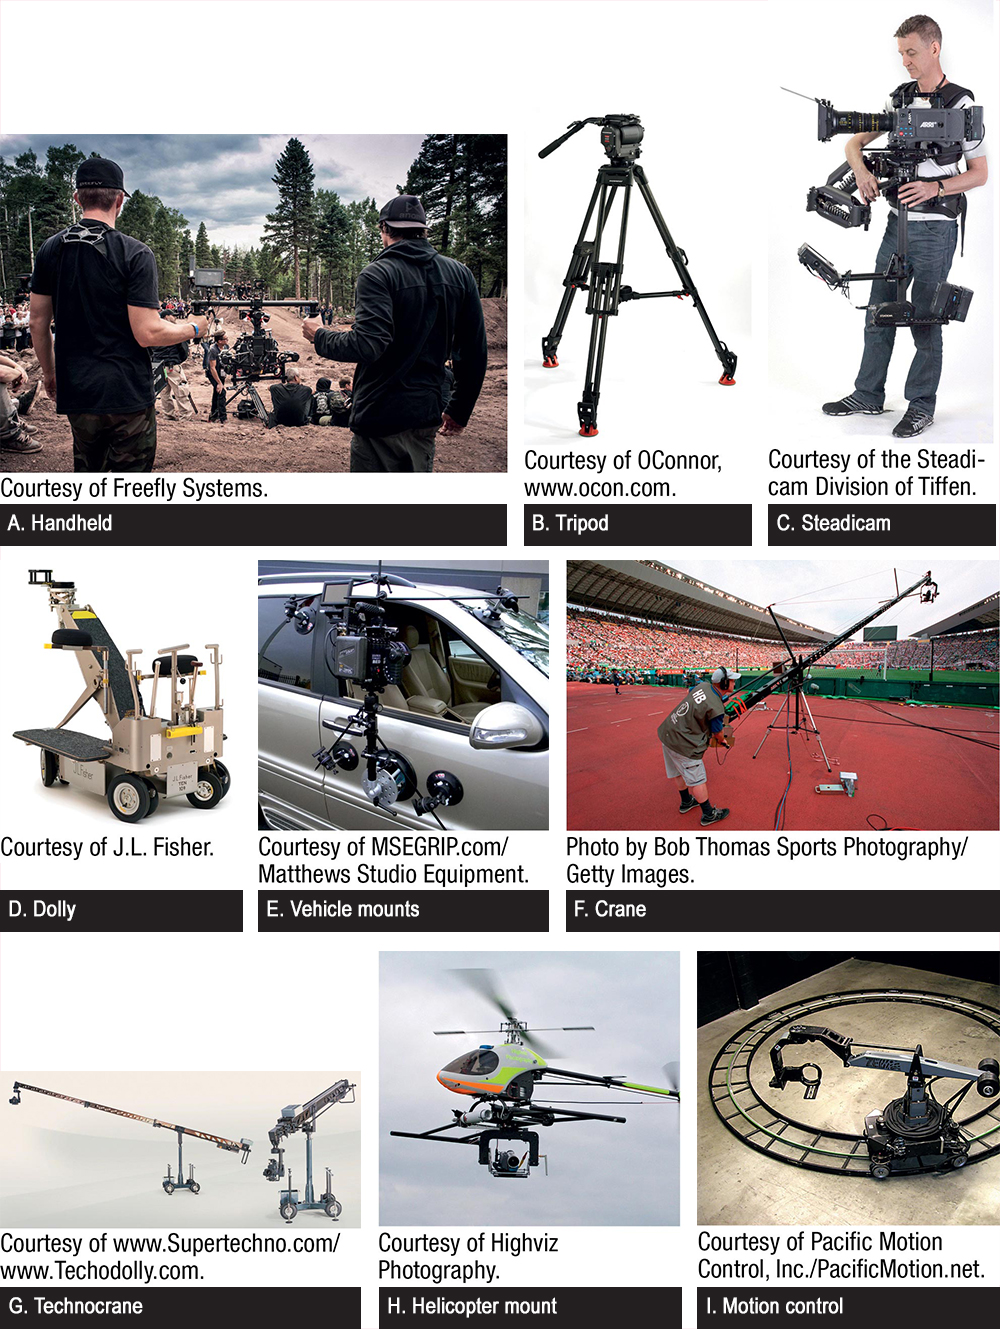
Types of camera mounts
STEADY YOURSELF
When operating a handheld camera, use your free hand to hold the elbow of the arm holding the camera, with the elbow of your free hand wedged against your hip. This will help keep the shot and camera steady. And don’t forget to turn off the function on a digital camera that automatically steadies the shot; it may correct movements you actually want.
Sometimes, of course, the camera must not move—for example, when an image needs to be completely static. In these instances, the camera must be mounted on something rock solid. It is impossible to hold the camera steady with your hands; you will always end up with small, perceptible movements. A camera that is static is said to be locked off, and a tripod is an excellent tool for locking off the camera. Locked-off shots are often used for establishing shots and for shots that will be adding extensive visual effects. They are also used in places where the story is better told by the action moving within the frame rather than by the frame of vision moving. Many comedies, for example, show the actors moving while the camera remains stationery, thereby emphasizing the actors’ physical comedy. (You’ll learn more about the relationship between shots and storytelling in the next chapter.)
The “Camera Package”

Whether you go to your school’s equipment check-out room or, on a professional production, to a rental house, you’ll be getting a camera package to make your movie. Even the pros do not typically own their own equipment, because great gear costs a lot, and its maintenance can be expensive.
Here’s what to look for if you’re renting or borrowing a camera package:
 Make sure you know what you will need. It will generally be easier to get everything from one vendor—camera, lenses, cables, and lighting equipment. Not only will this save you money (the more you rent, the more you save), but it will save you the transportation trouble and expense of picking up and returning gear to multiple locations.
-
Call around and get competitive bids. There could be a wide variety of prices, depending on how much equipment vendors have on hand at a given moment.
-
Check out the equipment carefully before you accept it, and make sure it is in proper working condition before you leave the rental facility. (It’s a good idea to bring at least one other person with you.) Anything that comes back broken will be your responsibility, whether it’s your fault or not. (See How Do I... Prepare the Camera?)
-
Look for deals, and don’t be afraid to negotiate. Some rental houses have weekend specials—you get your gear on Friday, return it on Monday, and they only charge you for one day. Some give discounts for student productions. Ask what they can do to help you; most will try to accommodate you and work within your budget.
USING YOUR TRIPOD
The tripod is the most basic and important tool for supporting a camera. Put all three legs together and extend them to the same length, then spread them out. Point the forward leg toward the action. Stand between the tripod’s two rear legs, with your forward leg directly in line with the lens and the action. Hang a camera bag or a sandbag over the tripod to keep it stable.
The tools described here are used frequently in studio movies, and different versions of them are increasingly being used in student productions. They should be obtained as part of the entire equipment order for your movie, which means you will need to think through in advance what you need—and what you can afford—to tell your story well. (See Business Smarts: The “Camera Package,” above.)
Camera Pro’s Emergency Kit

 A first-rate tripod, so the camera can be absolutely motionless when you need it to be
-
Canned air for blowing dust off lenses and out of cameras
-
A cloth diaper or desiccant packets to keep cameras and lenses moisture-free
-
An extra camera battery; you don’t want to run out of juice while shooting
-
Chargers with adapters that plug into every kind of electrical socket all over the world
-
Phone numbers of good tech people at the rental house where the equipment comes from—so you can call them the instant something breaks or doesn’t work properly
-
A large variety of different types of camera tape and markers
-
An accurate measuring tape to measure the distance from the camera to the object being filmed
-
A director’s viewfinder, which is essentially a zoom lens that helps define the choice of lens, angles, and coverage. It is also used by the DP to help plan shots on-set before moving the camera equipment
-
The American Society of Cinematographers manual. A student version is available