Qualities of Light
Cinematographers attempt to capture light as we see it or imagine it; at times they create illusions with extensive artificial lighting, which, when shot and finished, look completely natural. Due to the process by which cameras acquire images, whether on digital sensors or on film, the light you see with your eye will not be exactly what the camera records. Therefore, it takes a special understanding of light to create illumination that appears the way you want it to—whether natural or highly stylized. It is equally important to know how the human eye and brain combine to process imagery.
Meanwhile, forget what you think you know about light, because what you know is what your eyes tell you. Actually, you see what your brain tells you, because image processing takes place in the visual cortex, the largest system in your brain. The eye sends signals along the optic nerve to the brain—after the eye has automatically adjusted for the amount of light and the relationship of colors it is taking in. This process is similar to setting the ISO and aperture, which we studied in the last chapter, and setting the white balance, which we explore in this chapter. When the visual cortex receives these signals, it processes them in terms of color and pattern, always correlating them to colors and patterns with which we are already familiar. You have learned everything you know about color and light by the age of six; after that, the brain compares visual stimuli to information you’ve already stored.
 COLOR HELP FROM THE ACADEMY
What will it really look like? The Academy Color Predictor can come to your rescue. Developed by AMPAS, it will help you visualize how lights, cameras, and filters affect what you’re photographing. Download the free app here: www.oscars.org/science-technology/council/projects/colorpredictor/index.html.
You see the world in three-dimensional space, and photography creates the illusion of three dimensions on the surface of the screen. Yet when you’re watching a movie, you are not overwhelmed by the sense that the world you’re seeing is flat, even though, factually, it is. This is the result of lighting—the manipulation of contrast and color to create the illusion of depth on a two-dimensional plane.
This is true even with 3D filmmaking technologies, because in a 3D movie, the screen is still flat. 3D creates an illusion of depth using parallax viewpoints, as discussed in Chapter 6, but it is still an illusion on a 2D surface, and contrast and color are still the fundamental mechanisms that cause the illusion of depth.
All movies use some form of lighting, but as we explore the subject, we will draw on examples from well-known movies that showcase great lighting. You may wonder why you should spare the time and expense involved in achieving great lighting rather than just making sure your shots can all be seen. Great lighting is one of the best ways to distinguish your low-budget project, and we will show you some simple (and inexpensive) techniques for achieving a professional look with a strong, artistic point of view.
Just as master cinematographers learn from master painters, you can learn from master cinematographers how great lighting comes from shadows, contrast, exposure, and color. These are the visual qualities that will make an immense difference in how the audience reacts to your movie.
Shadows and Contrast
When you look at an object, you perceive its shape and texture because of shadows. At first an object may look like a circle because it has no shadows. With shadows, it becomes a ball; now it has depth.
FIGURE 8.1Attached shadow
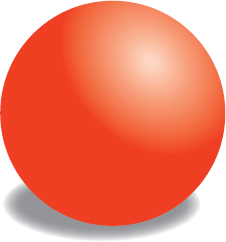
The shadow that falls across the ball in Figure 8.1 is called an attached shadow, meaning that you see the shadow on the object itself, as if it were visually attached to the object. As a cinematographer, you can adjust the lighting to make an attached shadow reveal shape and texture. For example, you can light the ball with a single light coming straight at it, so there will be little or no attached shadow; by doing so, the ball will look like a simple circle. Or you can illuminate the ball with an extremely angled light, in which case the attached shadow will reveal the dimples and texture of the ball.
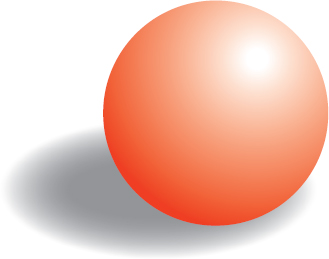
The shadow that the ball casts on the ground is called a cast shadow. Cast shadows put the object in the context of its surroundings. In Figure 8.2, the cast shadow shows that the ball is resting on the ground, not flying through the air. Cast shadows often come from sunlight, so they help us infer time of day: a long cast shadow suggests late afternoon, and a tiny cast shadow indicates midday.
Shadows are closely associated with visual contrast. Contrast is defined as the visual difference between light and dark. You can think of contrast as looking at the difference between the shadows. More contrast means less shadows; less contrast means more shadows.
Black-
FIGURE 8.2Cast shadow
In black-
The still from Touch of Evil (1958) has more contrast than the still from Raging Bull (1980). Simply put—
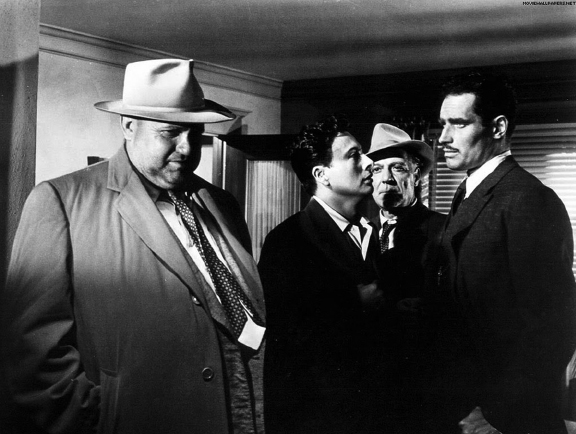
Touch of Evil (1958)
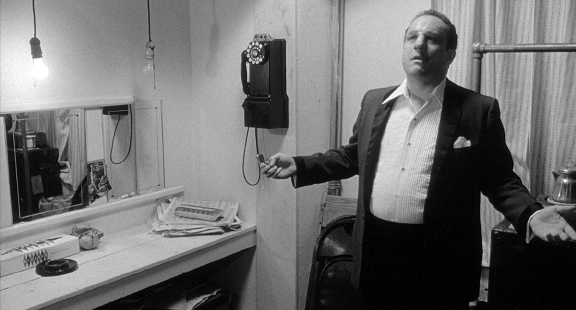
Raging Bull (1980)
In these examples, each cinematographer had a choice to make, and each chose differently. Russell Metty, who shot Touch of Evil, wanted to show a world where there was quite literally a high contrast between good and evil characters; he accomplished this visually, shot by shot, just as screenwriter and director Orson Welles accomplished this through dialogue and acting choices. Michael Chapman, who shot Raging Bull, wanted to show an ambiguous world where motives and characters are complex; he accomplished this visually by creating images that are far grayer than strongly black or white.
300 (2006) is about as contrasty as a color film can get. Its visual style emulates the Frank Miller graphic novel on which it was based, and there is little gradation in color. For example, notice the dark hair on the adult characters—
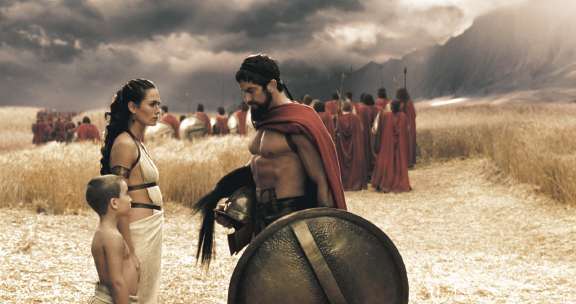
In 300 (2006), densely saturated colors and strong visual contrast convey its primal storyline.
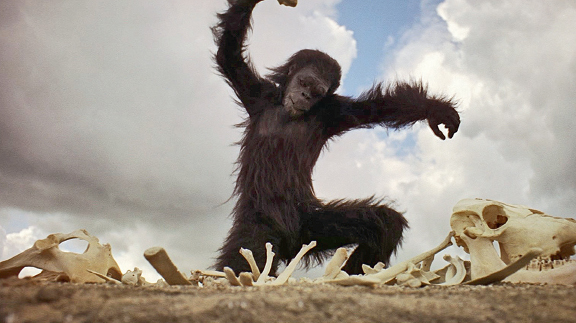
Less color saturation and reduced contrast are the visual representation of humans’ complicated evolution in 2001: A Space Odyssey (1968)
In comparison, study the ape’s fur in the still from 2001: A Space Odyssey (1968), in which there is a lot of definition and shades of brown. The contrast level of this movie is not extreme. Geoffrey Unsworth, the cinematographer, chose a less-
As these examples illustrate, contrast conveys meaning. More contrast typically suggests that the characters have more definitive decisions to make and that the world they inhabit offers stark choices and is dangerous. Less contrast implies that the characters have less moral certainty and that the world they live in is more nuanced and real. Superhero movies generally employ more contrast than do most character dramas; even though they both may be shot in color, the good versus evil world of superheroes is more black and white (more contrast), whereas the subtle world of a family has more shades of gray (less contrast).
Directional and Diffused Lighting
Thus far, the lighting you’ve learned about has been directional lighting, which means it comes from a clearly defined source, such as a lamp or the sun. Directional lighting is, by its nature, harsh and specific; it has sharp edges, casts sharp shadows, and has rapid fall off, which means its intensity diminishes quickly beyond its area of focus. For example, if there is a floor lamp in your room, you’ll notice that it makes a sharp circle of light on the floor, which is defined by the boundaries of the lampshade, and that the light falls off quickly beyond the circle. If you stand outside in bright sunlight, you’ll see that your shadow is crisply defined.
But what if you want softer lighting, which is more even and, therefore, less directional? This second type of lighting is called diffused lighting. If you’re standing outside and clouds pass over the sun, your shadow will nearly vanish as the light loses its sharp edges, yet the whole scene will be clearly illuminated. This is an example of diffused lighting in action.
FOR BEAUTY, GO SOFT
“Beauty” lighting, which emphasizes how good the actors look, is best done with softer, more diffused light. Keep in mind that in high definition, every little wrinkle and blemish on an actor’s face will be captured, therefore requiring just the right light to make the actor look better.
As a cinematographer, you will use both directional lighting and diffused lighting, depending on what you are shooting. Most films and television productions use directional lighting in a majority of their scenes. Commercial and fashion photography often use diffused lighting to create a glossy, smooth lighting ambiance, without high contrast and sharp shadows. Later in this chapter, you’ll learn about different tools you can use to achieve diffused lighting.
Measuring Lighting
Whether lighting is direct or diffused, it can be measured with a light meter. Light meters show light intensity, which is measured in foot-candles. A foot-candle is a standard unit of measure (like a quart or a pound) and is defined as the amount of illumination one candle casts on a surface one foot away. The metric (or Standard International) equivalent is the lux, which is the amount of illumination one candle casts on a surface one meter away; one foot-candle is approximately 10 lux. Many light meters immediately translate foot-candles into f-stops, which you learned about in Chapter 6, and will give you an f-stop reading based on the shutter speed and ISO you have entered.
There are three kinds of light meters: reflected light, incident light, and spot.
Reflected-light meters measure the overall light in the entire scene by displaying average light. The light meter in a digital camera is a reflected-light meter, and it is generally useful when the contrast you’re trying to achieve is not too high. A handheld reflected-light meter is more accurate; you should hold it next to the camera lens to get the best information. Any reflected-light meter will indicate if there is sufficient baselight—enough light for the image-capture medium to register an image properly.
When there are extreme differences in lighting levels, as, for example, when there is a lot of light flooding through a window and not much light in the room, the “average” reflected light will probably not give you the look you want—some areas will be either too light or too dark.
An incident-light meter solves this problem by measuring light at a specific place in the scene. A cinematographer will often walk to a certain spot on the set and take a reading with the incident-light meter to make sure the camera’s f-stop is correct. An incident-light meter measures the light that is incoming toward your subject. For that reason, you hold it where the subject is, face it outward, and read the amount of light. For example, you always want to make sure the actor’s face is properly lit, and an incident-light meter will help you make sure you have given the actor sufficient light.
 TAKING MEASUREMENTS
Using as many of the light meters as you have available in your class (reflected light, incident light, or spot), take light measurements in both an interior and an exterior setup, recording the f-stop from each measurement. Then, using the automatic meter on your camera, take note of the f-stop the camera recommends. Are the camera’s automatic meter and your handheld meters giving you different information? Explain why or why not.
But what if you want to find out how much light is reflected from a specific subject? This is useful because it’s the light that will actually come to your camera. For this you need a spot meter, which measures the amount of reflected light in a specific area of a shot. You hold it like a rifle scope and “sight” what you wish to measure, such as an actor’s face; the reading in the spot meter will tell you if the actor’s face has enough light.
DSLR cameras, which began as still cameras and evolved into video cameras, have spot meters built in. However, cameras that are designed as video cameras do not, and for these cameras, using light meters is essential. On professional shoots, cinematographers use a specialized video monitor to check lighting levels. Here is the process:
 Look at the shot in the monitor to see how it appears overall.
-
Check the waveform information on the monitor, which displays specific aspects of the video signal, to see if there is enough luminance (brightness) and if the blacks and whites are acceptable. (See Chapter 11.)
-
Check the vectorscope setting, which allows you to visualize the levels of color hue and saturation in a graphic format. (See Chapter 11.)
-
Use color bars to make sure the colors appear accurate. (On professional productions, the monitor is carefully calibrated to make sure the impression of color and contrast is accurate. Color bars approximate this calibration.)
-
Use a handheld light meter to double-check and confirm lighting levels.
-
Shoot a test. This is advisable in extreme, if not all, lighting setups.