Exposure
Exposure is the total amount of light that falls on the image-capture medium; it is the means by which contrast shows itself. Only with balanced exposure can you create the contrast and level of visual detail you’re aiming for; otherwise, your images will be too dark (underexposed) or too bright (overexposed), and you won’t be able to see all the details.
 EXPOSE THE FACE
The most important part of any scene is the actor’s face. In general, if the face is well exposed, the rest of the scene can be over- or underexposed, and the audience will forgive you.
To manipulate exposure, cinematographers follow these four basic steps:
- Take accurate lighting measurements of the entire scene, as well as the specific person or area that is to be the focus of the scene.
- Know the sensitivity of the capture medium. For digital video, this means setting the ISO. For film cameras, this means using a film stock with an ISO that’s right for the scene.
- Adjust the camera’s f-stop.
- Adjust the camera’s shutter speed.
Approaches to Exposure
Is there a “correct” exposure? In its classical sense, correct exposure means that you can see everything you want to see—
FIGURE 8.3Balanced exposure

Gregg Toland was one of Hollywood’s greatest cinematographers; in addition to Grapes of Wrath (1940), pictured, he shot Citizen Kane (1941). In this well-
Elements of Exposure
To achieve the exposure you’re aiming for, you have to understand all the variables at play. You’ve already learned about f-
Here are the other important variables that govern exposure:
 Luminance is the light that reflects, or bounces off, things. Light-
colored objects have more luminance, whereas dark- colored objects have less luminance. You will be able to measure luminance with your light meter and also use reflected, luminant light to add to the lighting in your scene. -
A foot-
candle (fc) is the measure of lighting intensity, as noted. Your light meter will give a readout in foot-candles. The more foot- candles, the brighter the object— meaning it is giving off, or reflecting, more light.
-
Exposure index (EI) is a measure of the amount of light to which your film or optical sensors are being exposed. It is related to ISO, but they are two separate measurements, as the EI is a mixture of shutter speed and aperture. Knowing the EI will allow you to create the correct exposure. Most digital cameras will allow you to set the EI, and you can enter EI information into your light meter.
-
The latitude of your image-
capture medium tells you how over- or underexposed your shots can be and still have enough detail to look good. Having more latitude means that your image can have a wider range of contrast between light areas and dark areas and still show details. On the other hand, a medium with narrow latitude cannot “see” details at the extremes of brightness or darkness. Color negative film generally has wider latitude than digital sensors.
Now that you’ve learned the different elements that control exposure, let’s see how they work together in action.
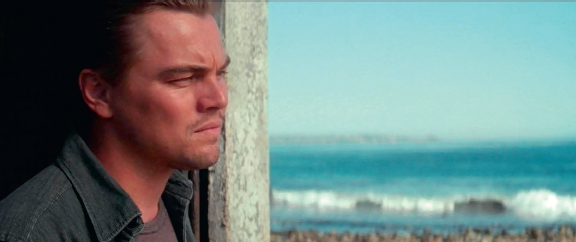
FIGURE 8.4Balanced exposure
Wally Pfister captures Leonardo DiCaprio’s face perfectly in Inception (2010).
Exposure in Action
Exposure is a matter of measurement as well as creative judgment, and the more you practice it, the better you get (see Action Steps: Solving Exposure Problems, below). Let’s take one example that frequently frustrates cinematographers: two characters are sitting in front of a window having a conversation. Clearly, the light is coming from the window. The director wants to see both sides of the characters’ faces—not just the side that’s lit by the window—as well as what’s going on outside the window.
FIGURE 8.5Intentional underexposure
Greig Fraser deliberately underexposed images in Zero Dark Thirty (2012), a thriller about SEAL Team Six’s mission against Osama bin Laden. This technique gives the film a sense of realism and emphasizes the gritty reality of a nighttime military operation.
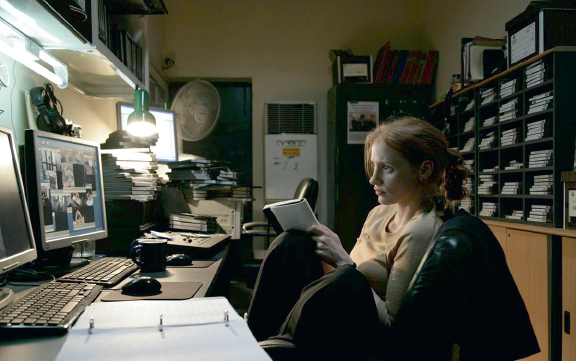
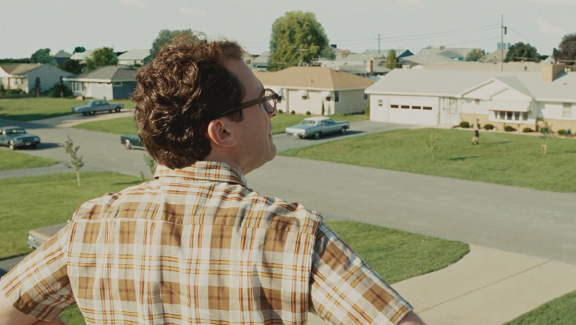
FIGURE 8.6Intentional overexposure
Roger Deakins’s deliberately overexposed the suburban landscape in A Serious Man (2009) to emphasize its artificial happiness and how its blinding brightness oppresses the main character.
USE LIGHT, NOT A DIAL
Your digital camera will have a dial, menu setting, or button (which may also be called gain, boost, or something else) that allows you to make the image appear brighter—but it will also make it less sharp and grainier. It’s better to add more light than to play with the brightness dial, because the seemingly simple fix of jacking up the ISO or gain setting can result in a strikingly bad image full of digital “noise.”
If you rely only on the incident-light meter reading or the automatic setting on your digital camera, you’ll miss the mark. The window will be “blown out” and just look like a white rectangle; you won’t be able to see anything outside. The characters will be silhouettes—dark forms against the bright window—and you won’t be able to see their faces. This won’t work at all.
The problem must be solved both aesthetically and technically. The aesthetics will come from discussions between you and your director, to decide on the right look for the scene. The technical solution comes from understanding how the digital sensor or film stock reacts to extremes of light and dark, and, therefore, how to set up the lighting.
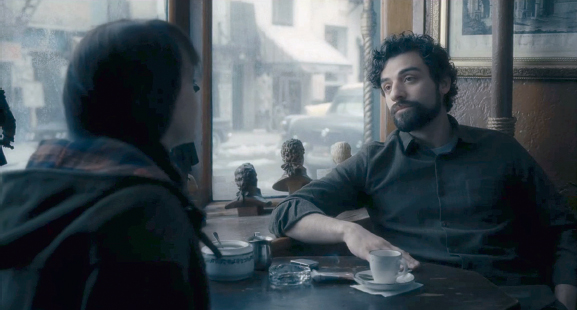
Inside Llewyn Davis (2013)
To get the proper exposure, you’ll want to take accurate incident-light meter readings from every part of the scene. In the pictured image from Inside Llewyn Davis (2013), directed by Joel and Ethan Coen, cinematographer Bruno Delbonnel handles exposure well, which means you can see many details: both sides of the coffee cup, both sides of the characters’ faces, the window and what is happening across the street. (He used a 35 mm film stock with a wide latitude of light sensitivity, which helped him capture this range of bright to dark.) The scene outside the window is bright, as would be appropriate for a sunny day, but not so bright that it overwhelms the rest of the scene.
How could you achieve this result? The main challenge is to balance your exposures between inside and outside. First, you’d set up your lighting with the main source of light coming through the window, and additional light coming from the room at the right of the frame. There is also some luminance bouncing off the wall behind the actor. Now take spot meter readings at all the important places in the scene. If the reading on the left side of the actor’s face is f11, for example, on the right side it may only be f4.8. The window side of the tea cup may be f5.6, with the room side of the teacup at f2.8. When the incident-light meter is placed at the window, it might show f16. To balance all the choices, a cinematographer might then set an f-stop of f8 and an EI of 400 to produce this shot.
 PLAYING WITH EXPOSURE
Shoot test close-ups of an expressive actor. Explore the limits of exposure and how you can control it. See how far you can overexpose and underexpose the shot and still see relevant details of the face—the eyes and facial expression. Record your exposure settings so you can review them when you watch the test shots.
ACTION STEPS
Solving Exposure Problems
Lighting can be like Goldilocks in “The Story of the Three Bears”—often too much or too little, and hard to get “just right.” If your lights are on a dimmer, you may be tempted to raise or lower their intensity, but if you do, you’ll get an unwelcome surprise: dimming photographic lights changes their color temperature (see here). Therefore, you’re better off using other techniques to achieve the amount of light you want.
 Change the lamp to a higher or lower wattage. Let the new bulb warm up for several minutes until it gets to its full color temperature before taking your new meter reading, especially if you are using a fluorescent lamp.
 Reposition the light. To get more light, point it directly on the subject or bring it closer. To get less light, move it farther away from the subject; point it slightly off the subject; or even bounce it off a reflector, wall, or ceiling. A light’s intensity is the inverse square of its distance to the subject; for example, a lighting instrument that is twice as close will be four times brighter, and if you double the distance of an instrument from its subject, it will be one-quarter as bright in the subject area.
 Some lights have levers that allow you to focus them into a tight spotlight or a wide floodlight. If you have one of these lights, adjust the focus lever to increase or decrease the light’s intensity.
 Use diffusion media to reduce intensity, or remove it to make the light brighter.