Design Plan
With the aforementioned design principles in mind, formulate a workable plan for how you will go about designing your film’s locations, sets, backgrounds, and other environments. Similar to other aspects of filmmaking, this starts with breaking down your script (see Action Steps: Design Analysis, below). During that process, you will reach conclusions about what scenes will require locations to shoot in, and which ones you will either need or want to build sets for. Then, you will dig deeper and decide what locations should be dressed up or altered in some way, and what set pieces and props you will need.
After you evaluate your story, think about which of these choices are realistic and which are not—
In fact, because of resource limitations, student filmmakers most typically film on location, rather than trying to afford stages and build sets. However, even if that is the case, you will almost certainly still need to build, paint, or otherwise change something. Thus, the fundamentals of figuring out and allocating resources, scouting locations and dressing them, and building sets or set pieces are just as important for you to learn as are the principles of art and composition.
 ANALYZE A SCENE
Watch William Wyler’s classic 1959 film, Ben-
In the scene, take note of the production design in general, and the concept of mise-
ACTION STEPS
Design Analysis
The screenplay is the first indicator of what the foundation for your production design needs will be. Following is a rundown of basic factors in your screenplay that will directly impact your design plan. It’s important for you to develop an awareness of these factors within your story before you can properly move on to the research phase and then begin designing sequences, because some, if not all of them, will influence virtually every design decision you make:
 Time and Place. These are probably the most obvious considerations when you first review your screenplay. If your story is a period piece or takes place in a unique locale, that will directly influence many design parameters, from costumes to architecture to colors to doorknobs. But keep in mind that the trick is in the details: you will need to make notations about the kind of details you must research for the era and locations your story requires.
 Define Characters. A character’s personality, lifestyle, and personal needs directly impact, as they would in real life, that character’s living, working, or recreational space. Evaluate and make notations about each character’s personality, economic situation, age, and so on. Think of what kind of residence that character could logically afford or have access to.
 Light. When evaluating your script, think practically about what kind of lighting the story will require. We have already discussed the value light can have in aiding production design, both generally and creatively, but you also need to think about light with specificity, as it relates to your story. On this page, we examine previsualization, which can include particular lighting setups when feasible, but before you get to that point, breaking down your screenplay can help you determine what your overall lighting needs will be. After all, every locale other than a pitch-
black room needs to have some kind of illumination. Scenes can be lit naturally, by sunlight, moonlight, or ambient light through windows; by source lights built into the set; or by movie lights, as we discuss in Chapters 8 and 9. Movie lights can be expensive and are not always feasible, particularly for student productions. So examine the script to start understanding what kind of lighting each scene might require and how you might fulfill those requirements. Will you need rooms with big windows? Can you illuminate scenes with practical lamps that are part of the design, forgoing movie lights? These are things you can notate when you first evaluate your script, long before you get into detailed research and design work.  Color Palette. On tech talk, we discussed issues related to choosing a color palette in detail. Keep that discussion in mind as you break down your script, and search for the mood of every scene to help your design plan along; the mood of the events in the story will help you determine colors, so make notations about those sorts of things as you analyze the script.
 Dynamic Space. As you read the script and make general notes about locations and sets, consider specific ways that you could make them as dynamic, interesting, and logistically feasible as possible. A boxed-
in, four- wall room limits possibilities and actor movement, and should therefore only be used if the story demands it. If your options are limited, consider whether a certain space would allow you to establish depth with windows or glass doors. (See here for more on the arrangement of people and elements within a particular space.)  Feasibility Factors. As you break down the script, think about resources and what is—
and is not— practical. Are the locations or sets described in the screenplay even feasible? Will some of the elements called for require permits or bring about other complications? Should you consider rewriting scenes to ease some of these limitations? We discuss some of these logistical matters in more detail shortly, but you should start thinking about their impact on your design agenda as you begin to break down your script.
Research and References
After you have broken down your script to determine your overall project needs, you will begin meticulous research to find elements and solutions for strategically executing the design. As we have urged, you can, and should, do constant general research, and labor always to train your eye to notice light, shadows, textures, shades, fabrics, and other subtle things in the world around you and in great art and photographs; this kind of training will inform your decision-
But general research isn’t enough. You need to get specific—
And by “going out,” we mean exactly that—
Therefore, strategically collect and organize reference photos, magazine and book clippings, drawings, paint and fabric swatches, and so on. You should also create sketches or take photographs that relate to the types of environments you will be featuring in your film. If you have locations picked out, walk those locations, and take photos and room measurements, and draw sketches to keep a fresh frame of reference about each space.
As you collect this material, you must organize it. Some designers organize it into alphabetized files, others into binders or reference books that apply to each scene or location in a movie. Catherine Hardwicke calls these “look books”—essentially organized files or binders of relevant visuals and data that apply to all the locations in your film. These become your template for figuring out a final design for each location.
Keep in mind, however, that your binder or files may consist of more than just photos and sketches. They could also contain color options, swatches, paint chips, diagrams, notes, comparison imagery from different eras and sites, close-
 Different versions of similar places (restaurants, office lobbies, kitchens, parks); perhaps later you will prefer one over the other, or perhaps you will mix and match elements from the different versions you have studied
-
Different exteriors visible in windows, depending on whether your setting is urban, rural, domestic, or foreign
-
Reference materials of similar locations that are lit differently—
with more or less exterior light or interior light only -
Examples of different kinds of furniture—
more modern or more vintage, in good or bad shape, in a wide range of colors, and so on -
Comparisons or before/after imagery of the same place, or side-
by- side comparisons between photos and drawings or paintings -
Imagery of locations empty and with people in them, so that you can study how people will interact with props and set pieces and impact the configuration of the space
These are just a handful of examples. There is no limit to what you can collect or how you can organize it, as long as your organizational method is efficient. Remember, as a bonus, these types of look books will outlive your project and eventually join a personal research library that you will likely find useful if you pursue filmmaking in the future.
Locations
Detailed script analysis and extensive research should lead you to a general understanding of when and why you would be best served shooting on location, and when you would ideally want to build sets to achieve particular shots. When all factors are equal, for most movies, the notion of reality, or at least believability, is central to connecting with audiences. This is one reason location shooting is often ideal; a real location, when dressed and shot properly, almost always feels more realistic than a fabricated set. Of course, all factors are not always equal, particularly when it comes to resources. Regardless of what level on the filmmaking hierarchy you are on, location shooting can be, in many cases, more affordable than renting a stage and building elaborate sets, at least when extensive travel is not involved. The complications of building sets and working on sound stages are a high bar for you to clear with few resources as film students. Therefore, as you pursue a filmmaking education, you are likely to be shooting on lots of real locations over time. Keep in mind, however, that a “location” could be your backyard or classroom or driveway. Such everyday places close to home are sites you should seriously consider if they can be made to fit with your story. Don’t discount them—you can radically alter and highlight even the most mundane patch of grass if you need to.
To get started, you first need to know what to look for when scouting locations that will work practically and creatively. In the professional world, location managers take the lead in this effort, but they do so in close collaboration with the director, production manager, and production designer, who frequently join them on location scouts.
As student filmmakers, take extensive notes when you scout locations. One glaringly obvious factor does not need much elaboration: investigate from the outset whether it is even possible to get permission, or an official permit if required, to shoot there. Although it is true that many students and independent filmmakers shoot “guerrilla style” in public locations—simply showing up with camcorders, filming with minimal setup or crew, and departing as quickly as they came—understand that operating that way can be disrespectful to the general public frequenting that area at best, and downright illegal at worst. And creatively, shooting in that style may end up giving your narrative material a documentary feel that is not intended. Get permission or go somewhere else.
Dumpster Diving

Many of the most important furnishings seen in the apartment of the Lynn Bracken character (played by Kim Basinger) in the 1997 noir classic L.A. Confidential were found in a consignment store in Palm Springs, according to Jeannine Oppewall, the film’s production designer. She likewise found the dining room table featured in certain scenes of The Bridges of Madison County (1995) “in the front window of a used furniture store maybe an hour from the set”—a table Oppewall used again for a particular set in L.A. Confidential. Over the years, Oppewall has even put her own furniture, and the furniture and possessions of friends and crewmates, into feature films she has designed.
In that respect, Oppenwall says, “production design is a shameless profession—we will beg, borrow, steal, and go anywhere to find something useful.” In other words, even professional productions severely limit resources and require ingenuity on the part of the production designer and his or her team to find appropriate set pieces. That’s good news for you, the film student, since you will likely have no budget of substance to work with, and yet, like professionals, you will need props and set pieces that fit your stories like a glove.
Therefore, as many designers suggest, go anywhere to find what you need, bargain hunt, and innovate. Think like a producer—you need not spend a sizable amount of money to furnish typical sets. This is an area in which you can most likely find what you need within the confines of your budget. Flea markets, garage sales, pawn shops, antique shops, estate auctions, consignment stores, junkyards, online sites like Craigslist where you can find used goods, neighbors’ houses, and even your own home most likely contain most, if not all, of what you need. Jack Taylor freely admits to having gone dumpster diving in his career, even loading discarded items on street corners into his vehicle if he felt they had cinematic use.
Additionally, you will find that many prop and costume shops that normally service the entertainment and theater industries will offer special deals, discounts, and even free items to student productions out of a desire to promote their businesses and lure the next generation of potential customers.
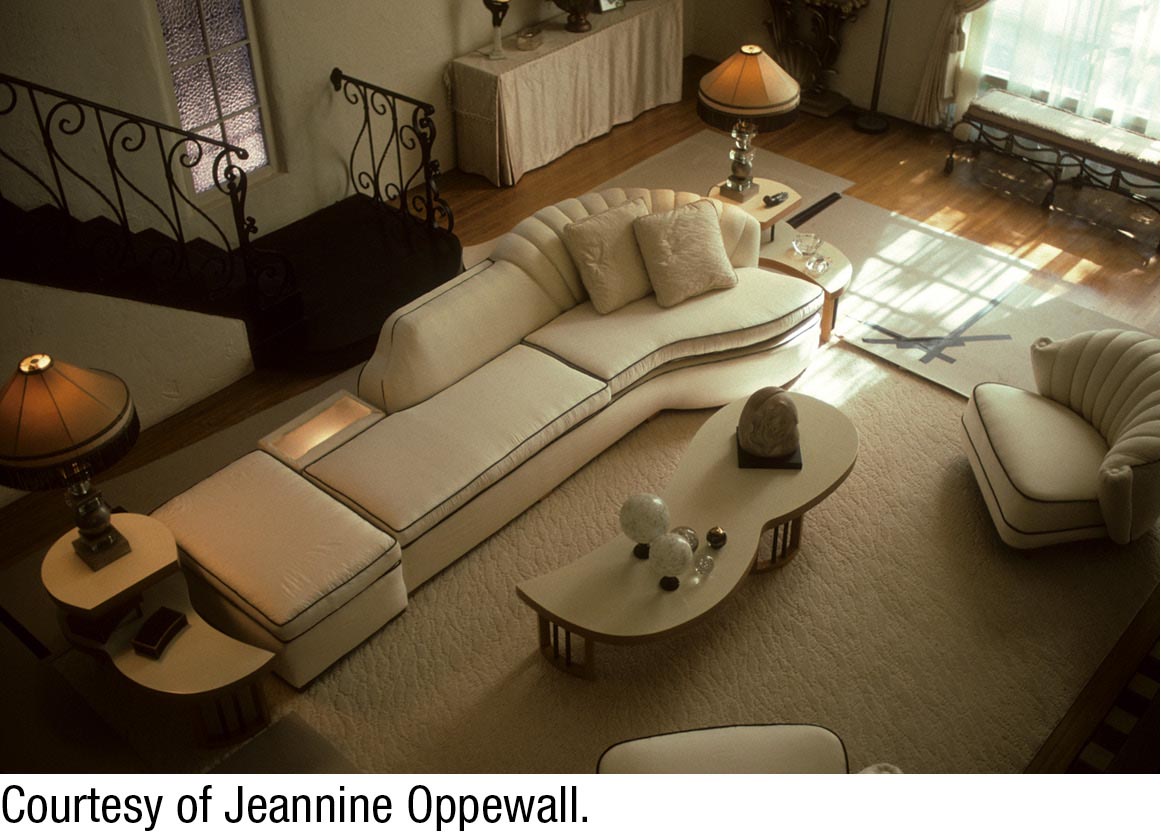
This overhead shot of a living room set from L.A. Confidential (1997) shows a variety of props and set pieces.
 PREDESIGN WHEN YOU CAN
Predesign for technical requirements whenever possible, particularly electrical needs. Sometimes—when building walls, for example—you will need holes strategically cut to permit power cord access.
With that said, here are other fundamental factors to consider:
-
Tweak your script to match what’s available. If resources dictate that you will only be able to shoot on campus or at your home, then there is no sense searching for a medieval castle to shoot in. You will either have to create that element with stock elements (images you can purchase from somewhere else) or visual effects, or go without it. If you’re preparing your story and you learn that there is a gym on campus you think you can shoot in as well as a local public park, set scenes in similar locations, so you can use what you have at your disposal.
-
Consider large spaces. For interior work, select large spaces with high ceilings and multiple doors or windows when you can, even if you are designing a small space. The advantages of shooting in a spacious environment are great, the cinematic tricks available to make the space look smaller on-screen are plentiful, and you will likely have opportunities to repurpose the space. Among its advantages: high ceilings and doors and windows you can maneuver through make it easier to fit people and equipment in and out of the space, and they enhance options for moving your camera.
-
Environments change. As you examine locations, keep in mind season, time of day, weather, and that human or animal activity can change the look or structure of an exterior environment. Study the location at the approximate time of year and time of day when you would expect to be shooting. Find out if construction or seasonal events will change the environment in any way before you will be able to shoot there. Also, examine and measure natural or artificial light when scouting the environment, take pictures, and shoot test footage if you can. You must be certain that you will be able to do what you need to do when you return there days, weeks, or months later. In particular, for exteriors, spend enough time at the location to track the sun: take note of when the area is in full sunlight, part sunlight, and total shade. This will help you plan what time of day to use the location.
-
Hear the location. Because you will likely be recording audio in the location, you need to study ambient noise there. Test levels and learn about local traffic patterns, whether animals or children frequent the area, and so on. Test echo patterns, as discussed in Chapter 10, and record test sound there with the same equipment you will be using when shooting. Also, if you are planning to use wireless microphones, make sure there is no signal interference in the area.
-
Logistics. The first, most basic thing to check is whether enough power supplies are readily available in the area for you to use freely, or if you will need to bring generators or extra batteries to the site. While you are at it, test some potential setups of how you would like to position cameras and microphones. You should also determine whether an exterior location is too grueling for your equipment, since electronic cameras and audio technology can be sensitive to moisture, wind, dirt, sand, and heat. Other logistical issues include parking; walk-up accessibility; access to food, shelter, and bathroom facilities; Internet or cell-phone connectivity; cooperation of the neighbors; and security.
CARRY A LOGBOOK
When ramping up a production, carry a design logbook and routinely make notations in it of design elements in the real world, in your own environment, or in movies or other media that you encounter. Examine buildings, rooms, and furniture, and either make notes about interesting characteristics or take photographs.
There is one other factor to consider in deciding whether or not to shoot on location and, if so, how to go about finding those locations: time. It can be time-consuming and laborious to drive or fly, even if resources permit it, to various locations for hours, days, even weeks on end, to find spots that work best for you. Once again, think like a producer: if what you are looking for is exceedingly rare or unusual, and you expect it won’t be easy to find, you will need to calculate the time and resource benefits of searching for that location versus coming up with a plan for building a set for it.
Sets
There are many reasons to build sets rather than shoot exclusively on location, particularly when there is no accessible location available to you. Another reason might be when complete control of lighting is needed for a visual effects scene. It can sometimes be more cost effective to shoot on a stage rather than risk the vagaries of a location shoot, as light control is a dominating factor for that kind of material. More generally, you typically have more control over light, weather, power, and other logistical issues on a set.
As noted earlier, one of the drawbacks is that you may have a hard time achieving the same level of realism that you would on location. Another obstacle revolves around resources. To build sets, you first need to find a place to build them—a sound stage usually, although you can creatively employ warehouses, basements, airline hangars, or garages for low-budget projects. Procuring permission and affording the cost of renting a sound stage can be difficult. Second, you need raw materials and proper equipment. Third, you must possess the design, construction, and paint skills necessary to build sets, as well as the ability to get the work done in a safe and efficient manner.
Still, one way or another, you will eventually have to build a set of some type. Let’s look at a handful of foundational issues you need to address when planning sets:
PREDESIGN WHEN YOU CAN
When searching for locations, keep in mind the likely limitations of your shooting schedule and resources. If you find two locations for two separate scenes that you love but they are two hours apart, will you have time to schedule different days to shoot at each? Traveling between the two will eat up a large chunk of a shooting day. A better idea is to find your most complex or important location first, and then hunt for related locations nearby. Alternatively, see if you can dress one location in different ways, to stand in for different places. If you need to show interiors of two different homes, for instance, try to find one home in which you can use different rooms for different characters.
-
General design. Using sketches, storyboards, or digital tools to previsualize your set (see here), design not only what you generally want it to look like but also how you want it to function—where cameras and lights will go, for example. Depending on your tools, skill level, and experience, your design may be a full-on blueprint. But even if your skills don’t permit that, be as specific as you can in terms of noting the size of the space you think you will need, remembering to include space for any important creative or logistical elements. Ideally, you will eventually create a
floorplan—a map of the stage from above, so that you will be able to see all elements and their locations before you build anything.
-
Finding a stage. This can be tricky, because renting a stage or studio space is often expensive. However, your school may offer facilities in the cinema or theatrical departments that you can arrange to use. Likewise, community centers and religious institutions may have space you can “borrow” during off hours, as long as you sign liability waivers and clean up when you are done. Or, in some cases, depending on the size and scale of your movie and sets, you can build in a garage, on a porch, in a field, in a barn, on a blacktop, and so on.
-
Construction plan. On a professional project, a
construction manager puts together a construction team and builds sets for major projects. Construction managers have reams of specialists to assist, ranging from carpenters, stagehands, painters, plasterers, grips, set decorators or dressers (tasked with procuring and placing all props and pieces that are not connected physically to a set), prop masters (in charge of finding and preparing all primary props), and
greenspeople (who handle all plants on the set). You may need to head up some or all of these tasks yourself, but unless you have a lot of time to prep or very little to build, you’ll need a crew of some type. Turn to classmates and friends for help building key elements (see Tech Talk: Common Set Structures, below). In addition, it’s a great idea to consult with a construction expert or professional at some point about the finer technical details of building sets. Obviously, keep safety in mind at all times, and understand that certain types of work in certain types of locations—and certain equipment—require permits and/or licensed experts to handle.
-
Building only what’s necessary. Think economically when figuring out what sets you will need, and keep in mind that a wealth of cinematic tricks exist that may permit you to film on partial sets—a wall or door frame, for instance. If a scene is extremely brief, it doesn’t make sense to spend a lot of time or money on an elaborate set. For scenes in which you will be shooting in only one direction, you might be able to get away with not building a complete set, if portions of the set will not be captured on camera. If that is the case, only build or decorate the portion of the set from the direction you will be filming. For example, if you are using camera angles that never show the ceiling, then the ceiling does not need to be realistic—or even finished. Conversely, if a lengthy scene absolutely requires 360-degree coverage, apply what resources you have for set design and construction to those scenes above all others. Reuse sets when you can. You might be amazed how a few props and some paint can transform a hotel lobby into a business office.
MAKE A STRIKE PLAN
Think about cleanup: Have a strategic plan in mind to strike, or dismantle, the set efficiently, and neatly dispose of all elements when you are done shooting. Certain materials can be stored and reused, others returned, others thrown away, and still others recycled. You need to research what, if anything, you are required to do with materials, especially with regard to possible hazardous waste, when you are done with them, and to plan the logistics of their removal early on, not just when you are done shooting your movie. In Hollywood and around the country, there are many companies that specialize in doing just this.
A sketch of a set for L.A. Confidential (1997, left) and its final, live version (right)
FINDING ELEMENTS
Read and evaluate a complete scene from any screenplay, compile a list of set pieces and props you would need to film the scene, and explain why each of them is necessary or at least useful to advancing the cause of the story and achieving the emotions intended by the writer. Then, put together a miniature “look book”—photographs, sketches, paintings, books, other movies, color swatches—that you would use as reference material for designing the look of that particular scene.
Common Set Structures

Certain structures are commonplace on film sets and actually derive from the theatrical world. It is useful to familiarize yourself with these basic elements and nomenclature:
 Flats. This term refers to two-dimensional pieces of scenery you will be painting. Often, flats are little more than a material, like canvas, stretched over wooden frames. They can be anchored to the floor, lashed together, and used in all sorts of combinations. Flats can be kept standing straight up with various methods, including those as simple and inexpensive as weighting them on the bottom of the outside portion of the wall with sandbags. Keep in mind that this form of construction likely won’t work for scenes in which people or objects need to interact directly with the wall, as the fabric on a flat may not be strong enough.
-
Platforms. These are simple layers of wood used to add height to an area of the stage, such as when depicting one room being a few steps higher than another in a house or giving the illusion of having gone up steps.
-
Wagons. These are platforms with wheels attached for purposes of moving them, as needed, around a stage. Wagons can be elaborate, even motorized, and run on tracks.
-
Turntables. Sometimes called revolves, turntables consist of a circular platform designed to spin. Actors, entire sets, or portions of sets can be placed on them.
-
Cutouts. These are thin pieces of material cut in such a way as to mimic a pattern or outline on an object, a wall, or a building. Often, cutouts are attached to flats to represent patterns of a design or element meant to be seen on a set.
-
Drops. These are made from painted canvas or other material hung from above, and they are often used to create the illusion of a distant background element, such as a cityscape or night sky.
-
Scrims. These are a form of a drop—large, typically unpainted, and often loosely woven or opaque so that they alter the properties of light when photographed from particular angles.
-
Cycloramas. These are curved walls frequently built out of plaster but sometimes made of large pieces of fabric painted, hung, and lit in a particular way to give the illusion of a night sky or another wide, open space. “Cycs,” as they are often called, can also be giant green screens or blue screens for visual effects purposes.
-
Projections. As the name suggests, still or moving images projected live onto a background, such as a cyclorama or a flat, can be used to conjure background or distance illusions on set.