| 1. | Importing a structure |
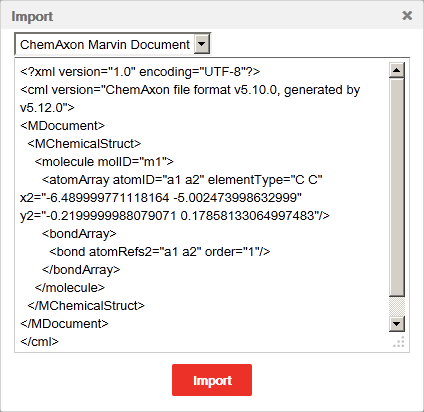
Marvin for JavaScript handles MDL Molfiles V2000 (.mol extension) and ChemAxon Marvin Documents (.mrv extension) as input files. Click on the Open button in the General toolbar to open the Import popup window. The dialog window can be opened by pressing "Ctrl+O" keyboard shortcut, too. Open the structure file in *.mol or *.mrv format with an editor, e.g., Windows's Notepad, select all, and copy the file contents to the clipboard then paste it into the input area of the Import window. At the top of the window you can select the appropriate file format from a drop-down list. Finally, pressing the "Import" button loads the structure on the canvas and closes the dialog window.
| 2. | Saving a structure |
A structure can be saved either in ChemAxon Marvin Document format or in MDL Molfile V2000 format. To save the structures on the canvas, click on the Save button in the General toolbar which opens the Save popup window. The dialog window can be opened with the "Ctrl+S" keyboard shortcut, too. In this window you can see the canvas contents in the default ChemAxon Marvin Document format. The displayed structure file format can be changed by selecting an option from the drop-down list of supported file formats. To save that to a file you need to copy its content to the clipboard and paste it into a text editor, for example.
| 3. | Cut/Copy/Paste options |
To copy a molecule or a fragment you have to select it first. The Cut and Copy buttons in the General toolbar place the content of the selected area on a virtual clipboard (available only within the application). The content of the clipboard can be imported to the canvas with the Paste button in the General toolbar. Their conventional shortcuts, "Ctrl+X", "Ctrl+C", and "Ctrl+V" can be used, too.
Pressing the "Ctrl" button and hovering the cursor over a selected area, you can move a copy of the selected structure by dragging it. When you do this, a "+" sign appears beside the cursor. A copy of the selected structure is placed on the canvas when you release the left button. Note that the new object remains selected when it has been placed on the canvas, so it can be multiplied several times.
4. Navigating on the canvas and modifying the zoom ratio
You can navigate on the canvas using either the arrows at the lower right corner of the canvas (Scroll X and Scroll Y) or the Navigate button between them. In "Navigate" mode the canvas can be moved by dragging: if you click on the Navigate button the "move" cursor appears and the canvas can be repositioned. The Scroll X and Scroll Y arrows work as usual: you can either click on the respective arrow or scroll the mouse wheel while the cursor is hovered over the arrows.
The content of the canvas can be reduced or magnified at will with the Zoom In/Zoom Out buttons in the General toolbar. The zoom ratio can be changed using the mouse wheel, too. (Zooming with the mouse wheel is centered at the cursor position. With this function, you can virtually "move" the canvas.) The Zoom All button in the General toolbar sets the optimal magnification to view everything on the canvas. The "Enter" shortcut can also be used for this purpose.
5. Drawing atoms
You can choose from several options to draw a new atom or to modify an already existing one:
| • | An atom can be inserted by using one of the most frequently used atom buttons in the Atoms toolbar. The chosen atom appears on the tip of the cursor and you can place it on the canvas with a left-click. |
| • | Any of the known elements can be selected from the Periodic Table, the button of which you can find in the Atoms toolbar. Clicking an element, its atom symbol will appear on the tip of the cursor and you can place it on the canvas any times. |
| • | Atoms can be placed on the canvas using the keyboard, too. By typing an atomic symbol, it will appear on the tip of the cursor, and can be placed on the canvas with a left-click or pressing "Enter". Although they are not listed in the Periodic Table, deuterium and tritium symbols (D and T, respectively) can also be used this way. |
| • | When an atom is placed on the canvas, it will automatically be augmented with implicit hydrogens according to the free valences of the atom. Metallic elements are exceptions to this rule, they are added to the content of the canvas as free elements. |
| • | Already existing atoms can be replaced using either of the above mentioned methods. Choose an atomic symbol from the Periodic Table or the Atoms toolbar and hover the cursor over the atom on the canvas you want to change. When the atom gets a green background, left-click on it to replace it with the new atom type. Alternatively, you can change the type of an atom by hovering the cursor over it and then typing the new atomic symbol. The same result can be achieved by selecting the atoms you want to change first, and then choosing the new atom type either by clicking or by typing. If you select several atoms at the same time, you can change them simultaneously using one of the methods mentioned above. |
6. Drawing bonds
| • | To create a chemical bond between two atoms on the canvas select the appropriate bond type using the Bonds button in the Tools toolbar, click on one of the two atoms, and drag the bond to the other atom. |
| • | If you draw a new bond by clicking on or dragging from an already existing atom, the bond will end with a carbon atom, and the length of the bond will be the default value. |
| • | Selecting a bond type and dragging the cursor on the canvas will create a new bond in the desired orientation with carbon atoms on both ends. |
| • | The type of an already existing bond can be changed by selecting the new bond type from the toolbar and clicking on the bond. The bond type can be selected by typing the appropriate shortcut, too. If the cursor is over the canvas, typing a shortcut will select the appropriate bond mode (the Bonds button is activated). However, if the cursor is over an existing bond, typing a shortcut will modify the type of the given bond only. In this case the selected mode (the active button) will not change. |
| • | Note that repeated clicking on a bond will change its type depending on the currently active bond type. If the selected bond type is Single, successive clicks on a bond will change its type according to the Single-Double-Triple-Single-... order. If Double bond type is selected, successive clicks on a bond will alternate its type between Double and Triple. If a bond has a direction (Single Up, Single Down, Single Up or Down, and Coordinate bonds), clicking on it will change its direction. |
| • | If you choose a new bond type when an area of the canvas is selected, the type of every bond within the selection will change to the chosen bond type. |
7. Drawing a molecule
Molecules can be built up by connecting atoms with different chemical bonds or with the use of templates in the Templates toolbar.
You can create alkyl or conjugated hydrocarbon chains using the Chain button in the Tools toolbar. A chain can be created as a new molecule or it can spread from an already existing atom. The new chain can be rotated around its starting atom to the desired orientation during drawing.
Merging structures:
Structures can be modified by merging already existing fragments. For merging two fragments, one of them should be selected. If you hover the cursor over the selected fragment, the cursor changes to "move" type (crossed arrows) indicating that the fragment can be moved closer to the other fragment. When their distance has become sufficiently small, light-blue circle(s) appears(s) to indicate possible merging point(s).
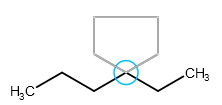
Merging is helpful, for example, if you want to create ring systems (spiro, fused, or bridged ring systems: one, two, and more than two atoms in common, respectively) or connect chainlike substructures.
Templates can also be merged with a fragment on the canvas. Choose a template from the toolbar (it appears on the tip of the cursor) and bring it near the atoms of the existing fragment. When the distance between them has become small enough, the possible merging points will be indicated by a blue frame. Left-click with the mouse to fix the template in the merged position.
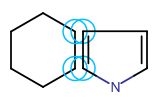
Spiro ring system Fused ring system
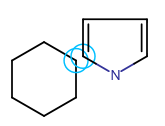
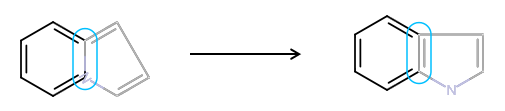
Symmetric templates (cyclohexane, cyclopentane, benzene, pyrrole) can be connected to an atom with a single bond: select the template from the Templates toolbar and hover the cursor over the desired atom to see a grey colored image of the template showing its would-be position. Clicking on the atom will connect the template to the atom with a single bond: one of the implicit hydrogens of the atom has been replaced by the template. Please note that non-symmetric templates (including naphthalene) cannot be sprouted.
When sprouting, the template and the connecting single bond can be rotated on the canvas by pressing the left mouse key and dragging the cursor.

If you want to avoid sprouting, hold down the "Shift" key while clicking on the selected atom. In this case the attachment point of the template will replace the selected atom in the original structure. It has similar effect as if the template had been merged to the fragment with one atom in common.
A template can be attached to an already existing bond which is about the same length as the template's bond: clicking on the bond connects the template to the selected bond. The template is rotated automatically in order to fit the chosen bond perfectly.
| • | Pressing the "Shift" button and holding the left mouse key during sprout drawing moves the template to the other side of the bond. The appropriate side of the bond for sprout drawing a template can also be chosen by dragging the cursor. |
| • | In case of the pyrrole template, pressing the "Space" button while sprouting rotates the template around its center, which can be particularly useful when fused rings are connected. |
8. Drawing a query structure
Query structures are generalized structures representing a group of similar molecules which differ only in some structural elements. For example, all of the molecules possess the same skeleton with a halogen atom as substituent, but it is not crucial to know which halogen exactly. See more about query structures in JChem Query Guide. Using the query atoms and bonds offered in Marvin for JavaScript different query structures can be designed. Note that atom properties (e.g. atomic charge) can also be modified for any query atom in these structures.
9. Transformation
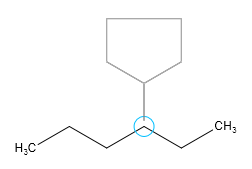
| • | Dragging the selected structure: After their selection, whole molecules or fragments (parts of molecules) can be moved on the canvas. When you hover the cursor over the selected area, the cursor appears as crossed arrows indicating that the highlighted part can be dragged on the canvas. If you have selected a whole molecule, it gets translated without any modifications, but when the selection contains only a fragment, it will be distorted due to the changes in bond lengths and bond angles. Note that the positions of the atoms within the selected fragment are fixed, so the distortion concerns only the bonds between the selected and non-selected part of the molecule. |
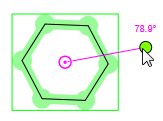
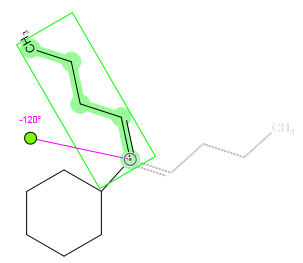
| • | Rotation in 2D: When a structure has been selected, it can be rotated around its center in two dimensions. In these cases a picture, similar to the one below, appears: |
The pink circle with a dot is the center of the selected area (pivot point). The molecule can be rotated around this point by clicking on the green dot and dragging the cursor on the canvas. Until the left key is pressed you can see the angle of rotation near this green dot. By default, rotation is constrained to 6° increments. For continuous rotation hold the "Shift" button while rotating.
If a whole molecule is selected, the original center of rotation can be relocated by dragging. In this case, if the new rotation center is too close to its original position, it will be snapped back to it. However, pressing the "Shift" key while dragging the center of rotation allows it to be as close to its original place as you wish. Moving the center lets you rotate the molecule around any point of the canvas. The image of the starting structure remains displayed in grey during rotation.
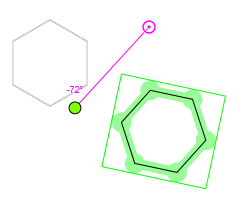
However, if you have selected a fragment which connects to the rest of the molecule with one bond only, you cannot move the pivot point (which is gray in this instance). In this case the rotation center will be that atom of the selected fragment which connects to the non-selected part of the structure.
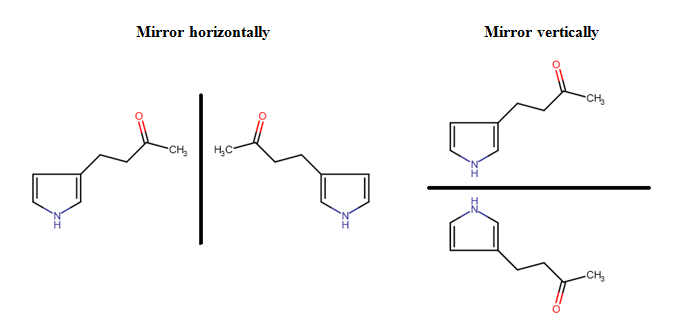
| • | Mirroring structures: Molecules or fragments can be mirrored either horizontally or vertically using the Mirror Horizontally or Mirror Vertically button in the General toolbar. For mirroring, you should select the molecule or fragment concerned and click on the appropriate button. |
Mirror horizontally Mirror vertically
Finally, it has to be stated that the rules of Undoing/Redoing are the same for every kind of transformation: an event begins with pressing down the mouse button and ends with releasing it. The whole action between these two points can be undone or set back in one step.
10. Structure display options
Structure display options can be modified with the View Settings button in the General toolbar, which opens the View Settings dialog box. The options offered here are the following:
| • | Use CPK Colors: When checked, the atoms are displayed colored according to the Corey-Pauling-Koltun convention. The two halves of a bond between two atoms will receive the color of the atom they are connected to. |
| • | Show Carbon Labels: When checked, the carbon atom labels become visible. |
| • | Index Atoms: When checked, the atom indices (the order of the atoms put on the canvas) are displayed. |
| • | Implicit H: To display the automatically added necessary hydrogens on atoms, an option from the drop-down list in the View Settings window should be chosen. These options are the following: |
Off |
Disable implicit hydrogens on every atom. |
Hetero |
Display implicit hydrogens on hetero atoms. |
Hetero and Terminal |
Display implicit hydrogens on hetero atoms and terminal carbons. (This is the default setting.) |
All |
Display implicit hydrogens on every atom. |
11. Atom properties
Currently Marvin for JavaScript supports the display of atomic charges and isotopes as atom properties. All of these attributes can be set using the Atom Properties button in the Tools toolbar. Note that atomic charges can also be modified using the Increase Charge/Decrease Charge buttons in the same toolbar. As a result, a charge will appear as an upper right index of the given atom, while the mass number (isotope type) will be displayed as an upper left index. In case of hydrogen isotopes (deuterium and tritium), their specific atomic symbols can be used (D and T, respectively), or they can be displayed as 2H or 3H, too.
12. Structure cleaning
If you have drawn a molecule you can perform a 2D cleaning on it using the Clean button in the toolbar. It calculates new 2D coordinates for the atoms on the canvas in order to get the same molecule in an evenly organized fashion. It is possible to clean only fragments of molecules or certain elements of a multi-molecular structure if they have been selected previously. In this case the 2D cleaning has no effect on the non-selected part of the structure.
This feature is available only if the server connection is active, otherwise an error message will be sent.
13. Error highlighting
Marvin for JavaScript only highlights valence errors, but does not correct them, so you can make the necessary corrections manually. In case of recognizing a valence error, Marvin for JavaScript highlights the particular atom with red background.