Writing Instructions
Printed Page 551-569
Writing Instructions
This section discusses instructions, which are process descriptions written to help readers perform a specific task—for instance, installing a water heater in a house.
Although written instructions are still produced today, the growth of social media has radically changed how organizations instruct people on how to use their products and services. Now that technology has made it easy for people to participate in writing instructions and to view and make videos, most organizations try to present instructional material not only as formal written instructions but also through discussion boards, wikis, and videos. And users do not rely exclusively on the organizations themselves to create and present instructions. Rather, they create their own text and videos.
Most organizations do not see this participation as a threat. A 2012 survey of more than 500 organizations (Abel, 2013) suggests that organizations are trying to take advantage of it. Among the major survey findings are the following four:
- more than half of the respondents provide an online support community based around discussion boards
- 46 percent of respondents provide opportunities for users to share feedback and rank the company’s instructional material
- 20 percent of respondents let users create or edit instructions through wikis
- 10 percent of respondents report that their users are creating their own instructions and support forums, without the support of the respondents
Your first job, then, in presenting instructions is to devise a strategy for incorporating user participation in the process and to choose the best mix of media for encouraging that participation. Written instructions (whether presented online or printed and put in the box with the product) will always have a role because they are portable and can include as much detail as necessary for even the most complex tasks and systems. But consider whether your users will also benefit from access to other people’s ideas (in a discussion board or wiki) or from watching a video.
The explosive growth of YouTube and other video-hosting sites has revolutionized how instructions are created and used. Product manufacturers and users alike make videos to help people understand how to perform tasks.
If you are producing instructional videos on behalf of your company, think about what style of video will be most effective for your audience, purpose, and subject. Companies often use simple, cartoon-style videos for basic conceptual information (“what can you do with a microblog?”), screenshot-based videos for computer-based tasks (“how to use master slides in PowerPoint”), and live-action videos for physical tasks (“how to install a ground-fault interrupter”).
Video is particularly useful for communicating about physical tasks that call for subtle physical movements or that involve both sight and sound. For instance, a video would be more effective than written instructions in communicating how a guitarist uses the tremolo bar to create different sonic effects. The viewer can focus on the way the guitarist holds his or her hand on the tremolo and on the range of movement that he or she uses. In addition, the viewer can hear how these physical actions change the sound.
Although there are many software tools available for making videos, making professional-quality videos calls for professional skills, experience, and tools. If you are going to be making many videos, it makes sense to learn the process and acquire professional tools and equipment; otherwise, consult your company’s media department or consider hiring freelance video producers. They can help you create videos that reflect positively on your organization.
Instructional videos tend to be brief. Whereas a reader of a document can navigate easily among various parts or steps, viewers of a video can only hit play, pause, and stop. For this reason, you should break long tasks into a series of brief videos: ideally 2–3 minutes, but no more than 12–15 minutes. Give each one a clear, specific title so viewers can easily tell whether they want to view it.
Similarly, you should make your instructional videos simple and uncluttered. Software makes it easy to add a lot of cinematic effects, but less is often more. Your purpose is not to win an Academy Award; it is to help your audience learn how to carry out a task. The fewer distractions in the video, the easier it will be for viewers to see what to do. And remember that video is a warm medium. Connect with the viewer by being friendly, informal, and direct. Don’t say, “Next, the right mouse button is pushed.” Say, “Press the right mouse button.” But do not confuse being warm and informal with not needing to prepare. You do need to plan, write a script, and rehearse.
Be sure to build in the time and resources to revise the video. As discussed in Chapter 13, good technical communication calls for reviewing, revising, and testing. This concept applies to video. Start testing even before production. Make sure your script and visuals are right for your audience and purpose. And repeat the process after you have created the rough cut of the video and after each major revision.
Use other sources responsibly. You need to obtain written permission to use any copyrighted text, images, videos, or music that will appear in your video. Because this process can be lengthy, difficult, and expensive, many organizations have a simple standing rule: do not use any copyrighted material. Instead, they generate their own images and text, and even their own music.
As you plan to write instructions, think about how readers will use them. Analyzing your audience and purpose and gathering and organizing your information will help you decide whether you should write a one-page set of instructions or a longer document that needs to be bound. You might realize that the information would work better as a web-based document that can include videos, be updated periodically, and provide readers with links to the information they need. Or you might decide to write several versions of the information: a brief paper-based set of instructions and a longer, web-based document with links.
As always in technical communication, imagining how readers will use what you write will help you plan your document. For example, having decided that your audience, purpose, and subject call for a printed set of instructions of perhaps 1,000 words and a dozen drawings and photographs, you can start to design the document. You will need to consider your resources, especially your budget: long documents cost more than short ones; color costs more than black and white; heavy paper costs more than light paper; secure bindings cost more than staples.
Designing a set of instructions is much like designing any other kind of technical document. As discussed in Chapter 11, you want to create a document that is attractive and easy to use. When you design a set of instructions, you need to consider a number of issues related to document design and page design:
- What are your readers’ expectations? For a simple, inexpensive product, such as a light switch, readers will expect to find instructions written on the back of the package or printed in black and white on a small sheet of paper folded inside the package. For an expensive consumer product, such as a high-definition TV, readers will expect to find instructions in a more sophisticated full-color document printed on high-quality paper.
- Do you need to create more than one set of instructions for different audiences? If you are writing about a complex device such as an electronic thermostat, you might decide to create one set of instructions for electricians (who will install and maintain the device) and one set for homeowners (who will operate the device). In addition to producing paper copies of the documents, you might want to post them on the Internet, along with a brief video of the tasks you describe.
- What languages should you use? In most countries, several languages are spoken. You might decide to include instructions in two or more languages. Doing so will help you communicate better with more people, and it can help you avoid legal problems. In liability cases, U.S. courts sometimes find that if a company knows that many of its customers speak only Spanish, for example, the instructions should appear in Spanish as well as in English. You have two choices for presenting information in multiple languages: simultaneous presentation or sequential presentation. In a simultaneous design, you might use a multi-column page on which one column presents the graphics, another presents the text in English, and another presents the text in Spanish. Obviously, this won’t work if you need to present information in more than two or three languages. But it is efficient because you present each graphic only once. In a sequential design, you present all the information in English (say, on pages 1–8), then all the information in Spanish (on pages 9–16). The sequential design is easier for readers to use because they are not distracted by text in other languages, but you will have to present the graphics more than once, which will make the instructions longer.
- Will readers be anxious about the information? If readers will find the information intimidating, make the design unintimidating. For instance, if you are writing for general readers about how to set up a wireless network for home computers, create open pages with a lot of white space and graphics. Use large type and narrow text columns so that each page contains a relatively small amount of information. Figure 20.7 illustrates the advantages of an open design.
- Will the environment in which the instructions are read affect the document design? If people will be using the instructions outdoors, you will need to use a coated paper that can tolerate moisture or dirt. If people will be reading the instructions while sitting in a small, enclosed area, you might select a small paper size and a binding that allows the reader to fold the pages over to save space. If people have a lot of room, you might decide to create poster-size instructions that can be taped to the wall and that are easy to read from across the room.
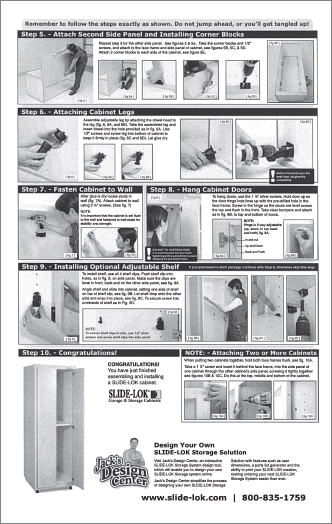
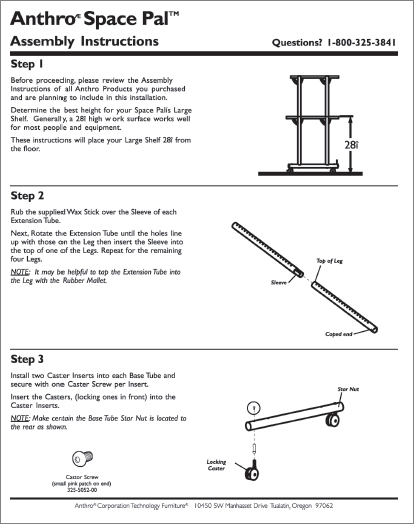
Figure 20.7 Cluttered and Attractive Page Designs in a Set of Instructions
Designing Clear, Attractive Pages

To design pages that are clear and attractive, follow these two guidelines:
- Create an open, airy design. Do not squeeze too much information onto the page. Build in space for wide margins and effective line spacing, use large type, and chunk the information effectively.
- Clearly relate the graphics to the text. In the step-by-step portion of a set of instructions, present graphics to accompany every step or almost every step. Create a design that makes it clear which graphics go with each text passage. One easy way to do this is to use a table, with the graphics in one column and the text in the other. A horizontal rule or extra line spacing separates the text and graphics for one step from the text and graphics for the next step.
If the subject you are writing about involves safety risks, your most important responsibility is to do everything you can to ensure your readers’ safety.
ETHICS NOTE
ENSURING YOUR READERS’ SAFETY
To a large extent, the best way to keep your readers safe is to be honest and write clearly. If readers will encounter safety risks, explain what those risks are and how to minimize them. Doing so is a question of rights. Readers have a right to the best information they can get.
Ensuring your readers’ safety is also a question of law. People who get hurt can sue the company that made the product or provided the service. As discussed in Chapter 2, this field of law is called liability law. Your company is likely to have legal professionals on staff or on retainer whose job is to ensure that the company is not responsible for putting people at unnecessary risk.
When you write safety information, be clear and concise. Avoid complicated sentences.
| COMPLICATED | It is required that safety glasses be worn when inside this laboratory. |
| SIMPLE | You must wear safety glasses in this laboratory. |
| SIMPLE | Wear safety glasses in this laboratory. |
Sometimes a phrase works better than a sentence: “Safety Glasses Required.”
Because a typical manual or set of instructions can contain dozens of comments—some related to safety and some not—experts have devised signal words to indicate the seriousness of the advice. Unfortunately, signal words are not used consistently. For instance, the American National Standards Institute (ANSI) and the U.S. military’s MILSPEC publish definitions that differ significantly, and many private companies have their own definitions. Figure 20.8 presents the four most commonly used signal words. The first three signal words are accompanied by symbols showing the color combinations endorsed by ANSI in its standard Z535.4.
Whether safety information is printed in a document or on machinery or equipment, it should be prominent and easy to read. Many organizations use visual symbols to represent levels of danger, but these symbols are not standardized.
Organizations that create products that are used only in the United States design safety information to conform with standards published by ANSI and by the federal Occupational Safety and Health Administration (OSHA). Organizations that create products that are also used outside the United States design safety information to conform with standards published by the International Organization for Standardization (ISO). Figure 20.9 shows a safety label that incorporates both ANSI and ISO standards.
| SIGNAL WORD | EXPLANATION | EXAMPLE |
|
Danger 
|
Danger is used to alert readers about an immediate and serious hazard that will likely be fatal. Writers often use all uppercase letters for danger statements. | DANGER: EXTREMELY HIGH VOLTAGE. STAND BACK. |
|
Warning 
|
Warning is used to alert readers about the potential for serious injury or death or serious damage to equipment. Writers often use all uppercase letters for warning statements. | WARNING: TO PREVENT SERIOUS INJURY TO YOUR ARMS AND HANDS, YOU MUST MAKE SURE THE ARM RESTRAINTS ARE IN PLACE BEFORE OPERATING THIS MACHINE. |
|
Caution 
|
Caution is used to alert readers about the potential for anything from moderate injury to serious equipment damage or destruction. | Caution: Do not use nonrechargeable batteries in this charging unit; they could damage the charging unit. |
| Note | Note is used for a tip or suggestion to help readers carry out a procedure successfully. | Note: Two kinds of washers are provided—regular washers and locking washers. Be sure to use the locking washers here. |
Figure 20.8 Signal Words
Part of planning for safety is determining the best location for safety information. This question has no easy answer because you cannot control how your audience reads your document. Be conservative: put safety information wherever you think the reader is likely to see it, and don’t be afraid to repeat yourself. A reasonable amount of repetition—such as including the same safety comment at the top of each page—is effective. But don’t repeat the same piece of advice in each of 20 steps, because readers will stop paying attention to it. If your company’s format for instructions calls for a safety section near the beginning of the document, place the information there and repeat it just before the appropriate step in the step-by-step section.
The yellow triangle on the left is consistent with the ISO approach. Because ISO creates standards for international use, its safety labels use icons, not words, to represent safety hazards.
The signal word ”Danger” and the text are consistent with the ANSI approach. The information is presented in English.
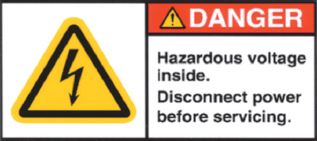
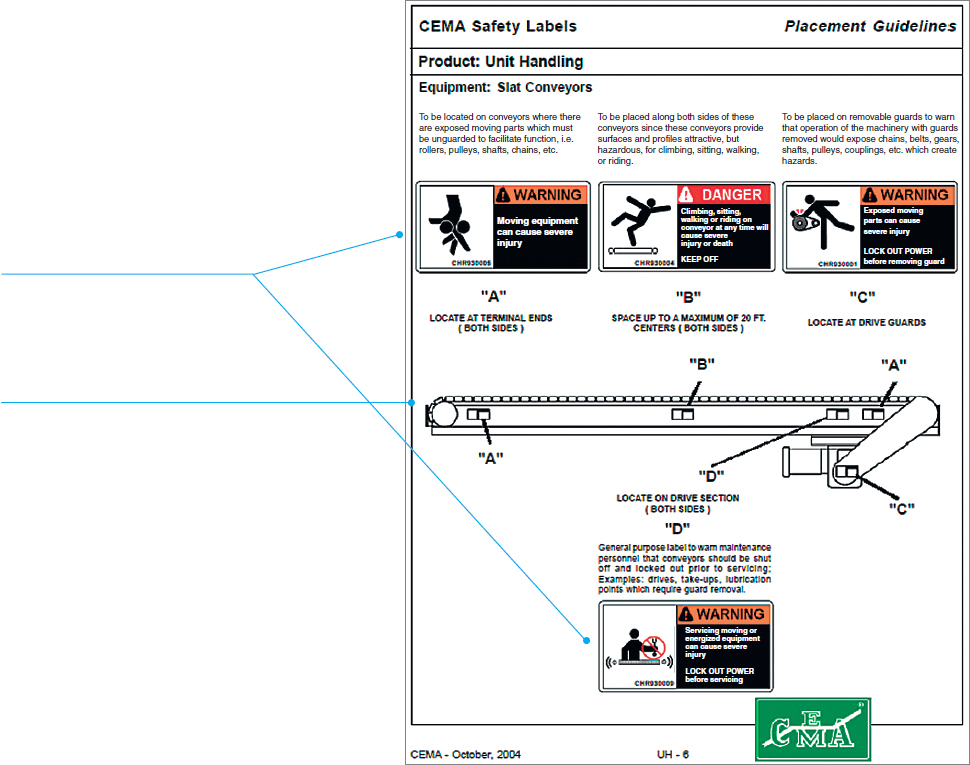
Figure 20.10 shows one industry association’s guidelines for placing safety information on conveyor belts.
This page shows the four safety labels that the industry association recommends for use on conveyor belts.
The diagram of the conveyor belt shows where the organization recommends placing the safety labels.
Instructions can be brief (a small sheet of paper) or extensive (20 pages or more). Brief instructions might be produced by a writer, a graphic artist, and a subject-matter expert. Longer instructions might call for the assistance of others, such as marketing and legal personnel.
Regardless of the size of the project, most instructions are organized like process descriptions. The main difference is that the conclusion of a set of instructions is not a summary but an explanation of how readers can make sure they have followed the instructions correctly. Most sets of instructions contain four elements: a title, a general introduction, step-by-step instructions, and a conclusion.
Drafting Titles A good title for instructions is simple and clear. Two forms are common:
- How-to. This is the simplest: “How to Install the J112 Shock Absorber.”
- Gerund. The gerund form of a verb is the -ing form: “Installing the J112 Shock Absorber.”
One form to avoid is the noun string, which is awkward and difficult for readers to understand: “J112 Shock Absorber Installation Instructions.”
Drafting General Introductions The general introduction provides the preliminary information that readers will need to follow the instructions safely and easily.
Drafting Introductions for Instructions
Every set of instructions is unique and therefore calls for a different introduction. Consider answering the following six questions, as appropriate:
- Who should carry out this task? Sometimes you need to identify or describe the person or persons who are to carry out a task. Aircraft maintenance, for example, may be performed only by those certified to do it.
- Why should the reader carry out this task? Sometimes the reason is obvious: you don’t need to explain why a backyard barbecue grill should be assembled. But you do need to explain the rationale for many tasks, such as changing antifreeze in a car’s radiator.
- When should the reader carry out this task? Some tasks, such as rotating tires or planting seeds, need to be performed at particular times or at particular intervals.
-
What safety measures or other concerns should the reader understand? In addition to the safety measures that apply to the whole task, mention any tips that will make the job easier:
NOTE: For ease of assembly, leave all nuts loose. Give only three or four complete turns on bolt threads.
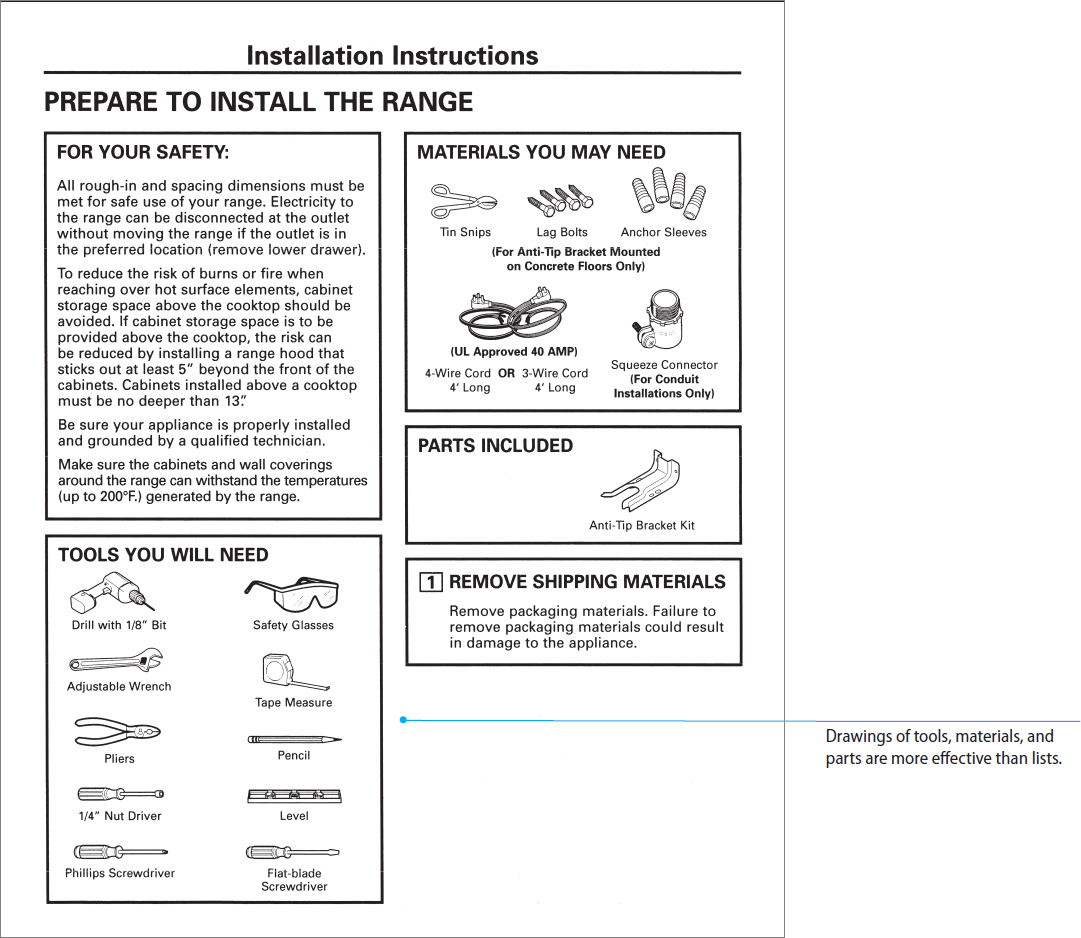
- What items will the reader need? List necessary tools, materials, and equipment so that readers will not have to interrupt their work to hunt for something. If you think readers might not be able to identify these items easily, include drawings next to the names.
- How long will the task take? Consider stating how long the task will take readers with no experience, some experience, and a lot of experience.
Drafting Step-by-Step Instructions The heart of a set of instructions is the step-by-step information.
Drafting Steps in Instructions
Follow these six suggestions for writing steps that are easy to understand.
-
Number the instructions. For long, complex instructions, use two-level numbering, such as a decimal system:
1 1.1 1.2 2 2.1 2.2 etc. If you need to present a long list of steps, group the steps logically into sets and begin each set with a clear heading. A list of 50 steps, for example, could be divided into 6 sets of 8 or 9 steps each.
- Present the right amount of information in each step. Each step should define a single task the reader can carry out easily, without having to refer back to the instructions.
TOO MUCH INFORMATION 1. Mix one part cement with one part water, using the trowel. When the mixture is a thick consistency without any lumps bigger than a marble, place a strip of the mixture about 1? high and 1? wide along the face of the brick. TOO LITTLE INFORMATION 1. Pick up the trowel. RIGHT AMOUNT OF INFORMATION 1. Mix one part cement with one part water, using the trowel, until the mixture is a thick consistency without any lumps bigger than a marble. 2. Place a strip of the mixture about 1” high and 1” wide along the face of the brick. - Use the imperative mood. The imperative mood expresses a request or a command—for example, “Attach the red wire.” The imperative is more direct and economical than the indicative mood (“You should attach the red wire” or “The operator should attach the red wire”). Avoid the passive voice (“The red wire is attached”), because it can be ambiguous: is the red wire already attached?
- Do not confuse steps and feedback statements. A step is an action that the reader is to perform. A feedback statement describes an event that occurs in response to a step. For instance, a step might read “Insert the disk in the drive.” That step’s feedback statement might read “The system will now update your user information.” Do not present a feedback statement as a numbered step. Present it as part of the step to which it refers. Some writers give all feedback statements their own design.
- Include graphics. When appropriate, add a photograph or a drawing to show the reader what to do. Some activities—such as adding two drops of a reagent to a mixture—do not need an illustration, but they might be clarified by a chart or a table.
- Do not omit articles (a, an, the) to save space. Omitting articles can make the instructions unclear and hard to read. In the sentence “Locate midpoint and draw line,” for example, the reader cannot tell if “draw line” is a noun (as in “locate the draw line”) or a verb and its object (as in “draw a line”).
Drafting Conclusions Instructions often conclude by stating that the reader has now completed the task or by describing what the reader should do next. For example:
Now that you have replaced the glass and applied the glazing compound, let the window sit for at least five days so that the glazing can cure. Then, prime and paint the window.
Some conclusions end with maintenance tips or a troubleshooting guide. A troubleshooting guide, usually presented as a table, identifies common problems and explains how to solve them.
You know, of course, to revise, edit, and proofread all the documents you write to make sure they are honest, clear, accurate, comprehensive, accessible, concise, professional in appearance, and correct. When you write instructions, you should be extra careful, for two reasons.
First, your readers rely on your instructions to carry out a task. If they can’t complete it—or they do complete it, but they don’t achieve the expected outcome—they’ll be unhappy. Nobody likes to spend a few hours assembling a garage-door opener, only to find half a dozen parts left over. Second, your readers rely on you to help them complete the task safely. To prevent injuries and liability actions, build time into the budget to revise, edit, and proofread the instructions carefully. Then, if you can, carry out usability testing on the instructions.
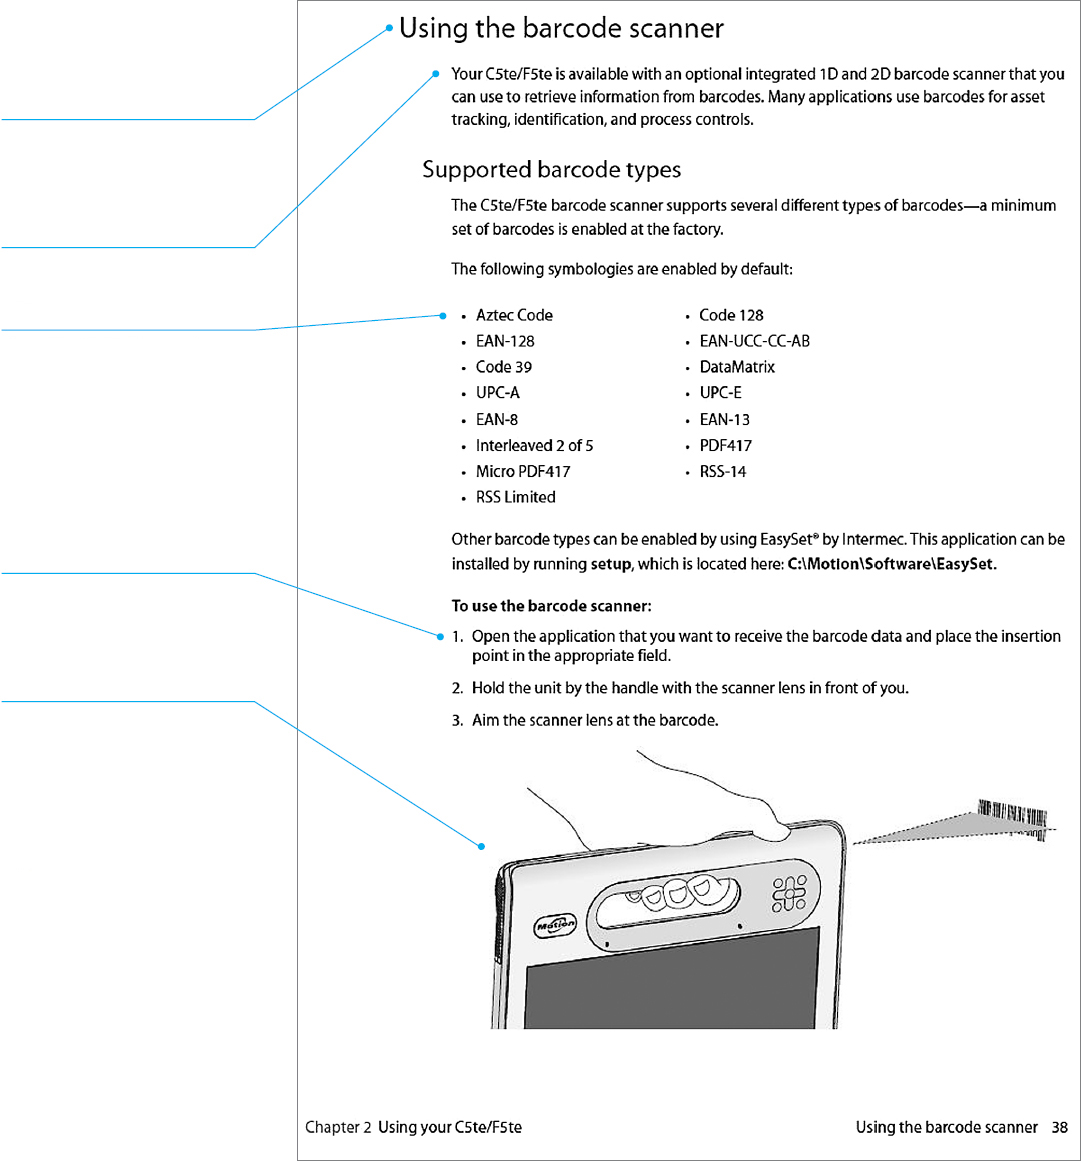
This page from the user’s manual for a tablet computer used in healthcare environments discusses how to use the barcode scanner.
Note that the writer uses a gerund (-ing phrase) in the major heading to describe the action (“Using the barcode scanner”).
The writer explains why readers might want to scan barcodes.
The writer lists the types of barcodes the tablet can scan and then explains how to enable the tablet to scan additional types. Note that the more conceptual information about the task precedes the instructional information. Why? Because readers want to understand the big picture before getting into the details.
The writer presents the steps. Note that the writer numbers the steps and uses the imperative mood for each one.
The drawing helps readers understand how to hold the tablet and aim it at the barcode. In cases such as this, simple drawings work better than photographs because they do not distract readers with unnecessary detail.
The safety information goes on to discuss eyestrain and motion sickness, repetitive motion injuries, and radio frequency interference.
This excerpt from a user manual for a video-game player that displays 3D images describes two of the safety risks associated with playing video games.
Notice that the excerpt uses mandatory language: “You must . . . .” Although politeness is desirable most of the time, you don’t want to sound as if you were making suggestions or asking readers to do you favors. For instance, if a task calls for using safety goggles, do not write “You should consider wearing safety goggles.” Instead, write “You must wear safety goggles when operating this equipment.”
This set of safety information defines the keywords warning, caution, and important.

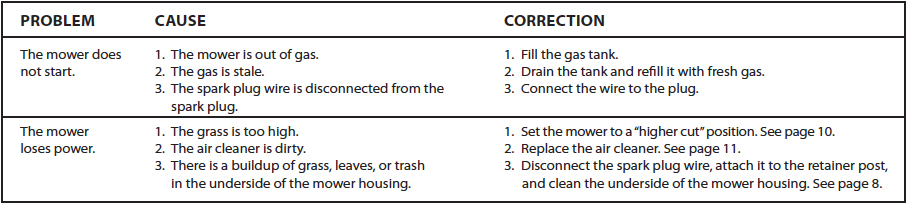
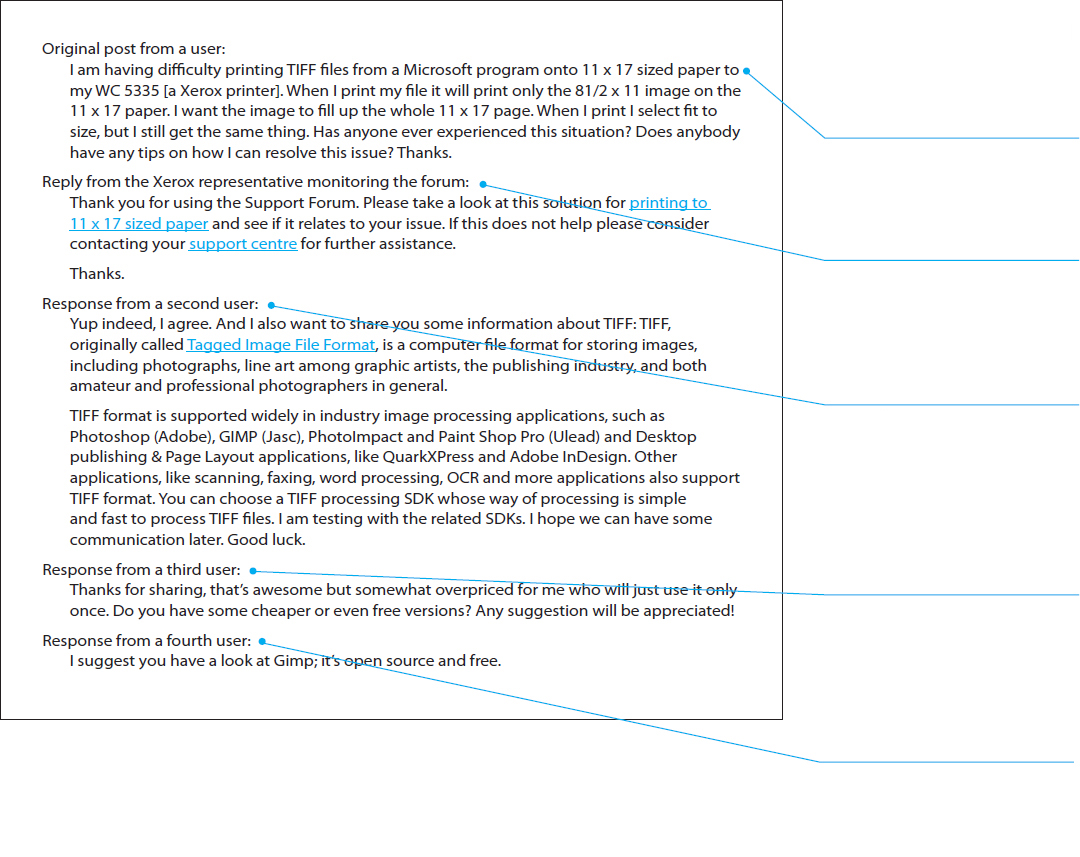
Figure 20.15 is an excerpt from a thread in a discussion board.
This excerpt from a user manual for a video-game player that displays 3D images describes two of the safety risks associated with playing video games.
In the original post, a customer explains a problem he or she is having printing a TIFF file with a Xerox printer.
The Xerox representative, who monitors the user forum, directs the customer to the company’s statement that is intended to solve the user’s problem.
A second user recommends the Xerox representative’s reply and presents additional information about TIFF files. Notice in the last sentence that he or she offers to try to stay in touch with the customer who asked the original question.
A third user, who is experiencing the same problem that the first user wrote about, expresses appreciation for the second user’s suggestions but raises a concern about the cost of the alternatives he or she describes.
A fourth user responds by pointing out that GIMP, one of the alternatives listed by the second user, is a free program.