Adding Visuals
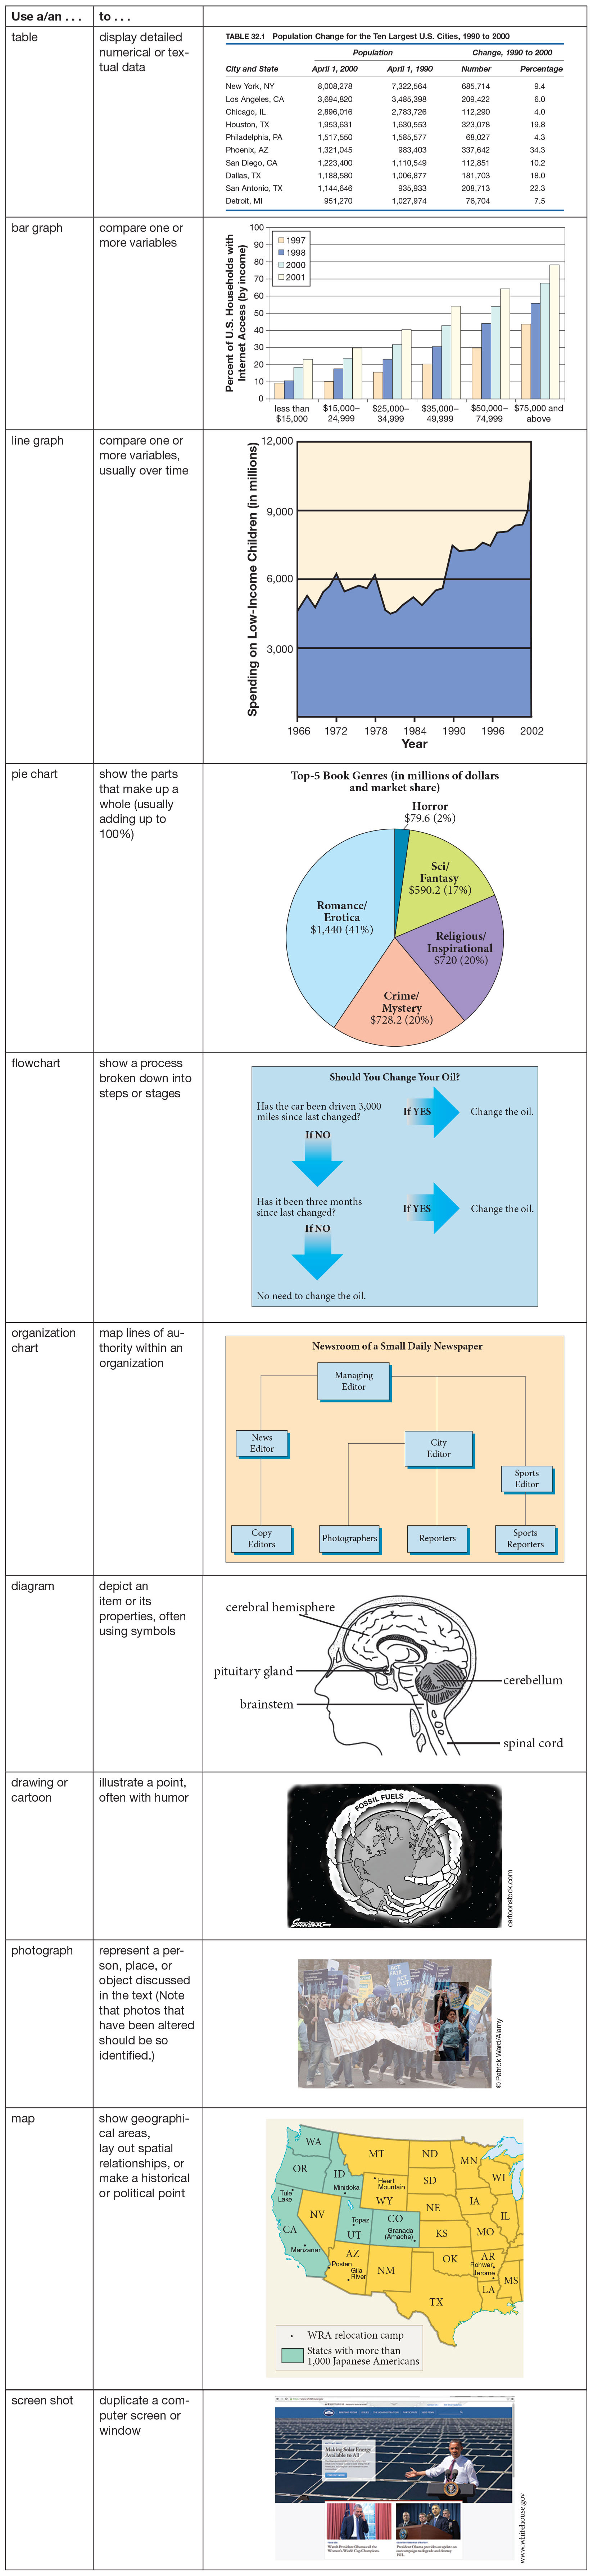
Tables, graphs, charts, diagrams, photographs, maps, and screen shots add visual interest and are often more effective in conveying information than prose alone. Choose the type of visual that will best suit your purpose (see Figure 32.3). In academic writing, be certain, too, that each visual has a valid role to play in your work; if the visual is merely a decoration, leave it out or replace it with a visual that is more appropriate.
For more about citing visual sources, see Chapters 24 and 25.
You can create visuals on a computer, using the drawing tools of a word processing program, the charting tools of a spreadsheet program, or software specifically designed for creating visuals. You can also download visuals from the Internet or photocopy or scan visuals from print materials. If your composition is going to be posted on the Web on a site that is not password-
Number, title, and label visuals.
Number your visuals in sequential order, and give each one a title. Refer to tables as Table 1, Table 2, and so on, and to other types of visuals as Figure 1, Figure 2, and so on. (In a long work with chapters or sections, also include the chapter or section number [Figure 32.1], as is done here.) In MLA style, use the abbreviation Fig.
Make sure each visual has a title that reflects its subject (for example, income levels) and its purpose (to compare changes in those income levels over time): Figure 1. Percentage of U.S. Households in Three Income Ranges, 2000–2012. MLA style requires that the title be placed above a table and below a figure.
To help readers understand a visual, clearly label all of its parts. For instance, give each of a table’s columns a heading, and label each section of a pie chart with the percentage and the item it represents. You may place the label on the chart itself if it is readable, or in a legend next to the chart.
Some visuals may require a caption to provide a fuller description or explanation than the title alone can. (See Figure 32.2, for example.)
Cite visual sources.
Finally, if you borrow a visual from another source or create a visual from borrowed information, you must cite the source, following the guidelines for the documentation style you are using. In addition, be sure to document the source in your list of works cited or references at the end of your document.
Integrate the visual into the text.
Visuals should facilitate, not disrupt, the reading of the body text. To achieve this goal, you need to introduce and discuss the visual in your text first and then insert the visual in an appropriate location.
Introducing the Visual Ideally, you should introduce each visual by referring to it in your text immediately before the visual appears. An effective textual reference answers the following questions:
What is the number of the visual?
Where is it located?
What kind of information does it contain?
What important point does it make or support?
Here is an example of a paragraph that effectively refers to a visual; it is taken from “The Rising,” the student paper by Paul Taylor that appears in Chapter 28:
The Rising
Gordon Parks’s 1952 photograph Emerging Man (Fig. 1) is as historically significant a reflection of the civil rights movement as are the speeches of Martin Luther King and Malcolm X, the music of Mahalia Jackson, and the books of Ralph Ellison and James Baldwin. Through striking use of black and white-
Placing the Visual in an Appropriate Location MLA style requires that you place a visual in the body of your text as soon after the discussion as possible (as Paul Taylor does), particularly when the reader will need to consult the visual. (Note that Taylor discusses the figures in the text and places them as close after he first mentions them as he can. The photograph Emerging Man appears at the bottom of the page on which the paragraph above appears. He also includes them in his list of works cited, with a descriptive title and source information.)
Use common sense when creating visuals on a computer.
If you use a computer program to create visuals, keep this advice in mind:
Make the decisions that your computer cannot make for you. A computer can automatically turn spreadsheet data into a pie chart or bar graph, but only you can decide which visual — or what use of color, if any — is most appropriate for your purpose.
Avoid “chart junk.” Many computer programs provide an array of special effects that can be used to alter visuals, including three-
dimensional renderings, textured backgrounds, and shadowed text. Such special effects often detract from the intended message of the visual by calling attention to themselves instead. Use them sparingly, and only when they emphasize key information. Use clip art sparingly, if at all, in academic writing. Clip art consists of icons, symbols, and other simple, typically abstract, copyright-
free drawings. Because clip art simplifies ideas, it is of limited use in conveying the complex information contained in most academic writing. While clip art may be acceptable in some nonacademic contexts, always consider your audience before including it.