Style, Planning, and Preparation
How should the movie look, and what will you have to do to photograph the vision in your mind’s eye? In Chapter 8, you learned how to control shadows, contrast, light intensity, exposure, and color. Now, using these tools as your paintbrushes, you will begin to design what the camera should see.
There is a continuum that may be used to describe how movies look. At one extreme is the realistic look, which tries to replicate how we normally see the world. Realistic movies don’t call much attention to their visual style, because the style is presented as fact, not fiction—
Neither style is right or wrong; the correct style is the one that best conveys emotion and story. Nor must your film hew to a single stylistic choice—
You explored directional lighting in Chapter 8; all directional light must come from somewhere. Among the most important choices you will make is whether the lighting in your movie is motivated (or justified), and by what sources. Realistic films always have motivated lighting—
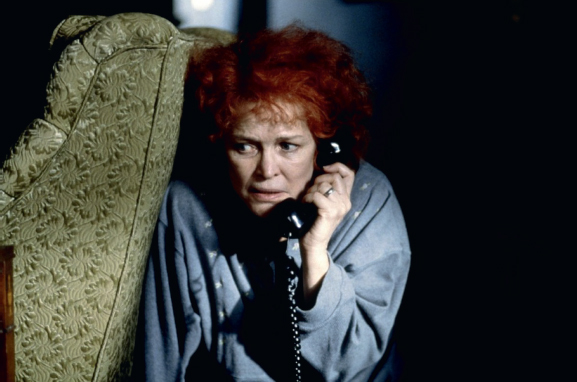
In Requiem for a Dream (2000), actor Ellen Burstyn plays a character driven to the edge by her drug addiction and paranoia; the expressionistic lighting is not justified from any source in this scene but perfectly conveys her unhinged state.
Whether your lighting style is realistic or expressionistic, or has variations along the way, it needs to stay consistent within each scene. Although this is sometimes difficult, in that different parts of a scene may be shot on different days, it is essential to maintain the illusion of continuity.
ACTION STEPS
Planning the Lighting
Once you have determined the style of lighting, you have to make it happen. This is where theory meets practice, and planning is essential. Follow these steps to plan your lighting:
 Do a scout (sometimes called a recce, short for the military term reconnaissance mission). Go to the place where you will be shooting to get a sense of what you’ll have at hand and what you’ll need to bring. If it is an outdoor location, where and when does the sun rise and set? Are there trees or buildings that will create shadows at different times of the day? If it is an indoor location, are there windows? Are there existing lights you will need to avoid or might be able to use?
 Plan your circuits. Will you have enough power? If it is an outdoor location, is there a power supply nearby, or will you need to bring a generator and electrical cords long enough to ensure that the generator’s noise is not picked up by the sound recording? With an indoor location, you may still need to bring a generator if there is not sufficient power and circuit capacity for the lights. (See Chapter 8, on amps and circuits.)
 Make a list of everything you’ll need. The list must be comprehensive, including lighting instruments as well as stands, cables, sandbags, clamps, gels, diffusion media, spare lamps, a generator, and so on. You’ll want to bring extras if you have them, in case a key piece of equipment breaks during the shoot.
 Check the truck. When you load the truck before going to the set, double-
check everything against your list.  Check the weather three times when you are planning for an outdoor location. Even before your scout, check the long-
range or historical forecast; it will tell you expected conditions far in advance. Then check the forecast the night before and the morning of your shoot, to make sure you are fully prepared.  On the day you’ll shoot the scene, communicate with the director to make the lighting setup easier.
- Work with the director to make sure the actor’s blocking doesn’t require lighting changes. This will speed up the shooting day (see Producer Smarts: How Long Will Setups Take?, below).
- To keep things efficient, make sure you always shoot on the same side of the line (see Chapter 7). If you can keep the same line in one scene or a group of scenes, you will be able to keep the same lighting with only minimal adjustments, saving precious time.
Three-Point Lighting
Let’s play with lighting. Imagine you are on a set with an actor; there is one light, and it is pointed at her. The light illuminates the actor from one direction, causing attached shadows to fall on her face and a long shadow to cast behind her.
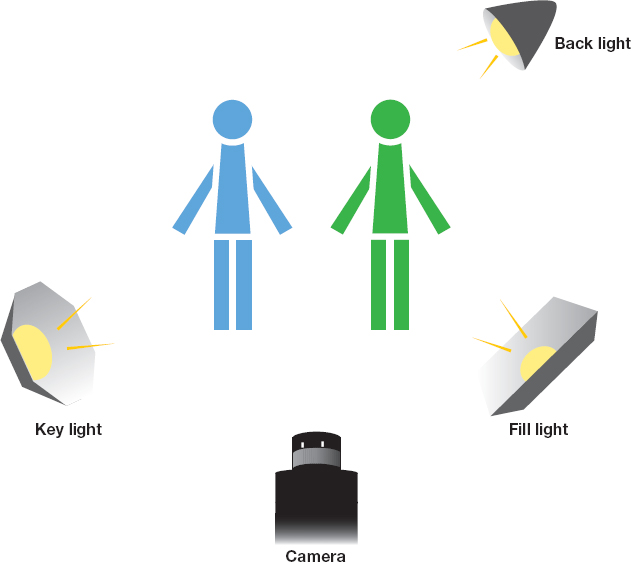
This main light is a directional light, because it comes sharply from a single direction. It is also the main light in the scene and is thus called the key light. This is not an attractive way to light an actor, because it is harsh and unrelenting. Unless that is the creative choice you want to make, you’ll need to add other lights: fill light and backlight. The fill light is positioned on the side opposite the key light, and the backlight is placed behind the subject. Combined, these three lights form the basic construct of all lighting plots, and are often referred to as either three-
Three-
For example, now that you know what a key light is, can you find the key light in the scenes from Touch of Evil and Raging Bull (shown in Chapter 8)? In the frame from Touch of Evil, although the main source of light is not seen, it is clearly supposed to be a ceiling light that would be in the upper left, out of the frame. In the frame from Raging Bull, the main light source is supposed to be the hanging light bulb. For the audience to accept that the action is really taking place, the primary light source must be motivated from some place that would make sense in the context of the scene, and in both of these examples, it does.
ACTION STEPS
How to Set Up Three-
 Prepare the scene, determine the angle for the master shot, and set up your camera. By doing so, you’ll know where the lights can be positioned so that they stay out of the frame.
 Decide what direction the strongest light should be coming from. For example, it could be coming from a window, from an overhead light, or from the sun. That’s where your key light will go.
 Place your key light so that it is the primary directional light. If you are outdoors on a bright day, you can use the sun as your key light.
 Place your fill light at an approximate 90-
degree angle to the key light. The fill light will even out the attached shadows on the actors. Set up the backlight behind the actors, to separate them from the background. This creates definition and the sense of depth, and makes a little halo around their heads. The backlight should be directed so that it does not shine into the camera’s lens; also, don’t overdo it—
a little backlight goes a long way, and too much can make a shot look artificial.
FIGURE 9.1A simple illustration of three-
The Lighting Ratio
Three-
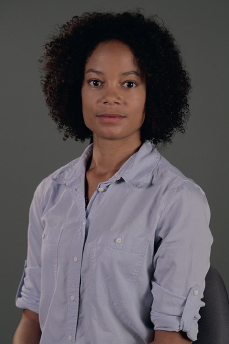
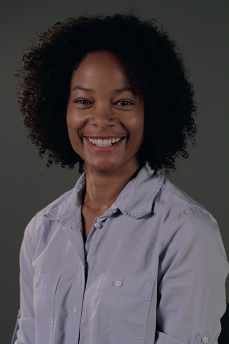
The lighting ratio is the difference in intensity between the key light and the fill light. By experimenting with the lighting ratio, you can achieve different amounts of contrast in your three-
In Chapter 6, you learned about the f-
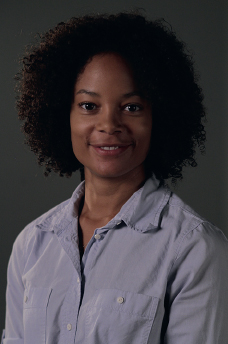
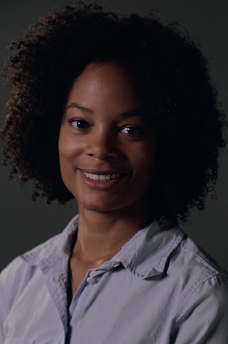
Which of the examples in Figures 9.2–9.5 would work best for the film you’ll shoot for this class?
|
|
|
FIGURE 9.2The key light and the fill light are at the same intensity, so the ratio is 1:1; therefore, there is little contrast. There is no difference in the f- |
FIGURE 9.3There is a 2:1 ratio between the key and fill lights, and a 1 f- |
|
|
FIGURE 9.4There is a 4:1 difference between the key and fill lights, indicating a 2 f- |
FIGURE 9.5There is an 8:1 difference between the key and fill lights, indicating a 3 f- |
Continuity and Your Lighting Triangle
As you will recall from Chapter 7, continuity makes the audience believe that each scene is part of a single, continuous event, and that the different camera angles are all being shot at the same time. Of course, this is rarely the case. In practice, you will shoot one setup, then move the camera, shoot another angle, and repeat the process. Sometimes different angles will not even be shot at the same location, as, for example, when you shoot a wide master at a hard-to-get practical location, and then must move into a studio for close-ups or insert shots.
Your job as DP is to make sure the lighting never varies from what you have established in the master shot, so that the audience never has the subconscious feeling of “Hey, that doesn’t look right,” or “Why doesn’t the lighting match?”
If the lighting doesn’t match, you’ve probably made a mistake and inadvertently changed your lighting triangle. Your key light should always come from the same direction, and your fill and backlights should match.
You have great flexibility in adjusting your master shot lighting triangle in order to fit the style needs of the story; your creative decision will be the lighting ratio for each scene. A high-key lighting triangle has a lighting ratio at or near 1:1, as a comparison of key light and fill light. High-key lighting casts even lighting across an entire scene; it also has the advantage that lights don’t require much resetting when you move your camera for new angles. High-key lighting feels brighter and happier than other lighting; for this reason, it is frequently seen in comedies and television sitcoms.
 HIGH AND LOW
It may seem confusing, but high-key lighting has a lower lighting ratio, and low-key lighting has a higher lighting ratio!
Low-key lighting has a more extreme lighting ratio between the key and fill lights—perhaps as much as 8:1 or 10:1. Low-key lighting emphasizes shapes, contrasts, and contours, and heightens dramatic tension and mood. Most scary movies use low-key lighting to increase suspense, and you’ll often see low-key lighting in dramas as well.
The use of high- and low-key lighting is not dictated by genre. Many movies use both kinds of lighting triangles in different scenes, depending on what is happening to the characters.
How Much Light?
The amount of light you throw on a scene does not equal the amount of light your camera captures. As you learned in Chapter 6, you control the amount of light that falls on the optical sensor or film by adjusting the camera’s f-stop. In other words, you could have a very bright scene and make it look dimmer with a higher f-stop, or have a dim scene and make it appear brighter with a lower f-stop.
 TALK IT OUT
Good communication with the crew is essential. Don’t rely solely on notes or sketches. Walk through the location, check the instruments, and talk to your team.
As you adjust the lighting levels, you will also be impacting the depth of field with which you can shoot the scene. You learned about depth of field in Chapter 6, and how it contributes to storytelling: a shallow depth of field isolates objects or characters; a deep depth of field—which puts everything in focus, whether near the camera or far away from it—gives the audience a broader viewpoint on the entire scene.
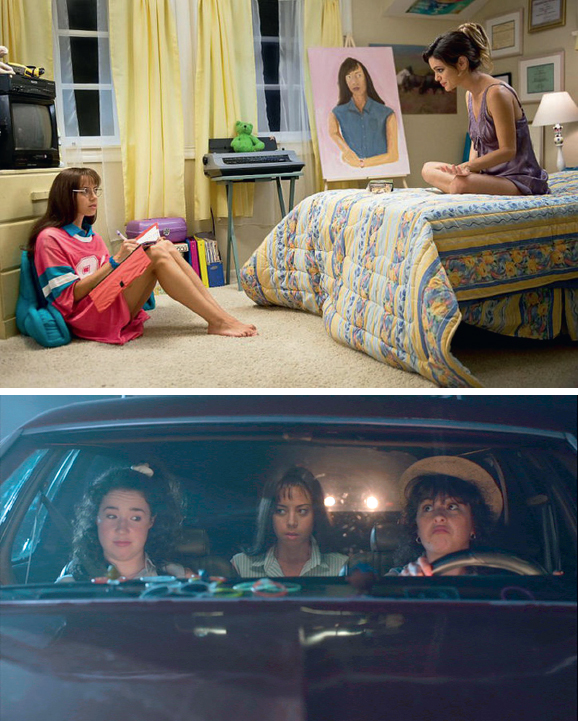
High- and low-key lighting is used at different times in The To Do List (2013).
To achieve deep depth of field, you need to let a small amount of light into the camera, such as an f-stop of 16 or 22. This means you will need to overilluminate the scene, throwing much more light than would be normal, for the scene to appear realistic and for the camera to capture sufficient detail at every distance. Conversely, shallow depth of field can be achieved with less light and a more open lens, which will have a lower f-stop number.
In any depth of field choice, you will frequently face an exposure dilemma: some elements of the scene will be at one f-stop, and others will be at a different f-stop. There are different approaches to this problem. One is to adjust the lighting levels, moving from a low-key to a high-key style, which will even out the exposure variance. If you make this choice, you need to make it at the beginning of the scene and keep it consistent as you change angles.
The other choice is to adjust your camera’s exposure for the most important element in the scene—the character or object that, from a storytelling perspective, should be the prime intention of the frame—and to light that character or object properly. This creative choice, which is both an exposure and a lighting decision, will keep you from falling into the trap of averaging your exposure between elements, which results in none being properly exposed.
 IDENTIFYING THE LIGHTING
Using the last film you watched in class as an example, identify instances of the following:
 Realistic lighting
 Expressionistic lighting
 High-key lighting
 Low-key lighting
Adjusting the Lights
Once you are on-set, whether outdoors or indoors, setting up the lights is a multistep process (see Producer Smarts: How Long Will Setups Take?, below). You may do it the morning of your shoot or—in the case of large and complicated locations, which will require a lot of lighting equipment—a day or more in advance. This is called pre-rigging.
On your student film, you may be the only one to work on all facets of lighting. In a large studio feature, the electrical and grip departments work with the cinematographer to achieve the desired look, and it’s helpful to know the names of each job function. The gaffer has traditionally been the head of the lighting department, responsible for designing and implementing the lighting plan and electrical power needed to supply it, which is why the gaffer has also been referred to as the head electrician in charge of lighting. More recently, the person in charge of lighting has often been credited as the chief lighting technician on major Hollywood productions. Either name refers to the person responsible for the film’s lighting plan in modern filmmaking. (The name gaffer dates to nineteenth-century England, where it referred to the supervisor of a work crew.) The best boy (electrical)—the gaffer’s key assistant—is usually on the electrical truck, dealing with such logistics as equipment, crew schedules, and rentals. Electrical technicians set up and control the electrical and lighting equipment, from lighting instruments to electrical generators and other sources of electricity that may be used.
Lighting grips are also part of the lighting crew. They specialize in rigging everything related to lighting—from adjusting set pieces to putting the camera into the correct position to setting up flags, bounces, and silks. Note that lighting grips might sometimes be a separate team from the camera grips that we mentioned in Chapter 6, although on a student production, the same small team may be required to do all rigging work for lights, cameras, cables, and more. (The word grip has its origins in nineteenth-century theater, where workers had to “grip” the scenery and curtain ropes.) The key grip heads the grip department and works closely with the DP to set up and break down the elements for lighting. The best boy (grip)—the key grip’s main assistant—also keeps the grip truck and equipment organized. Dolly grips set up and take down dolly track, camera dollies, and cranes, and push the camera along the dolly track for tracking shots. Whether working for the electrical or grip department, the job of best boy, whose name dates from the old apprentice system and refers to the master’s oldest and most experienced apprentice, is not gender specific.
Once your lights are set up (rigged), you will do a preliminary focus, setting your key, fill, and backlights, and any other spots or specials. This means adjusting the position of the lights so that they illuminate the scene as you want it. Always start with your lighting triangle and build outward from there; background lighting is a good addition, because your main focus is to light the actor, not the set. At this point in a professional production, the director still hasn’t seen the set—you are just getting things ready for the director’s approval.
Now it is time to show the director what you’ve done. The director may ask for some adjustments and may further explain how the scene will be blocked, which will help you ensure that the lights are well placed. Usually at this point, the director will call a rehearsal with the actors, and they will do the formal blocking of the scene. Watch the blocking carefully so that you can reset lights, if necessary, to work for the scene.
 BRING ACTORS TO THE LIGHT
Especially in natural-light situations, remember that it is always easier to bring your actors to the light than to bring the light to your actors. Talk with the director about staging a particular scene so that the light will best illuminate the characters and fit the emotional moment.
How Long Will Setups Take?

A cinematographer can make a production swift and fun—or long and dragged out. That’s because there is a wide range in how DPs see visual choices and how they choose to light scenes. One DP can light a scene in 30 minutes with a few instruments; another will take half a day and use dozens of instruments to set up lighting for the same scene. It’s all a matter of creative approach and, of course, money. In the best-produced films, lighting design choices jibe well with the film’s budget and time constraints; when that doesn’t happen, it can be a disaster.
Producers must be savvy. Before hiring a DP, the producer needs to check both the quality of prior work (by watching previous films) and the DP’s work habits. If the DP historically takes a long time to set up lights and get ready for the shoot, the producer needs to make sure the budget and schedule make allowances. Sometimes the time is worth taking; the director may be visually oriented and care a great deal about gorgeously lit images, which are intrinsically time-consuming. However, if that isn’t consistent with the film’s resources, the producer will be wise to take the slow-moving DP off the list and come up with some alternatives.
You must also pay special attention to where the actors will spend most of their time during the scene. Your previous focusing of the lights was only approximate; now, with the real actors in place, you can fine-tune the lights to their specific heights and positions. You may place tape marks on the floor so that the actors can “hit their marks,” and the lights will be there for them. Many professional productions excuse the main actors at this point and use stand-ins, who must be the same height and physical build as the actors they are doubling. The stand-ins will remain in place as long as it takes for the cinematographer and lighting crew to adjust the lights. Although this may seem excessive, it is actually quite efficient: while the stand-ins are working with the lighting crew, the principal actors will be getting their hair and makeup ready for the shoot.